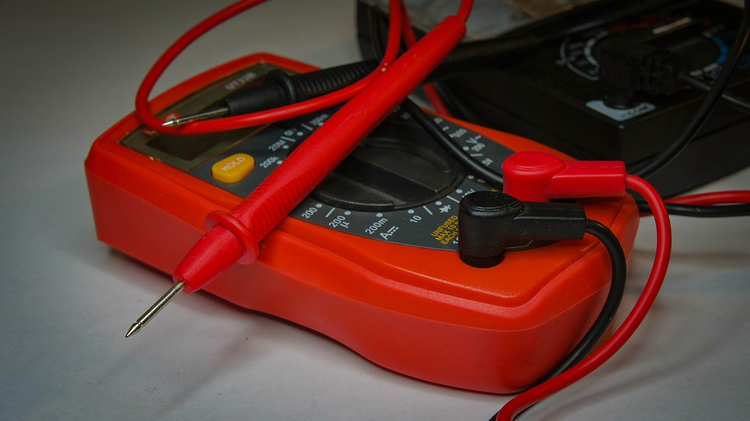
Checking the ampere with a multimeter. Find out how to check amperes with a multimeter? Instructions
Content
Types and features of memory
The types of these devices are classified according to the following criteria:
- undervoltage (transformer, pulse);
- purpose (charger, starting-charging);
- control (manual, automatic).
Pulse memory
The fundamental factor is the voltage-lowering element. This is what distinguishes transformer and pulse devices. The second devices are more expensive, more compact, more reliable, and have a more complex design. But it is quite possible to test them yourself. Almost all impulse devices have automatic control and can be charging or starting-charging.
Pulse welding machines are lightweight, compact, reliable and powerful.
Transformer charger
The principle of operation of the transformer is familiar from the school physics course. This class of devices is popular due to its availability and maintainability. Due to the simplicity of each block, it has an uncomplicated design. Transformer chargers are starting-charging, with manual or automatic control.
As a rule, network USB chargers for the phone are transformer.
Elements of the apparatus:
- wiring components,
- fuse,
- switch,
- power step-down transformer,
- rectifier diode bridge,
- ammeter.
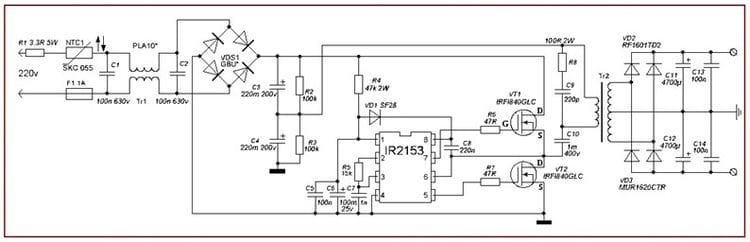
Car battery charger circuit
Often, users themselves test and identify defects in the transformer device. To do this, make sure that each element is in good working order. Current and voltage are indicators by which the integrity of the apparatus is determined. Having specified how to check how many amperes the charger gives out, they find out its defectiveness.
Principle of operation
The charger works by lowering the voltage and converting AC to DC. For this, a step-down transformer and a diode bridge are present in the circuit.
The charging voltage should be 5-10% higher than the nominal value of this parameter for the battery, and the charging current should be about 10% of its capacity.
Sometimes the phone is recharged from the car's DC battery. In this case, rectification (conversion from variable to constant) is unnecessary.

Check
To check the performance of the charger transformer, it is enough to connect a lamp parallel to the terminals, the rating of which corresponds to the charger. You can check the presence of voltage at the terminals of the charger with a tester (digital multimeter).
A complete picture of the status can only be obtained by checking the charger with a multimeter. Recharging is done differently for different appliances, and obviously the test methods are different.
How to connect correctly
In such a matter, how to check ammeters with a multimeter, you need to be guided by the recommendations below:
- Calculate the range for measuring the indicators. The battery has 1.5V, 7.5V and 12 V. The value is set slightly above the norm. This will be a reserve that will prevent damage to the device.
- The direction of the current is correctly determined, i.e. the polarity of the terminals to be measured. The designations of the generally accepted type indicated on the case are taken as a reference point.
- Proper connection of the probes is required. Black – negative, put in a common type socket called COMMON (COM). Positive – installed in the red connector.
Working with the device is easy
Scheme of further actions:
- The device is adjusted in the required measuring range.
- The value is set at 10% more than expected.
- If the indicator is unknown, then the maximum is taken as the extreme mark.
- The probes are installed according to the scheme corresponding to the type of measurement being carried out. Red to connectors where current, voltage or resistance is measured. Black into common connector.
- The probes are brought to the investigated device or power supply network. Red is put on plus, black on minus.
- It is necessary to evaluate the indicators obtained. It may be necessary to initially adjust the position of the pointer (“to zero”) to make the information more reliable.
In the charger
The charger should be checked if there is a need to determine the reason why it is defective. The current strength for each specific device is different. For example, it is the same on phone and tablet devices, but much more on car devices.
For your information. The permissible rate is indicated on the product label or printed on the body as a marking.
The principle of operation is exactly the same. The difference is that with small contact sizes on the connector, it is difficult to connect the probes.
Terminals must be connected correctly
How to measure amperes with a multimeter in a charger if the test leads are not included in the connector:
- Steel sewing needles are inserted inside the contacts.
- To do this, use pliers, and put gloves on your hands.
- The probes must be connected to the tips of the needle through the load.
- If this is not possible, then you need to disassemble the unit body. So you can connect the probes to the charger output in the place where each end of the electrical wire is soldered.
It is necessary to correctly observe safety precautions and pay attention to the recommendations from the manufacturer. In some products, it is forbidden to open the lid, while others are completely disposable, that is, they cannot be repaired.
In the battery
You can check the lithium-ion battery in your vehicle by doing the following:
- The multimeter is put into the voltmeter mode, on which the voltage is examined.
- Set the range to 0-20V.
- It is advisable to measure the battery only when the vehicle is disconnected from the power supply.
- The red probe is applied to the positive socket.
- The black test lead is placed on the negative jack through the load.
- The readings obtained must be recorded.
Now you need to evaluate the result:
- Voltage = 12.6 volts. The device is suitable for use. There is no need to charge.
- The voltage is less than 12 V. The car battery must be charged. She was discharged.
- Readings more than 15 V. Such a device is prohibited to use. This will damage the generator. Purchase of a new battery is required.
For your information. To get accurate data, you need to measure them 6 hours after disconnecting from the car.
The power supply has large currents
Charger repair
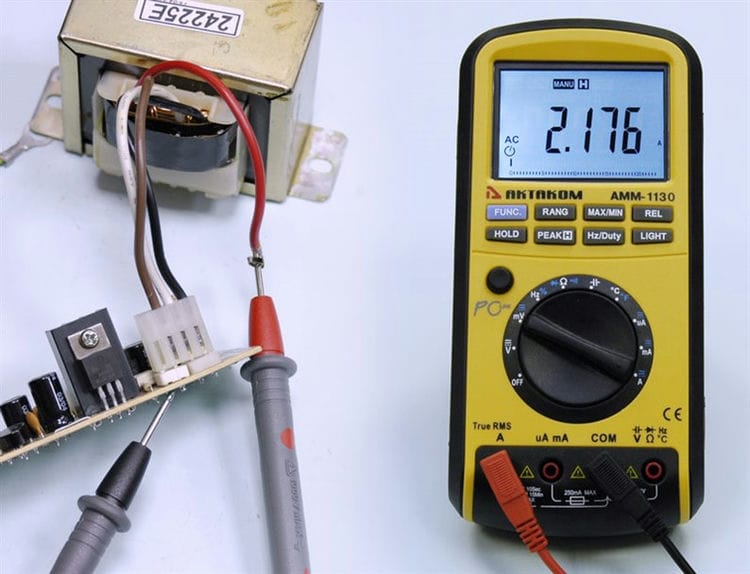
If the check reveals a malfunction, you can try to repair the device. First, you need to disassemble it in order to check each element. To test the diode bridge, you need to apply a recharge current. A healthy element will have current at the input and output. If it is absent, the diodes are checked separately.
The automatic device is equipped with a board. Measuring the output voltage will indicate its performance. If the board is broken, then there is no voltage or is abnormal.
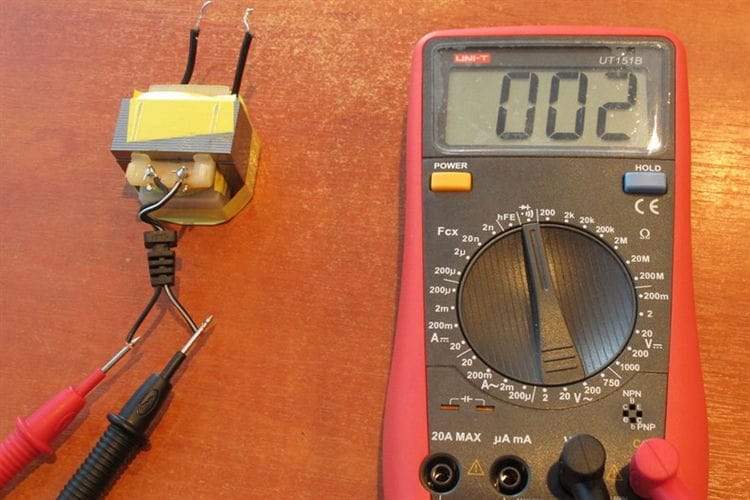
The transformer is checked by ringing the winding. Normally, the resistance varies between 20-30A. If the transformer is out of order, then it is more profitable to buy a new device to charge the battery. The transformer costs a lot, so it makes no sense to replace it with a new one. The only option is to rewind the winding yourself. But for this you need to have the necessary skills.
Regular checking of the charger will help to identify a breakdown in a timely manner and prevent incorrect recharging of the battery.
Tips on caring for the battery and using chargers provided by the specialists of the online store
A multimeter is a device that measures the voltage, current, resistance, and performs a “continuity” of wires. That is, this device is in high demand. Moreover, as practice shows, it is quite popular not only in industry, but also in everyday life.
But before proceeding with the necessary measurements, it should be borne in mind that a multimeter is not a completely harmless device. If used improperly, you can not only easily disable it, but also cause serious harm to your health. This is especially true when you need to take measurements at high voltage or high amperage. Not only can you burn out the multimeter right away, but you can seriously injure yourself.
That is why, before you start using the multimeter, you need to practice on power sources with low amperage indicators, for example, on batteries. Also, do not neglect the instructions for the device.
What parameters can a multimeter measure
With the help of a multimeter, you can accurately determine the voltage, capacity, amperage, etc. when checking the battery. Let's consider one by one in detail.
Amperage
The battery can be discharged by itself if there is no power, this is a natural procedure. Large losses are incurred by acid batteries. Permissible leakage current values are from 50 to 80 mA. So the burglar alarm consumes 20 mA, the radio tape recorder – 3, the injection system – 5, etc. If the current is consumed normally, then the battery will work for more than one year. Leakage can also occur due to a malfunction if:
- there are wet areas of the electrical circuit;
- there are sections with thinned insulation.
In these situations, the battery may be completely discharged, and fire may occur in places with poor electrical wiring. When checking the battery for leakage with a multimeter in the mode of changing the current (ampere), see that the indicator does not exceed 80, since the battery will quickly drain.
To prepare the car for testing, turn off: lighting, all devices, radio, etc.
Leakage current measurement
Step-by-step diagram of connecting the measuring device:
- The first step is to put the measuring device in the 10 ampere position.
- The red connector goes to the “10 ADC” socket.
- We remove the terminal from the power source and connect the red wire of the ammeter to it.
- Place the black wire of the testing device on the disconnected terminal.
After all the manipulations, all indicators should be absent on the device screen. If some numbers suddenly appear, then the leakage current is significant, you need to diagnose the on-board system of the vehicle.
Attention! When checking the battery for a short circuit, also use a multimeter, if the contacts sparkle, you need to urgently disconnect the device, as you can “burn” it.
How to measure current and voltage
To begin with, a small educational program on using the most popular and inexpensive digital multimeter (of course, from Uncle Liao). It can be used to measure the magnitude of AC and DC voltage, current and resistance of the circuit. Some devices additionally allow you to check the health of radio elements – diodes, transistors, capacitors. Today we will use it to measure DC voltage and current.
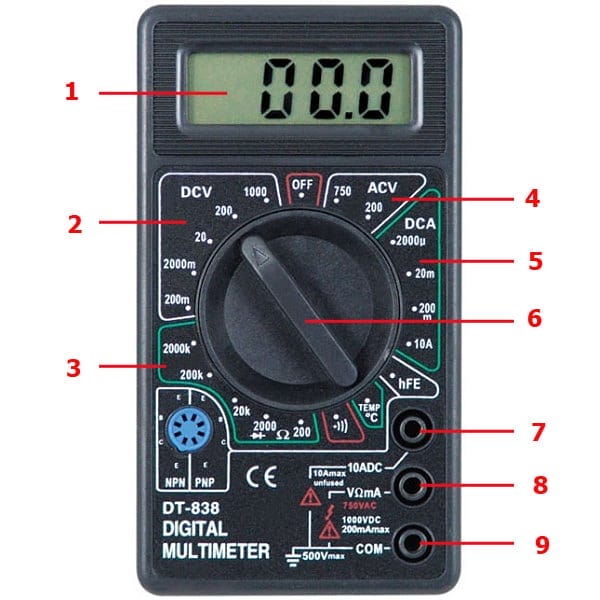
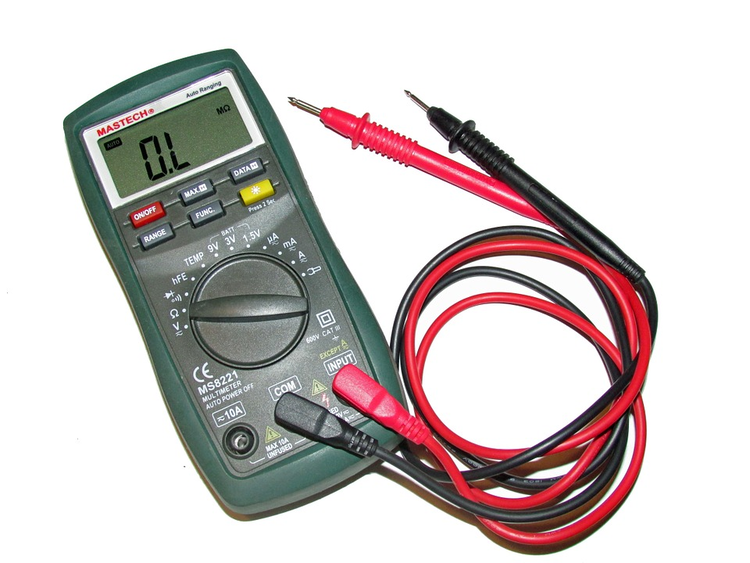
Digital multimeter (tester)
- digital display;
- DC voltage measurement section (DCV);
- resistance measurement section;
- section for measuring alternating voltage (ACV);
- DC current measurement section (DCA);
- mode switch;
- socket for measuring direct current at the limit of 10 A;
- socket for work in all other modes;
- common nest.
In order to carry out measurements, we connect the probes to the corresponding sockets, set the required mode and measurement limit with a twist switch. It's simple.
Expert opinion
Alexey Bartosh
Specialist in repair, maintenance of electrical equipment and industrial electronics.
Ask a Question
Important! Everything is very simple, but it requires care when choosing a mode and measurement limit. It is worth making a mistake, setting, for example, the current or resistance measurement mode, and measuring the voltage, as the device will be irretrievably damaged. It seems obvious, but almost everyone has made a mistake at least once.
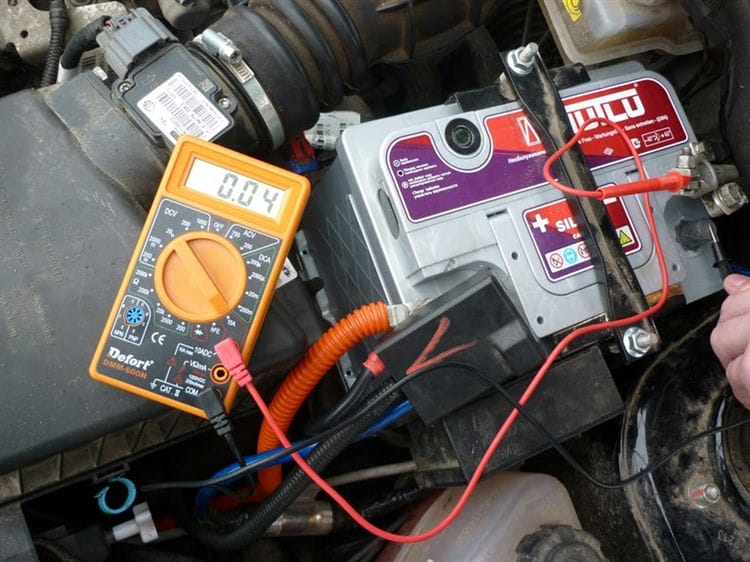
Let's try using this device to check the voltage of the car battery. We insert the wires with probes into sockets 9 and 8. In this case, the probe installed in socket 9 will be negative. Set the mode switch to section 2. The display automatically lights up. Now you need to select the measurement range. More precisely, the upper limit of measurement. It must not be lower than the measured voltage. The battery of the car gives out about 12 V, so we are quite satisfied with the limit 20. On it, we definitely will not overload the device. Set the spinner to 20 DCV.
We touch the battery terminals with the probes and read the readings from the display. In this case, the polarity of the connection of the probes can be disregarded. If we have reversed the polarity of the connection, before the readings the display will show “-“. This is the normal operation of the multimeter.
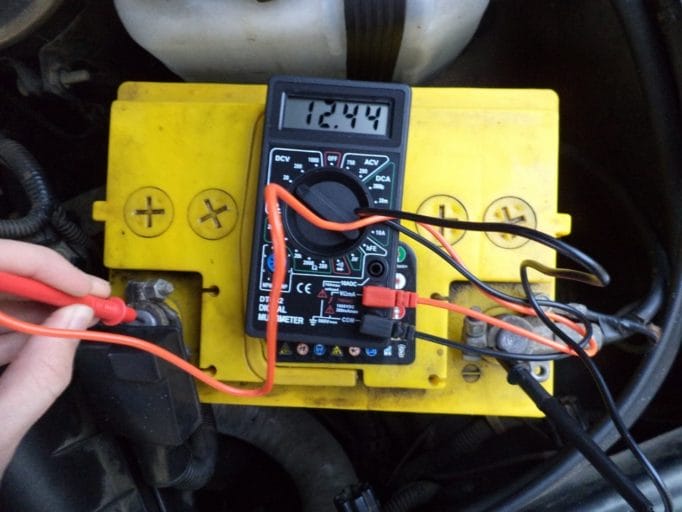
The voltage at the terminals of this battery is 12.44 V, the probes are connected in the correct polarity
Important! If we do not know what the voltage in the measured circuit is, we set the largest limit and, if necessary, after control measurements, reduce it. In the photo below, the generator is being checked, therefore, just in case, a deliberately higher measurement limit was set – 200 V.
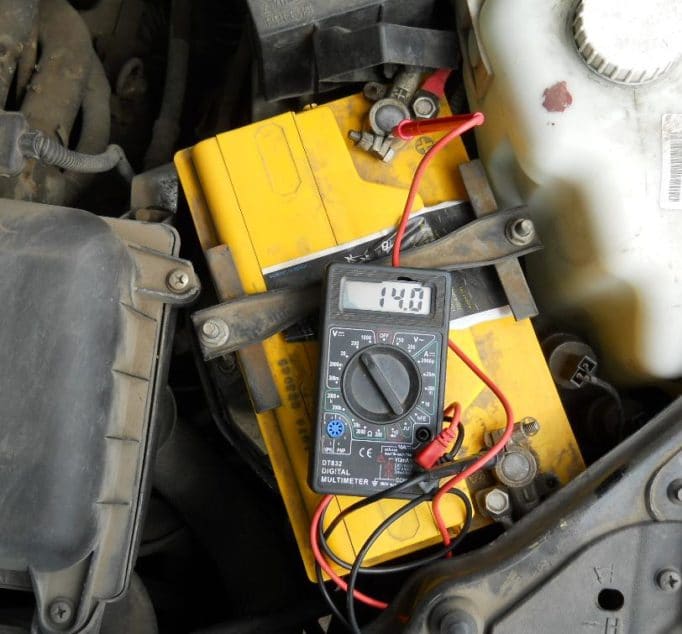
The 200 V limit has been selected to test generator operation.
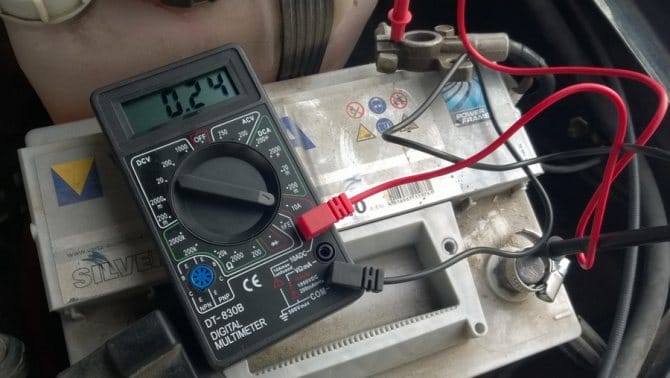
How to measure current with a multimeter? As an example, let us measure the current leakage while the car is parked with the ignition off. Since we do not know how large the amperage will be, we set the device to the maximum current measurement mode – 10 A. Section, of course, DCA (pos. 5 in the first photo). Move the measuring probe from slot 8 to slot 7. Leave the probe in slot 9.
Turn off the ignition, de-energize additional non-standard electrical equipment, if any (navigator, DVR, etc.). We reset the tip from one of the battery terminals and turn on the multimeter into the gap. We close the doors, put the car on guard. That is, we park it for long-term parking. After a while, the machine will “fall asleep” and the leakage current can be read from the tester's display. In the photo below, the current is 330 mA. That's a lot. Either we forgot to turn off something, or the vehicle's on-board network is faulty.
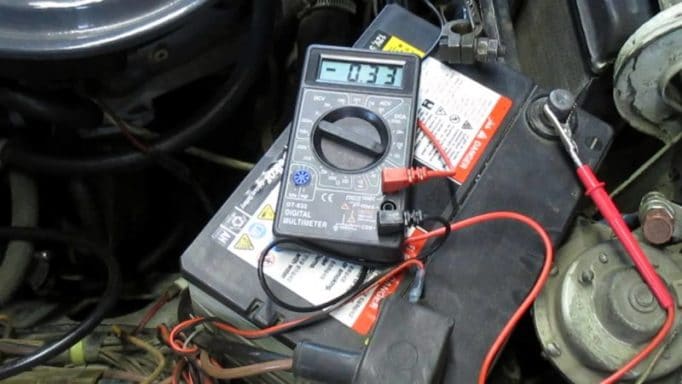
The leakage current is 330 mA, the polarity of the probes is reversed
Important! In no case are we trying to start the engine with the tester connected. The current consumed by the starter at the moment of starting is hundreds of amperes and will instantly burn the device, which can withstand 10 A with difficulty and only for a short time.
How to check battery charging with a multimeter?
Determining the state of a lithium-ion (the most common type of modern battery) battery is quite simple if you follow these guidelines:
- Disconnect the energy storage device from the car and wait 5-6 hours.
- The multimeter must operate in the “voltage” mode (voltage test).
- A standard lithium battery produces amperage in the 12.7-13.2 volt range. The switch is set to 20 or closest to it. So the voltage is measured from this value and below.
- The wires from the device are connected to the battery: red to the positive terminal, black to the negative. If the wires are of the same color, then you should focus on their marking and connect to opposite charges, minus to plus and vice versa.
Depending on the performance of the device, a decision should be made about the replacement or further use of the battery.
- 12.7-13.2 volts – the battery is charged and ready for use;
- 12.1–12.4 V indicates that the battery has been charged by about half and it is desirable to increase the energy level;
- 11.6-12 volts – severe depletion and the battery is not suitable as a source of electricity;
- Below 11 and V – the equipment is completely out of order and attempts to use it can lead to breakdown.
To understand how to test a car battery for performance with a multimeter, you do not need special knowledge or special equipment, just a little time and adherence to the listed tips.
The structure of the multimeter
The main working areas of the multimeter.
Most often, electronic multimeters are used for home checks, which have a small LCD screen and a knob for switching device operating modes. The current measuring type and range is opposite the red dot or indentation on the edge of the switch.
There are several test leads on the front or side of the case. The black probe is negative and is always connected to the connector labeled “Com” or “Common” (ground). The positive (red) probe is inserted into a free slot.
If there are 3 sockets for probes on the body of the multimeter, then the red probe is inserted into the middle socket (the lower one is designated as “Ground”). The upper connector is used for the “positive” probe only if the measured current is less than 5-10 A. In models with 4 sockets, the amperage range is divided into 3 zones: up to 200 mA (1st connector), from 200 mA to 5 -10 A and more 5-10 A.
The DC voltage measurement mode is labeled ACV, AC – DCV, current – DCA, and electrical resistance – Ω (omega). Direct and alternating current can be indicated by a straight line and wavy line, respectively.
Continuity activation zone is located between amperage and resistance range. When a break is detected, the multimeter beeps (for some models, only light indication). The functionality of the tester is provided by a Krone battery, resistors, rectifier diodes and other elements.
Determine the capacity
The battery capacity is measured by the test discharge method at the given load parameters. The purpose of the test is to determine how long it takes for the battery to lose half of its charge after it is fully restored.
The check is performed in the following sequence:
- measure the voltage at the terminals, compare with an indicator equivalent to full charge;
- connect a consuming element with a given power, note the start time of the test;
- the half-discharge time of the battery is multiplied by the amperage in the circuit;
- the obtained value in A * h is compared with the data of the technical passport of the battery.
For a quick test, you can connect a lamp to the battery, which consumes half the battery current. Dimming of the light after 2-5 minutes of the test indicates low battery performance.
Smart chargers check the battery capacity automatically – during normal charging or recovering from a deep discharge.
Checking the batteries
Battery health check.
The nominal voltage of alkaline and alkaline finger-type batteries is 1.5-1.6 V. To check their performance, a 2-step test can be used:
- Without load. Select a constant voltage mode on the multimeter with a range from 200 mA to 5-10 A, apply the probes with respect to the polarity. Classify batteries according to the obtained indicators: more than 1.35 V – working, from 1.2 to 1.35 V – require testing under load, less than 1.1-1.2 V – must be disposed of.
- With a load. You need to check only those batteries, the voltage of which at stage 1 exceeded the threshold of 1.2 V. After connecting the load to the circuit, you need to wait 30-40 seconds, and then connect the multimeter probes. With a voltage of less than 1.1 V, the batteries should be disposed of, at 1.1-1.3 V – can be used in low-power devices (remote controls, computer mice), with more than 1.35 V – used in any devices powered by portable drives.
Other voltages are accepted for testing lithium batteries. When fully charged, an efficient battery produces 3.6-3.7 V, and when discharged – 2.5 V.
Sources used and useful links on the topic: https://3batareiki.ru/zu/kak-proverit-zaryadnoye-ustroystvo-dlya-avtomobilnogo-akkumulyatora https://EvoSnab.ru/instrument/test/proverka-zarjadnogo-ustrojstva-multimetrom https://rusenergetics.ru/instrumenty/kak-proverit-ampery-multimetrom https://ToolProkat43.ru/bytovaya-tehnika/kak-proverit-amperazh-zaryadnogo-ustrojstva.html https://Acums.ru/akkumulyatory/ avtomobilnye / kak-proverit-multimetrom https://automonth.ru/proverka-akkumuljatora-multimetrom/ https://knigaelektrika.ru/teoriya/kak-proverit-multimetrom-zaryad-akkumulyatora.html
Post source: lastici.ru