How to transfer photos to iPhone from iCloud storage. Using iCloud photo storage. How do I upload photos from iCloud to my computer?

Content
How it works
ICloud Photos automatically saves all photos and videos you upload to iCloud so that you can access your library from any device, anytime. All changes in collections on one device are synchronized with other devices. Your photos and videos are sorted into Years, Months, Days, and All Photos. The Memories and People collections are updated across all your devices. Thanks to this, you can quickly find pictures of certain events, pictures of friends or relatives.
The collection is sent to iCloud every time the device connects to a Wi-Fi network and its battery is charged. On iOS 11 or later, your library can also be updated over the cellular network. The time to add photos and videos to all devices and iCloud.com may vary depending on your internet connection speed.
Preparation
- Update your iPhone, iPad, or iPod touch to the latest iOS or iPadOS, your Mac to the latest macOS, and your Apple TV to the latest tvOS.
- Set up iCloud on all your devices.
- Sign in to iCloud with the same Apple ID on all of your devices that you want to use with iCloud Photos.
- If you are using a Windows computer, upgrade to Windows 7 or later and download iCloud for Windows.
Turn on iCloud Photos
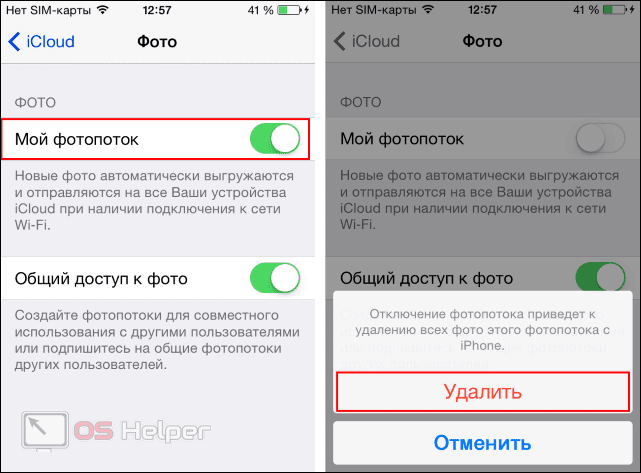
- On your iPhone, iPad, or iPod touch, go to Settings> [your name]> iCloud> Photos and turn on iCloud Photos.
- On your Mac, choose System Preferences> Apple ID. Click iCloud in the sidebar, then choose Photos. If you're on an earlier version of macOS, go to System Preferences> iCloud. Click the Options button next to Photos, then choose iCloud Photos.
- On Apple TV 4K and Apple TV HD, choose Settings> Users & Accounts> iCloud. Then turn on iCloud Photos.
- On a Windows computer, follow the steps in this article.
In previous versions of iOS, macOS, tvOS, and iCloud for Windows, iCloud Photos was called iCloud Photo Library.
ICloud Features
For full use of the “apple” smartphone, its owner gets an Apple ID. The presence of a single account opens up to the user all the possibilities of the ecosystem created by Cupertino engineers. One of them is the use of cloud storage. Everyone gets free 5 GB on a permanent basis. Backups, documents and photos will be stored in this space.
You can use My Photo Stream or iCloud Music Library to post photos. Let's consider both possibilities in more detail.
My photostream
The “My Photo Stream” function appeared on the iPhone a long time ago and it can be enabled on any smartphone model, starting with 4S. Images will be uploaded to the cloud automatically in the range of a trusted Wi-Fi network. At the same time, no more than one thousand photos can be uploaded to the cloud within 30 days. When the specified amount is reached, the oldest image should be automatically deleted, making room for the new one, which will be placed at the end of the list.
The main convenience of this method is that the amount of photos sent to iCloud does not count towards the free 5 GB. In other words, 1000 images are stored for a month without taking up precious space. You can pull them out to the device at any time.
ICloud Media Library
This feature appeared with the release of iOS 10.3. Accordingly, it is turned on on devices that support it or have been updated to the latest, 11th version of the operating system. iPhone 5 and 6 support the installation of iOS 10, but not all users install it, fearing hypothetical “brakes”. Owners of relatively new models 7 or the latest 8 and X do not need to think about this. Their devices will survive several more OS updates without any problems.
The footage will be uploaded, as before, without user intervention. The advantage of the library is the automatic synchronization of the changes made on all devices, the ability to save Live Photos and videos, as well as expanded support for formats. In theory, you can upload an unlimited number of photographs to the library, but they will be taken into account. Consequently, the storage volume will have to be increased to the required size.
What can iCloud sync?
1 iTunes Content. Cloud-based iTunes provides automatic downloads of purchased music, applications and books to any of your devices.
2 Mail, calendars, reminders, contacts, notes, bookmarks are also synchronized via iCloud.
3 Photo Stream. All photos taken from Apple devices are automatically uploaded to Photo Stream and transferred via iCloud to other iOS devices as soon as you close the Camera app and when connected to a Wi-Fi network. (Photos are not transferred to the cloud via the cellular network).
Please note that up to 1000 photos can be stored in the “cloud”, and all subsequent ones will be overwritten in place of the old ones.
But on the other hand, all photos are stored on the computer, not just 1000. You can view them on a Mac computer – through iPhoto or Aperture, on a PC – in the Photo Stream download folder, by default it is the C: UsersApplePicturesPhoto StreamMy Photo Stream folder .
4 Documents (iWork). If you work with texts, spreadsheets, and presentations through Pages, Numbers, and Keynote, they can also be synced across all iOS devices, as well as documents in the Mobile Documents folder on Mac computers. When you edit a document on iOS, its “version” is automatically updated on all iOS devices.
5 Backups. Backups are now created automatically when the iOS device is connected to a power source and connected to Wi-Fi and sent to iCLoud. The backup includes device settings, screen layout, messages, app data, photos and videos, ringtones, purchased music, apps, books, and TV shows. If you want to restore your iphone, you can use the backup copy so as not to lose data.
6 Family Sharing. With this option, users can share content from the iTunes Store, iBooks Store, and App Store with up to six family members.
In general, the iCloud cloud service allows you to keep all information on all your iOS devices and associated computers up to date, quickly and conveniently transfer new applications and files between them. The iCloud service was introduced in mid-2011. Since then, the Cupertinos have significantly expanded its functionality.
Information deleted from the iPhone is stored in iCloud for 30 days. Read here how to recover deleted files.
How much do i need to pay to use iCloud
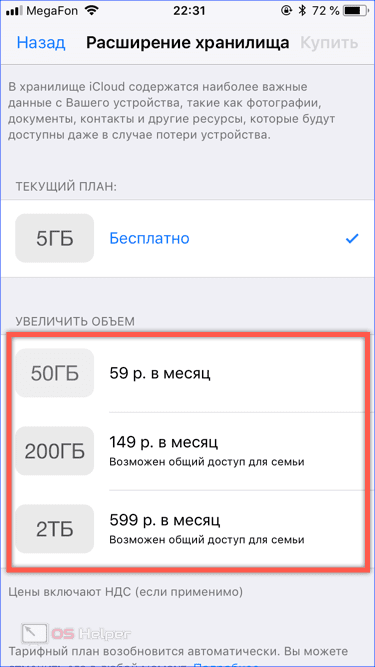
All Apple ID account holders automatically receive 5GB of free cloud storage in iCloud. It can be used to store backups, application files, important documents, and more.

If necessary, users can expand the available capacity by 50 GB, 200 GB or 1 TB. Depending on the chosen “package”, the cost of the service will also change. When purchasing an additional 50 GB, users will need to pay an additional 59 rubles per month, and in the case of purchasing 1 TB – 599 rubles per month.
It should be noted that relatively recently the company has slightly reduced the cost of the “packages”. Last year, one additional TB of cloud space cost 200 rubles more.
How to set up iCloud
How to use iCloud and how to set it up. There is nothing difficult here. However, depending on the platform, it has its own nuances.
Set up iCloud on iPhone
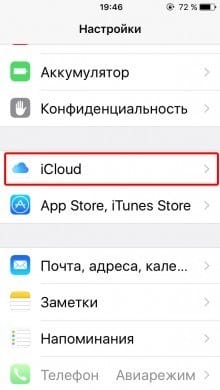
1 On your smartphone or tablet, go to Settings – iCloud.

2 Enter your Apple ID login and password. Instructions on how to create an Apple ID.
3 Choose one of the two options – merge or not merge Safari data on mobile and in the cloud.


4 Activate Find My iPhone geolocation.
Set up iCloud on Mac
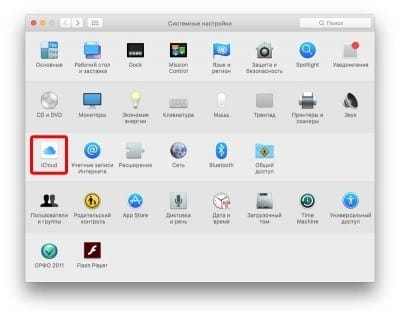
1 On OS X, open System Preferences – iCloud.
2 Enter your Apple ID login and password and click Login.

3 If necessary, activate the “Find Mac” function, as well as transfer contacts, calendars, reminders from Mac to iCloud.
IPhone setup
Both of these methods require the user to first sign in to their account. Without this, it is impossible to sync or look at the data stored in the cloud. With your Apple ID logged in, you can set up both of the above features in one place.
- Open the settings and scroll through them to the block of multimedia applications. Select the “Photo” application from the list.
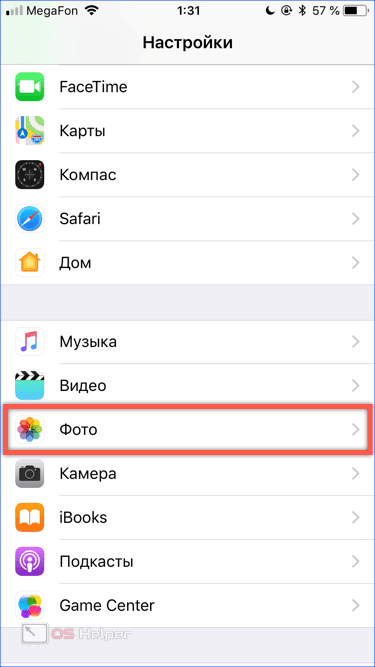
- In the program options, we see the items indicated by numbers. The first is for activating the media library. The second starts the transfer of images to the photostream.

Transferring images
Photos taken on the iPhone, whatever the use of the cloud, will not go anywhere. Using the library, you can choose a setting that allows you to move the original to storage, leaving an optimized copy of it on your smartphone. The photo quality will be reduced only on a mobile device. In this case, the size of the image will be 2048×1536 pixels, which allows you to comfortably view it on a PC screen or high-definition TV.
- To transfer images from the cloud to the smartphone's memory, open the “Photos” application. Switching to the option of displaying albums, we see a folder with pictures placed on the device (marked with the number “1”), and cloud storage, marked with a two.

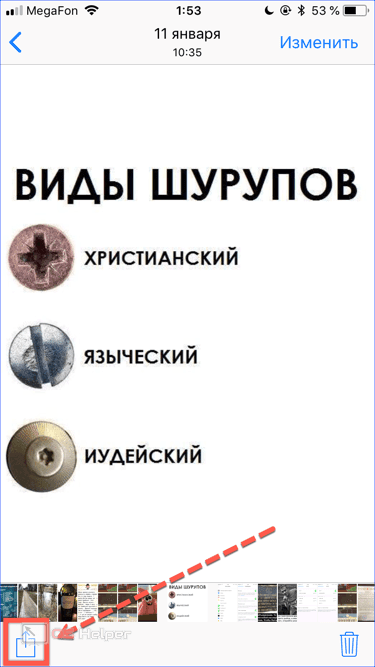
- Opening the photostream folder, select the desired photo. The “Share” icon is located in the lower left corner. Click it to expand the full list of possible actions.
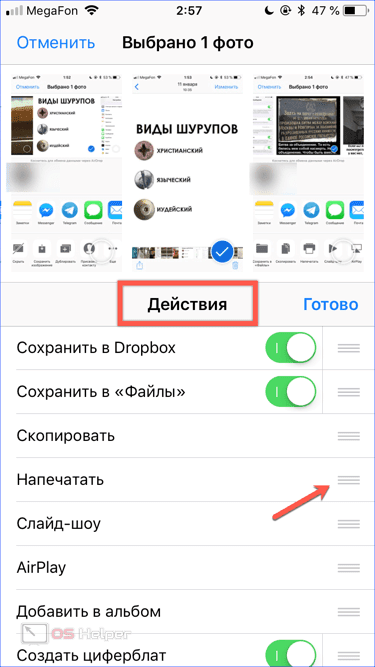
- At the bottom of the screen, two bars appear with installed applications and operations. Scrolling through the action menu, we find the icon indicated in the screenshot. With its help, the selected image can be taken out of the cloud to download or restore on a smartphone. The upper strip with messenger icons makes it possible to drop it to any contact from the phone book. If the available capabilities are not enough for operations with the file, the item marked with an arrow will open an additional menu.

- Using the horizontal strokes indicated by the arrow, you can sort the allowed actions in the desired sequence according to the frequency of use. After that, you can copy, add to the selected album or transfer the photo to another cloud service with one click of a button.
How to Upload Photos from iCloud to iPhone
The easiest way, which ensures the maximum speed of obtaining the desired frames, is to use the official website of the cloud service. This method works for any device, not just iPhone.
Scheme of actions:
- Go to icloud.com, enter your Apple ID details – mail and password. If Keychain Access is turned on, all you have to do is use Touch ID or Face ID to sign in automatically.
- If this is your first time accessing the site, you will need to agree to the terms and conditions and privacy policy.
- Next, on the home page of the service, select the “Photo” icon. A gallery of media files uploaded to the Cloud will open.
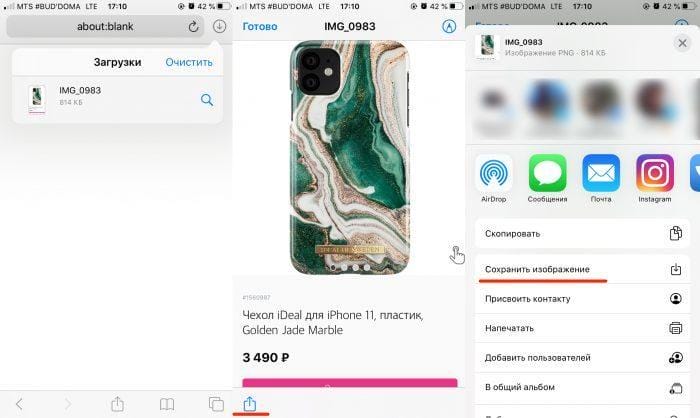
- Click on the desired object. When it opens, a circle with 3 dots will appear in the lower right corner – a menu of additional actions.

- Select the “Download” item in it. After that, Safari will ask you to confirm the download, and the image will appear in the “Downloads” icon in the upper right corner.
- Open the downloaded file, in the lower left corner, click on the “Share” icon and find the item “Save Image”. The snapshot appears in your iPhone library.
![How to transfer photos to iPhone from iCloud storage. Using iCloud photo storage. How do I upload photos from iCloud to my computer?]()
The downside is that you have to upload one image at a time. If you need to get a lot at once, it will be long and difficult – it is better to set up automatic unloading.
To get all the images available in the Cloud, you will need to go through the following steps:
- Open “Settings” and scroll down to the line “Photos”.
- Select “Storing Originals”.
- Put the iPhone on charge and be sure to connect it to WiFi – the download is poor through the cellular network. It is better to do this in the evening if the media library is large: by morning all the photos will appear in the phone's memory in excellent quality.
How to upload photos from iCloud to iPhone if there is not enough storage on iPhone
In the case when the user has only an iPhone from Apple devices and he urgently needs to pull images from his cloud media library, but there is no place on a specific device, any other gadgets will come to the rescue. You will have to work through the official iCloud website. The algorithm is in many ways similar to the one described above for the iPhone.
Scheme of actions:
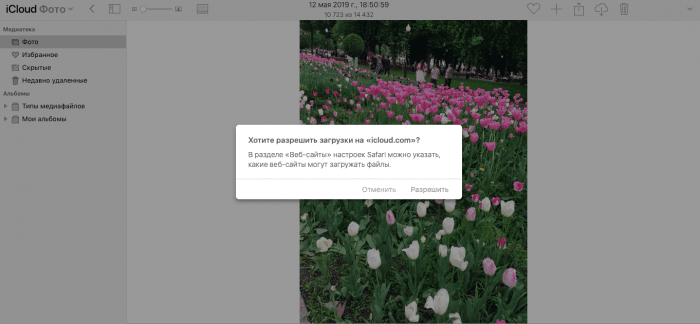
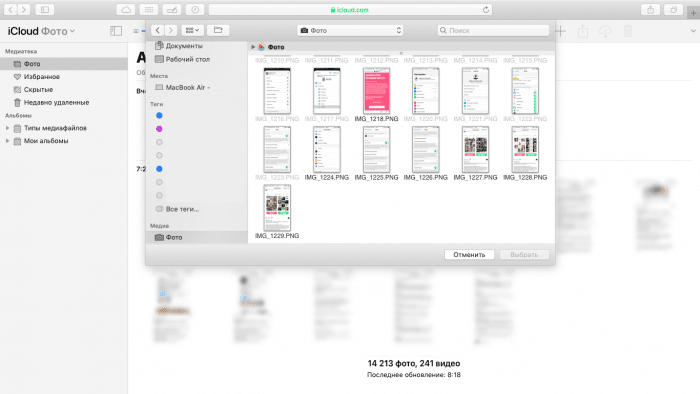
- Open the site, enter your credentials and wait for the page to load.
- Select the “Photo” block. If your media library is large, you will have to be patient while previews of all images appear on the screen.
- Double-tap the photo to load it in its original format. At the top, find the cloud icon with an arrow pointing down – this is the upload. For Windows computers, you will need to specify the file path.
![How to transfer photos to iPhone from iCloud storage. Using iCloud photo storage. How do I upload photos from iCloud to my computer?]()
- To upload a large amount of images, hold the cursor over an empty area and drag up, grabbing the files you want. They will be downloaded in a zip archive. To select the entire library, you can use the standard Ctrl + A command.
If all images and videos were stored in their original size and therefore took up all the free space, you can try clearing memory by turning on “Optimize Storage”. This option is in the “Settings”. At the top of the section, you need to click on your Apple ID, go to the “iCloud” section and then to the “Photos” tab.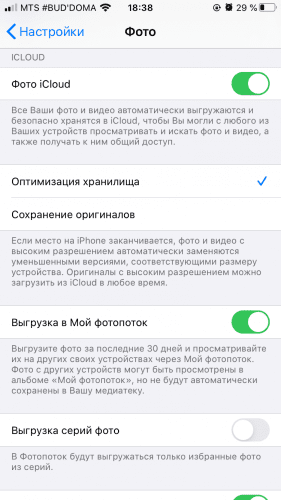
Only “light” versions will remain on the iPhone and other devices, there will be free space, but there will be no physical pictures on the phone. The required originals will have to be pulled separately from the Cloud.
How to Upload Photos from iCloud to Mac
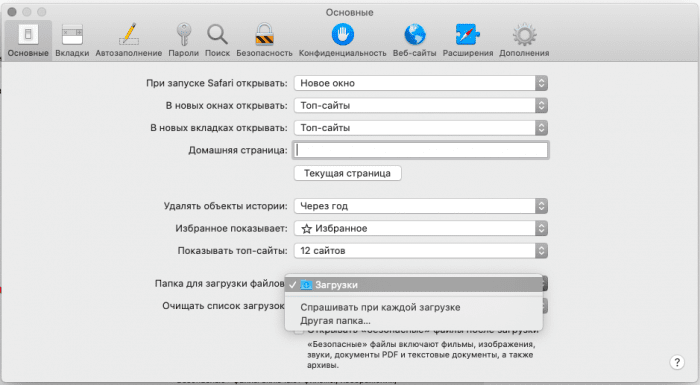
Single images can be pulled from the cloud server through the official site, the same steps as for iPhone and PC on Windows. Only here Safari users are advised to open a browser, select the “General” item in the “Settings” and at the very bottom indicate the folder where the downloads will be saved. If this is not done, you will have to press confirmation for each frame.
When uploading a large volume of photos, it is better to set up automatic sync. 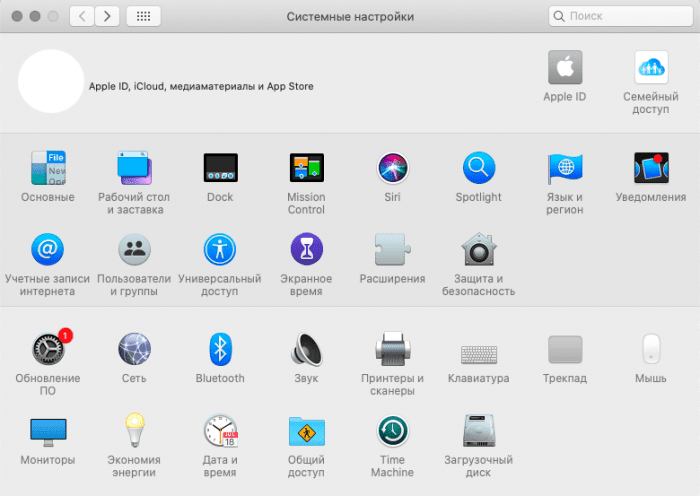
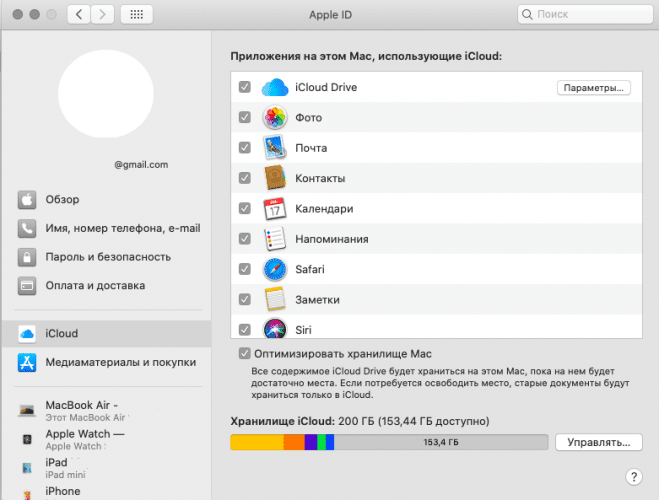
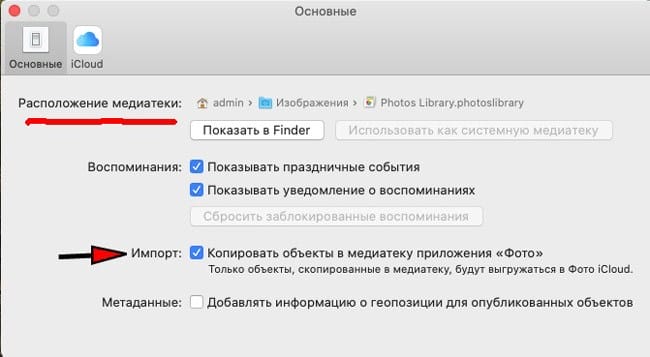
In MacOS, the file access system in the library is simplified as much as possible, so the user just needs to go through the following path: go to “System Preferences”, click on the Apple ID icon, select iCloud and put a checkmark in front of the desired item.
Additionally, for automatic unloading, you should go through the following steps:
- Open Photos on your Mac.
- On the top panel, select the menu of the same name and the “Settings” section.

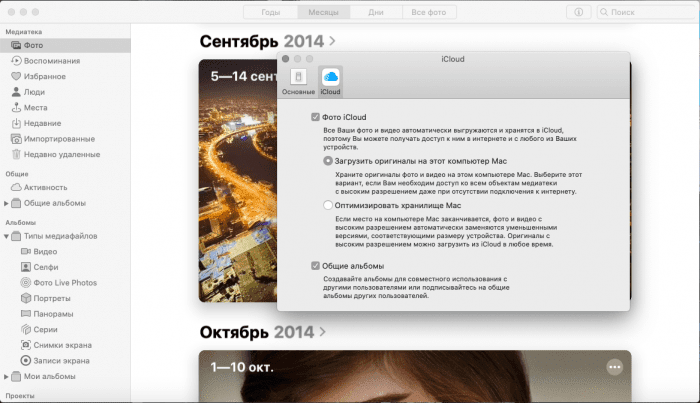
- Go to the “iCloud” block and check the box on the first line. Optionally, you can also turn the Mac into a repository for originals if you select the appropriate option.
![How to transfer photos to iPhone from iCloud storage. Using iCloud photo storage. How do I upload photos from iCloud to my computer?]()
After that, all the pictures that are taken on any of the Apple gadgets will appear on the Mac. If after their creation a lot of time has passed and the system has sent the necessary frames to the Cloud, you will need to double-click on the image in the media library and wait for it to automatically load in good quality.
If for some reason the process froze (often this is due to failures on Apple servers), you should restart the Internet or find the desired snapshot on the Cloud website.
How to add photos to iCloud
The taken photos or videos will be automatically sent to the cloud storage immediately after shooting, subject to 2 conditions:
- ICloud Photos is turned on.
- The iPhone has a charged battery, and the gadget itself has an Internet connection. IOS 10 and earlier requires WiFi, not available over cellular. The download speed is determined by the quality of the Internet connection and the state of the Apple servers.
Function activation diagram for iPhone, iPad and iPod:
- Open Settings.
- Sign in to your Apple ID profile.
- Select the “iCloud” block and then “Photos”.
- Move the iCloud Photos slider to the right (turns green).

For users with iOS 12 and earlier, the feature on all gadgets will be called iCloud Music Library. For Mac, the algorithm is similar, but you need to go to “System Preferences”.
For a short time, you can upload a photo for access from all Apple gadgets through the Photo Stream. This function allows you to send to the server only new images up to 1000 pcs. and store them for no longer than 30 days. After that, they are automatically deleted, but they can be downloaded to an iPhone or other devices. To enable it, you need to select the “Photo” block in “Settings” and drag the slider to the right in the “Upload to My Photo Stream” line. A tab of the same name will appear in the media library.

Important: after the “iCloud Photos” function is enabled on a specific device, the “My Photo Stream” section on it ceases to exist, but remains on other gadgets where this function is not active. All pictures from this block go to “All photos”. Anything that was not saved in the library is erased.
In addition to automatic transfer, there is another way to add frames taken on iPhone to the cloud storage: transferring your favorite photos through the site. This option is only available from computers. You should go to the desired block with photos and click on the cloud icon with an arrow pointing up.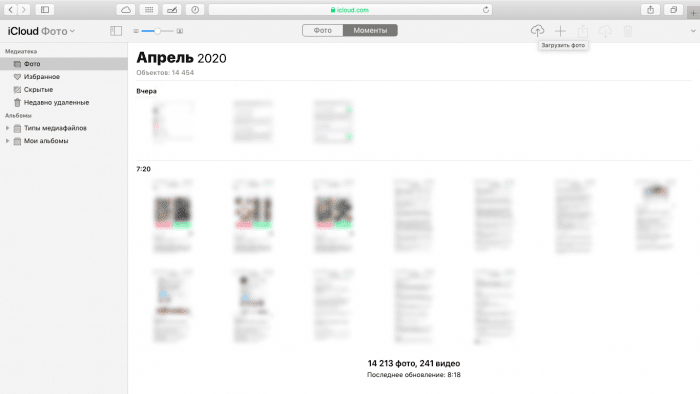
After that, you will need to select photos on the desktop or in folders and wait for them to load.
In order to transfer images from your iPhone or iPad to the Cloud, use the Files application, which appeared in iOS 11. For it to work correctly in Settings (block with Apple ID) and in the iCloud section, you must enable the iCloud Drive item.
Working with Files:
- In the library, select the desired photo, click the “Share” icon.
- Find “Save to Files” in the menu.
- Select the “Photos” folder and confirm this action.
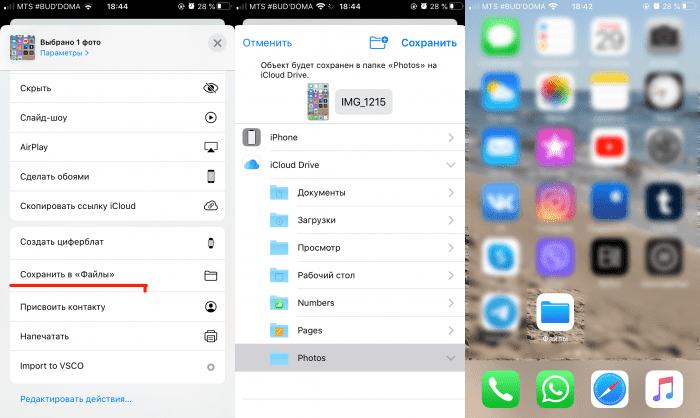
The only caveat: with such a upload to the cloud storage, the photos do not appear in the Media Library itself, but are stored on virtual servers. They will have to be pulled out the same way through the “Files” or through the Aykloud website and the “Photos” folder of the same name.
Import and export of photos and videos
What happens when importing photos depends on the option
By default, this option is enabled, so imported photos are copied to the Photo Library on your Mac. The location is shown on the same panel. All of these images are synced to iCloud Photos. If you want to save some photos in a different location, like an external hard drive, but to be visible in the photo, you can disable this option before importing the images. Photo files will remain, but will not sync with iCloud or appear on other devices.
If you have photos in your personal library but want to keep copies outside the cloud, you have two options:
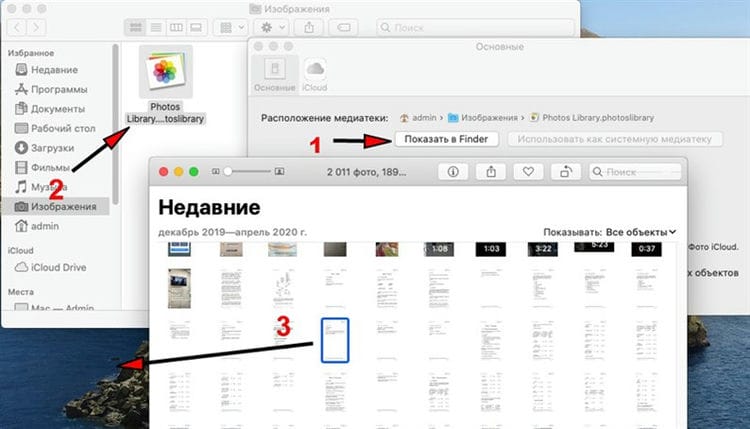
-
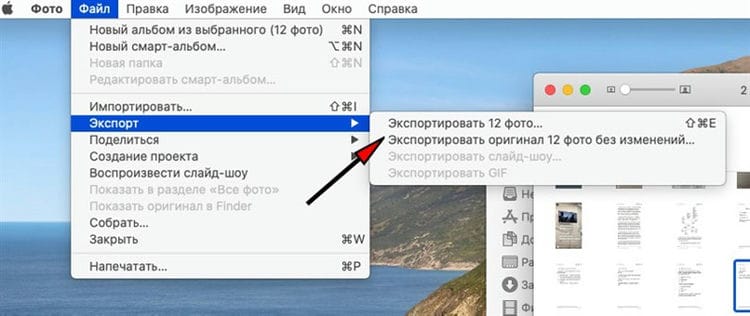
Click Show in Finder, go to Photo Library, then drag the photo to a different location. Hold the Option (alt) button if the location is on the same drive. A separate full copy of the photos will be created. To view these photos, exit the Photos app, restart it while holding down the Option button, and select a different library. Don't forget to switch back later.
![How to transfer photos to iPhone from iCloud storage. Using iCloud photo storage. How do I upload photos from iCloud to my computer?]()
Drag the photo with Opt
-
Or select multiple photos in the app and use the menu bar
to make copies, or
to copy modified pictures. The changes will be irreversible.
If photos and videos don't want to sync
Photos in iCloud may sometimes not work as expected. First of all, you need to check that you understand the operation of this service, for which the tips later in this article will come in handy. Turn off and on Photos in iCloud settings on each device.

Turn Photo off and on again
If some images in Photos on your Mac won't load, select them and open
… If they are not in your photo library, it means they are out of sync. You will be prompted to move them to the library.

Finally, incompatible or damaged photos or videos may not sync and prevent everyone else from syncing. This shouldn't happen on macOS Catalina. Look in the library for the message Unable to load, where there should be a list of damaged objects.
PC users can install the Windows version of iCloud to manage personal photos and videos. It is possible to share personal albums via iCloud.
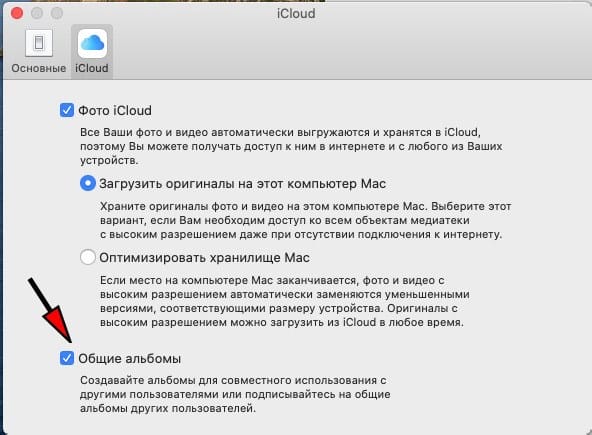
iCloud not only allows you to store and sync your photos, but also show them to other people. On macOS Catalina, make sure under
the Shared Albums option is enabled .
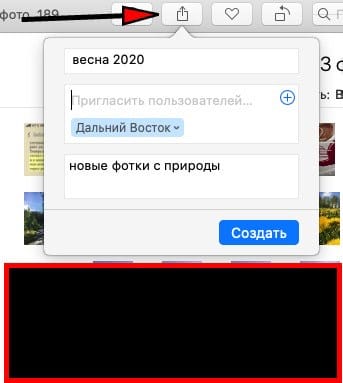
Select the photos you want to share, click on the icon above
… And create a new shared album: write down the title, invite users and add a comment-description to the album. Finally, click Create.
Shared Albums are only available on Apple devices or in iCloud via Windows.
On iOS 13, enable shared albums under
, then select the pictures you want from the Photos app, click the Share icon at the bottom left, and click Add to Shared Album. Press to select an album or create a new one.

Or, you can select Copy iCloud Link from the Share menu to create a web gallery with a Download option that will be available for 30 days. And then just send the link by email or through messages.
Sources used and useful links on the topic: https://support.apple.com/ru-ru/HT204264 https://os-helper.ru/ios/kak-vygruzit-foto-iz-ajklaud.html https: // iphone-gps.ru/programs/system/icloud-help https://tarifkin.ru/mobilnye-sovety/kak-vygruzit-foto-iz-icloud-na-iphone https://macnoob.ru/howto/polnoe- rukovodstvo-po-icloud-chast-2-upravlenie-foto /
Post source: lastici.ru