How to return an overwritten file to its original location (after saving). How to recover an overwritten Word file

Content
“Third party” applications
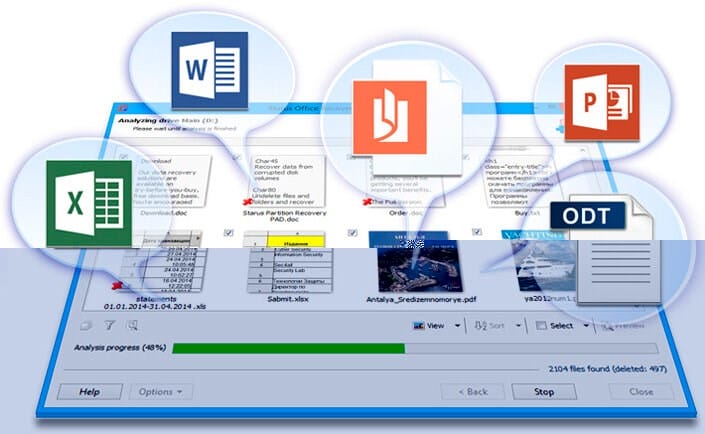
We advise you to start with programs that specialize in recovering files of a certain format, and in this case, the formats of the Microsoft Office suite. Since, for example, software developers use special algorithms to recover images that are not very suitable for working with text documents, the quality of recovery in this case can be seriously affected.
We suggest using RS Office Recovery, which has established itself as one of the most effective tools for recovering Microsoft Office documents. Just download and run the program and scan the disk where the damaged file was stored.
All detected documents available for recovery will be displayed by the program in a separate window. The documents will have original titles. You will be able to view the contents of the documents and then restore the necessary files, simply by clicking the “Next” button.
How to repair a damaged Word document?
Let's say you tried to run a document file and saw the following error message.

This error already provides several recommendations from which you can understand what to do, for example, make sure that there is enough disk space, whether you have permission to use the document and edit it.
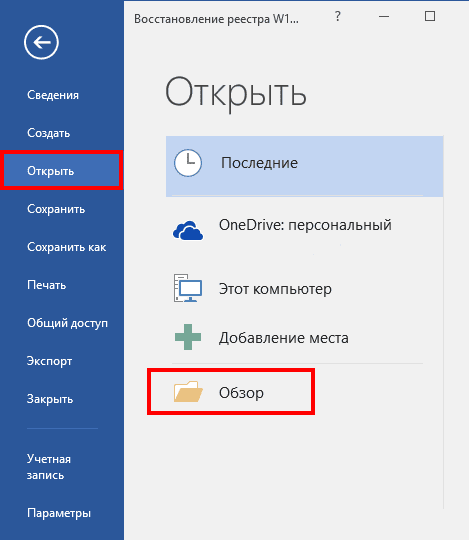
In this case, we can return the document using Word itself. Just open the icon of this program to start Word, and then go to the left to the item “Open” and select “Browse”.
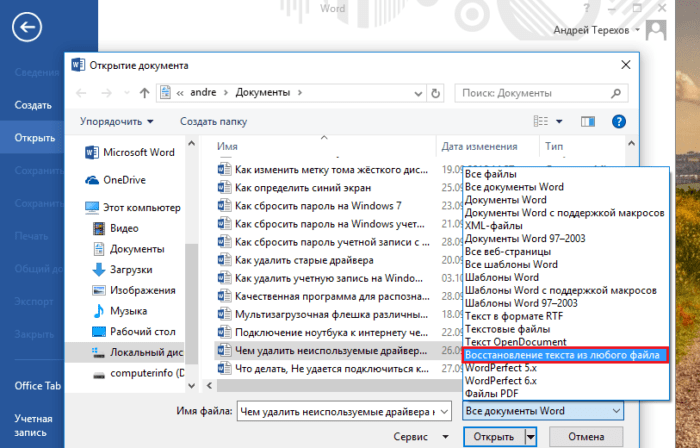
In the explorer that opens, look for the document you want to open, click on it once so that its name appears in the “File name” field. Then you select the item “Recover text from any file” from the drop-down menu and click “Open”.
If the document is very voluminous and you have applied many design styles, then it is not always successfully restored. Sometimes part of the text disappears, or there is text, but without formatting styles. The main thing, of course, is to restore the integrity of the document.
What are the types of damage?
Damaged Word documents behave unexpectedly. This can be caused by damage to the document itself or the template, which is taken as the basis for all other types of documents. Damage manifests itself in the following forms:
- Broken page numbering of the document.
- Repairing page breaks in a document.
- When opened, the document displays unreadable characters.
- Incorrect formatting and structure.
- PC freezes after launching the file.
- Critical application termination when trying to open content, or other unexpected behavior.
Advice! Unexpected document behavior may be due to other factors, such as damage to the Word program itself or Microsoft Office utilities, opening the document with an earlier version of Word, or virus infection of the operating system.
Forced repair of a damaged file with Microsoft Word
If the previous method doesn't work, Word might try to force the file fix. Click on the File menu, then click Open.
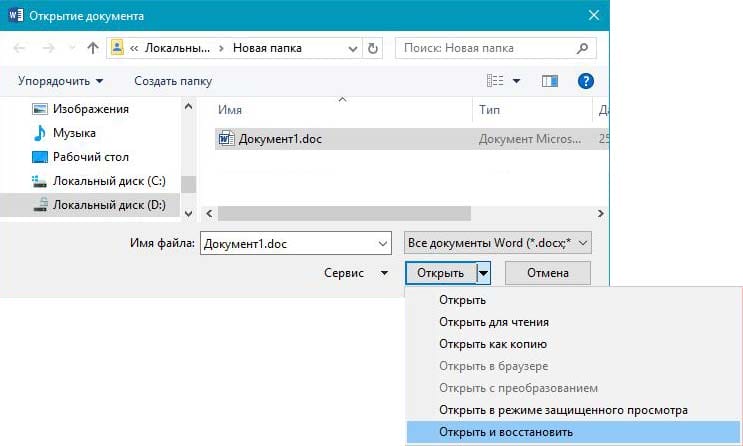
In the Open File dialog box, highlight your damaged file.
Click the arrow on the Open button, then point to Open and Fix.
Built-in recovery capabilities
By default, Word offers two possible ways to open a damaged document: Open and repair the file or Open with Text Recovery Converter. In addition to these two options, there are other ways to fix the file using only Microsoft resources – all of which are detailed in the support instructions. Be sure to try to open the file with all the suggested methods before moving on to work with extraneous tools – often standard tools are really enough.
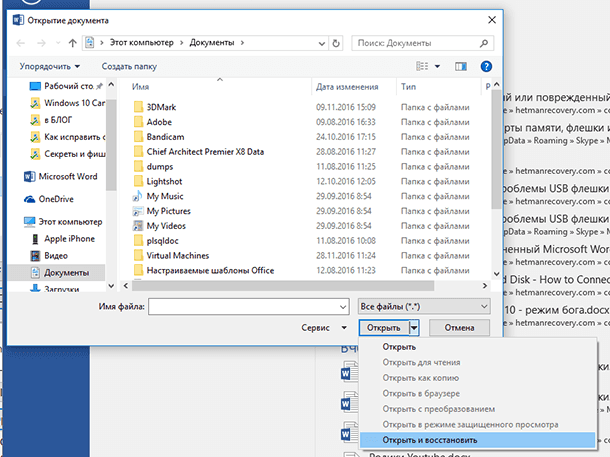
The standard recovery methods mentioned above can be implemented through the Open File dialog box. Click ” File “, then ” Open “, then click once on the file you want to restore. Do not try to open the required file by simply double-clicking on it, otherwise Windows will try to open it “as usual”, and you will receive an error message again.
Now, instead of clicking on the ” Open ” button, click on the black arrow located on the right side of the button. You will see many additional options, one of which will be Open and Restore. Word will try to repair the damaged document, and if you're lucky, you should be able to view the file.
The second built-in feature is Recovery Converter, which you can also access through the Open dialog box. In the drop-down list ” All Word documents ” select ” Recover text from any file “.
If neither of these two methods worked, you can try pasting the damaged document into another Word document. To do this, open a new file and click on the ” Insert ” tab .

Click Object and then select Object again from the drop-down list. Go to the Build From File tab and click the Browse button. Select the damaged Word file and see if you can paste the content into a new document.
Removing damaged content
For cropped documents that do not display all of the content, you can switch to another mode and delete the corrupted data. Determine the page where the file is being clipped and remember the content of that page. Then:
- Switch to Draft or Web Document mode.
- Scroll through the content to the point where it is clipped.
- Select and delete the next paragraph or object.
- Switch back to layout mode and check if the document is displayed in full.
- Delete content in this way until it is fully displayed in Page Layout mode.
- After the done manipulations, save the document.
Recovery using online services
The most convenient, simple and affordable online service is Online File Repair Service.

This online service can recover more than 10 different types of files, including corrupted Microsoft Word files. The online service works on all platforms (PCs, tablets, phones, etc.) and all operating systems (Windows, iOS, Android, MacOS).
How to recover Word file online
Recovering a Word file with an online service is a very simple operation, divided into several steps. The user needs:
- Select a file on disk / device;
- Type captcha characters;
- Enter email;
- Click the “Upload file for recovery” button;
- If the service was able to recover the Word file, then you can view the contents of the document, pay for the file recovery ($ 5) and download the recovered file.
Recovering an old version of a file via Dropbox
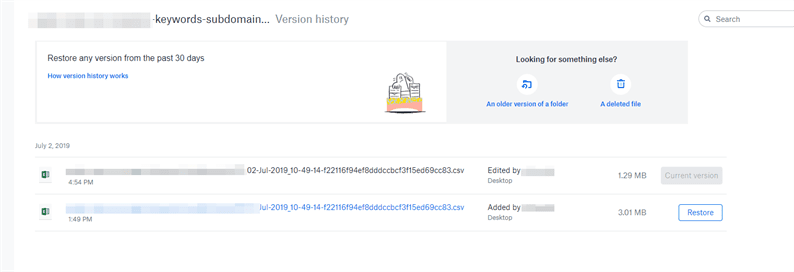
Dropbox users have a better chance of getting overwritten files back because the version history in the cloud is kept for a 30-day range.
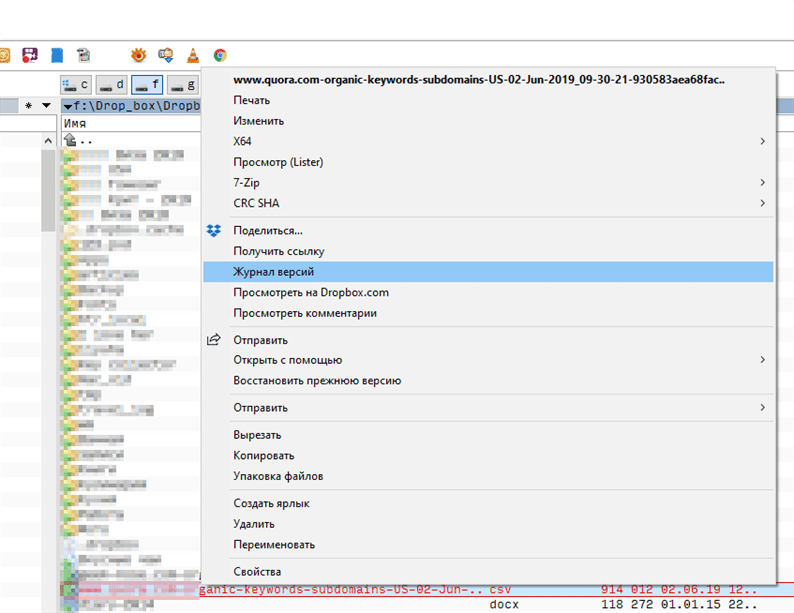
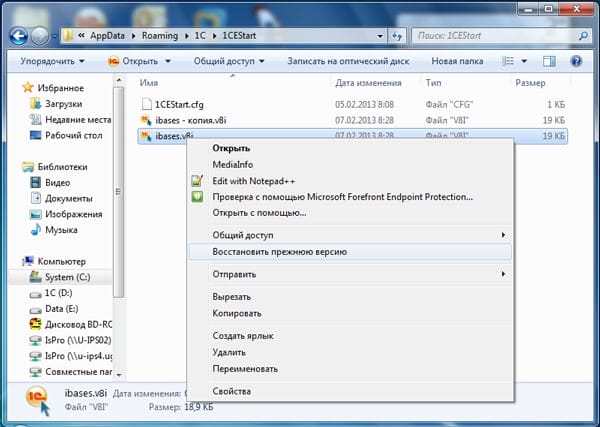
The Version history feature works natively in Dropbox and can be found through the context menu of a file or folder.
- Go to your Dropbox folder
- In the context menu of the file, select the “Version History” option.
![How to return an overwritten file to its original location (after saving). How to recover an overwritten Word file]()
- In the list that opens, select the required document, focusing on the modification date.
- Restore the document – the Restore command. (Be careful: the file will overwrite the current, i.e., newest, version of the file.)
![How to return an overwritten file to its original location (after saving). How to recover an overwritten Word file]()
It is enough to go to the service and select the version of the document. Alternatively, the same can be easily done through the file manager if you are using the Dropbox desktop app.
PhotoRec (on Windows, Mac and Linux)
-
![How to return an overwritten file to its original location (after saving). How to recover an overwritten Word file]()
one
Stop recording to the hard drive. If you notice that you have accidentally deleted a file or overwritten another file, do not save anything else to this hard drive. Don't run programs. If new data is written to the disk, it may interfere with the recovery of the deleted file. If you don't record anything new, your chances of a successful recovery will increase.
-
![How to return an overwritten file to its original location (after saving). How to recover an overwritten Word file]()
2
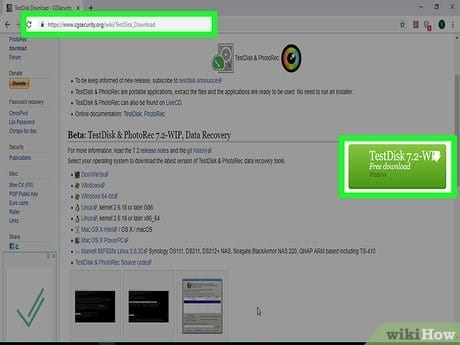
Download the free PhotoRec software on another computer or hard drive. It is a very effective freeware program. It is not very pretty, but it can do the same thing as more expensive recovery software. It can be downloaded completely free of charge from www.cgsecurity.org as part of the TestDisk utility.
- PhotoRec is available for Windows, OS X and Linux.
- Download the program to another hard drive so as not to overwrite the file that you want to recover. You can download PhotoRec to a different hard drive, but it's better to use a separate computer.
-
![How to return an overwritten file to its original location (after saving). How to recover an overwritten Word file]()
3
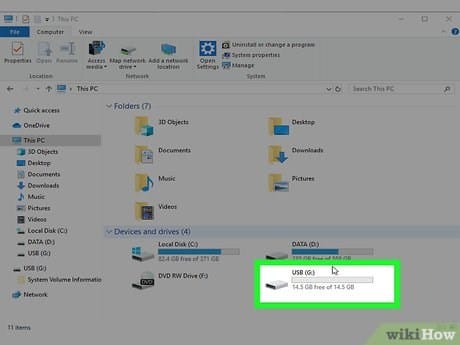
Insert a blank USB drive into your computer. It is best to use a storage device that has enough space for both the program and the files you want to recover. This is because restoring a file to the same disk on which it was damaged may overwrite the file, as a result of which it will not be restored correctly.
- PhotoRec is only 5 megabytes in size and will fit on any USB stick.
-
![How to return an overwritten file to its original location (after saving). How to recover an overwritten Word file]()
four
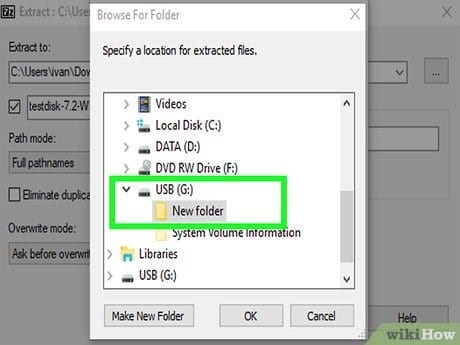
Unzip the downloaded file with the program. TestDisk will be in ZIP (Windows) or BZ2 (Mac) format. Unzip the TestDisk folder.
-
![How to return an overwritten file to its original location (after saving). How to recover an overwritten Word file]()
five
Copy the TestDisk folder to your flash drive. This will launch PhotoRec from the USB stick.
-
![How to return an overwritten file to its original location (after saving). How to recover an overwritten Word file]()
6
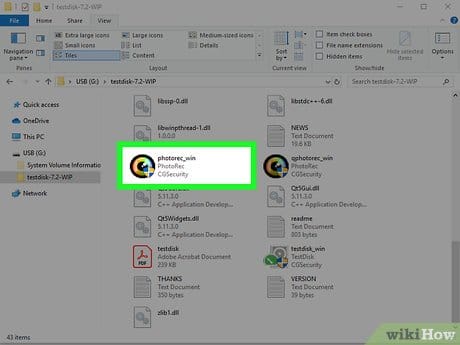
Insert the flash drive into the computer that contains the damaged file (or files). Open the TestDisk folder on the flash drive.
-
![How to return an overwritten file to its original location (after saving). How to recover an overwritten Word file]()
7
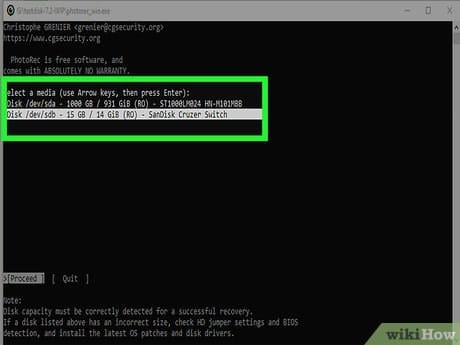
Start the PhotoRec program. The command line will appear on the screen.
- Navigate up, down, left and right with the arrow keys ↑ ↓ ← → and use the ↵ Enter and ⏎ Return buttons to make a selection.
-
![How to return an overwritten file to its original location (after saving). How to recover an overwritten Word file]()
eight
Select the drive where you want to recover the file. The drives will be simply numbered, so you will need to pay attention to their size to figure out which drive you want.
- If your hard drive has many partitions (for example, C: and D :), they will not be visible until you select the drive itself.
-
![How to return an overwritten file to its original location (after saving). How to recover an overwritten Word file]()
nine
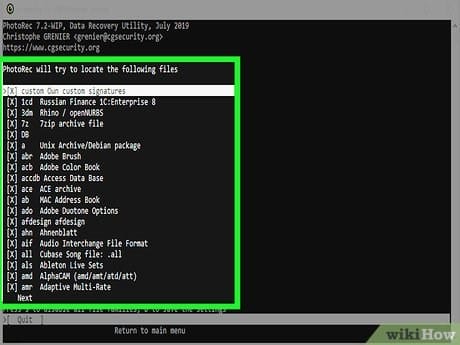
Select the type of file you want to search for. By default, PhotoRec will try to recover all files it supports. You can speed up the process by specifying which files you are interested in.
- You can change the file type in the File Opt menu.
- From the File Opt menu, deselect all files in the list by pressing S. Then go through the list and select the files you want.
-
![How to return an overwritten file to its original location (after saving). How to recover an overwritten Word file]()
10
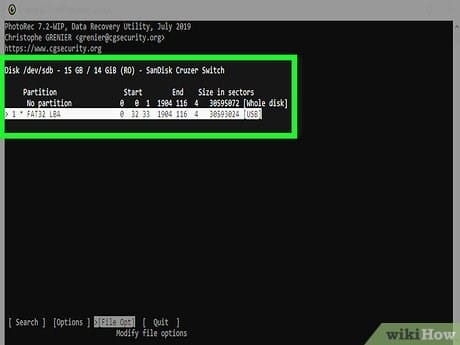
Select the desired disk partition. You will have to recognize the sections by size. Some of them may be signed.
-
![How to return an overwritten file to its original location (after saving). How to recover an overwritten Word file]()
eleven
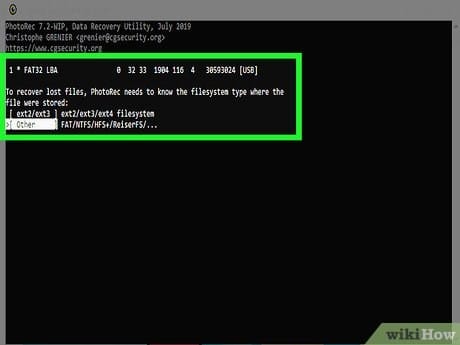
Select the file system type. If you are on Linux choose ext2 / ext3. If you are using Windows or OS X, select Other.
-
![How to return an overwritten file to its original location (after saving). How to recover an overwritten Word file]()
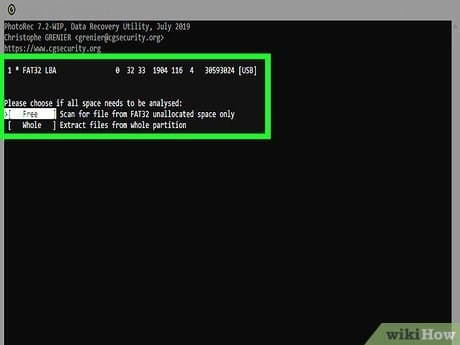
12
Decide where to find the file. Your choice may be determined by how the file was deleted:
- Free – Select this option if you have manually deleted the file or overwrote another file.
- Whole – select this option if the file was lost due to a hard disk error.
-
![How to return an overwritten file to its original location (after saving). How to recover an overwritten Word file]()
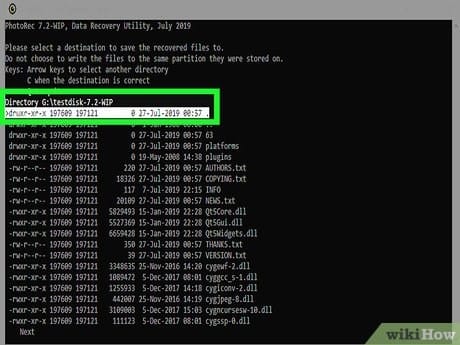
13
Select a location to write the recovered files. The files must not be on the same drive where they were deleted.
- To return to disks, use the menu .. at the top of the directory list. This will allow you to select a location on another drive or partition of your hard drive or USB stick.
- When you find the location you want, press C.
-
![How to return an overwritten file to its original location (after saving). How to recover an overwritten Word file]()
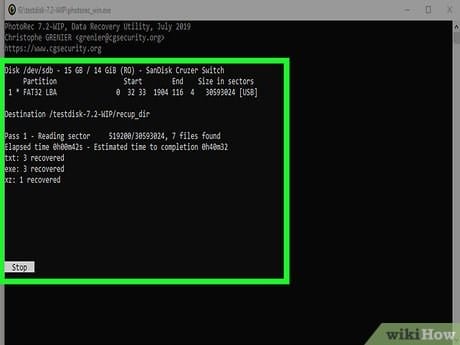
fourteen
Wait for the files to be restored. PhotoRec will try to recover all lost files at the location you specify. The execution time will be displayed along with the number of files recovered.
- It can take a long time to recover files, especially if the partition is very large or if you are looking for a large number of files of different types.
-
![How to return an overwritten file to its original location (after saving). How to recover an overwritten Word file]()
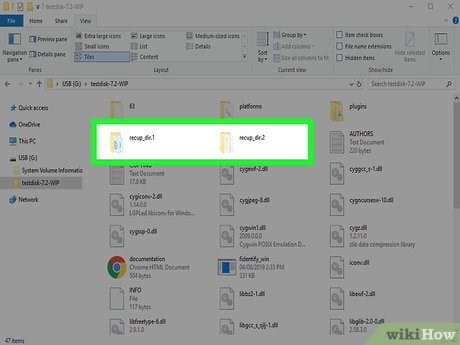
fifteen
Check the recovered files. When the scan is complete, see if the files have recovered. Most likely, the file names will be lost, so you will have to check each file to make sure that it is recovered.


Basket
The first thing to pay attention to is the basket. This is the utility that contains most of the files that we accidentally delete in one way or another. It not only contains them until the moment of complete erasure, but also protects in some way, not allowing you to immediately get rid of the file.
To restore a word file from the recycle bin, use the following instruction:
1. Open the Trash.
2. Right-click the deleted file and select Recover.
Done!
The file should now return to the directory it was removed from.
Bonus option – a program for recovering Word files
I myself have never been interested in third-party Word recovery programs, but they can help if none of the above methods helped. I can cite the Hetman Office Recovery program as an example. The utility, unfortunately, is paid, perhaps there are analogues that I will add to this article. To use Hetman Office Recovery, you just need to install it on your computer and check the disk for lost and damaged documents.
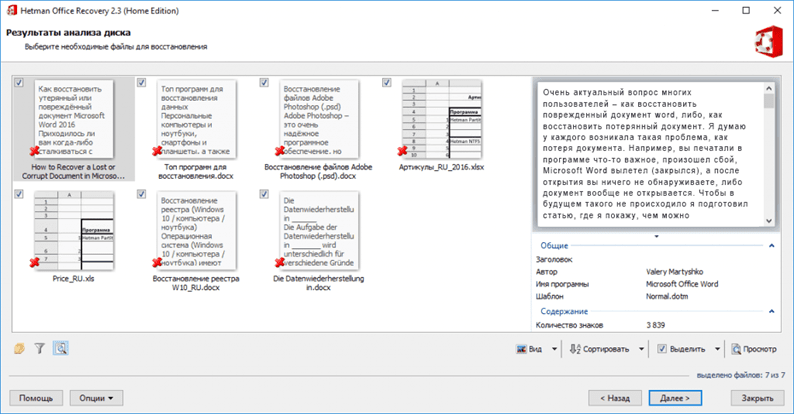
The program will find documents and show them in its window with real names. If you want to restore something, you select them with checkmarks, then the matter is small.
The File History utility in Windows gets its name from its ability to restore older versions of a file. This feature is part of all backup programs, although it is often referred to as “Restore”. Although the idea is the same: you check out the old version of the file from the backup archive. The File History function simplifies this process and the work with files in general.
In order to revert an old version of a file from a backup disk, you need to follow these steps.
- If you want to replace the current version with a new one: select Recover and then Replace File in Destination Application. The current file is overwritten with the backup.
- In order to save both the current version and the restored backup, you must click “Restore” and select “Restore to”. Select the target folder for the recovered file.
- To view the archived copy: click “Open”. The file has not been recovered, but you can view its contents to see if it contains the information you need.
4 Then click to close the Properties window when finished. If there are no previous versions, you will see the message “There are no previous versions available after step 2. This means that the file is new and has not been copied, that the file has not changed, or that a backup copy of this file does not exist. The File History utility is not a replacement for recovering a file from the Recycle Bin; if you delete a file, you need to restore it from the Recycle Bin.
File history only works with files in the folders that you selected when configuring the utility.
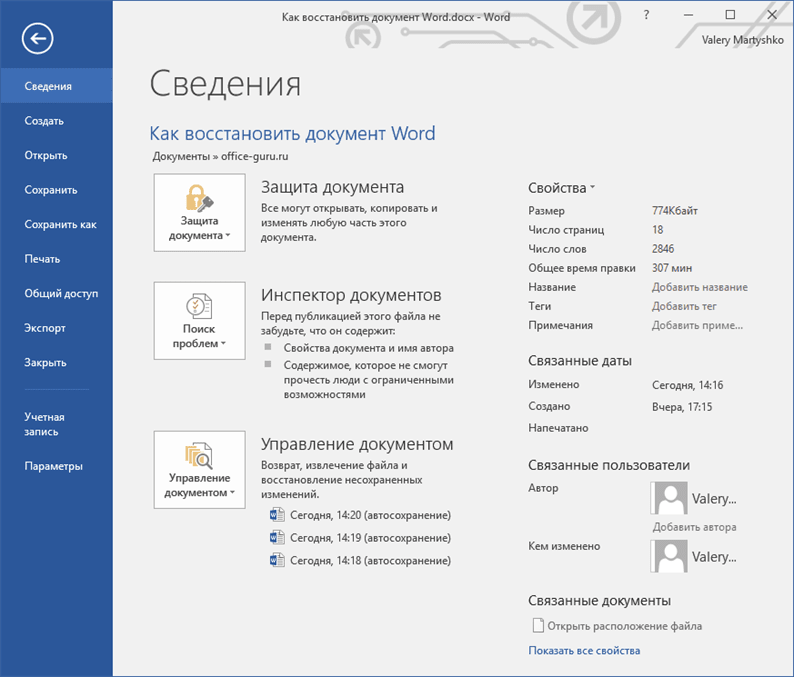
Autosaved copy
One of the remarkable features of the most popular text editor, which allows, in particular, to restore an unsaved Word document, is the automatic creation of backups of open documents at regular intervals. Typically, these copies are deleted at the end of the session, but in the event of an unexpected failure or power outage, the chances are high that the “draft” will remain on the hard disk.
Important: since the program creates copies solely based on time, a user who was able to restore a Word document in this way may find that there are no edits made – however, this is better than completely losing important data.
To recover and open a Word file that was damaged due to a system error or an unscheduled computer shutdown from a backup copy, you will have to:
-
Open the “Computer” menu and go to the C drive. Here – switch to the “View” tab
-
Expand the Show / Hide nested list.
-
And tick the two lower checkboxes: “File name extensions” and “Hidden items”.
-
Now, without leaving drive C, open sequentially the “Users” directories.
-
The account folder under which the Word document was created and edited.
-
AppData – this subdirectory is hidden, and the user who has neglected to perform the first three points will not advance further.
-
Microsoft.
-
И Word
-
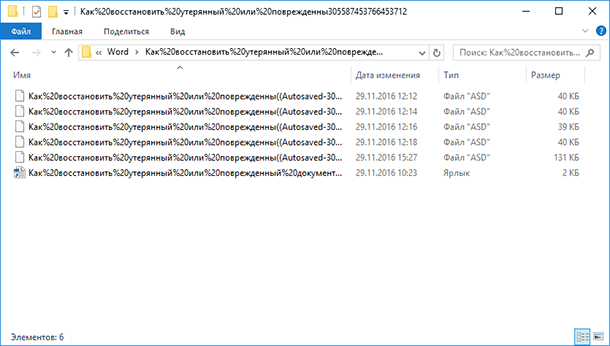
Here, the owner of a computer who wants to open a Word document that has been damaged will see a folder with the name of his file.
-
And opening it – a backup copy with the ASD extension. It can be opened in MS Word by double-clicking on the title.
-
Or, having previously changed the extension to DOC / DOCX – this is where a checkmark in the “File name extensions” checkbox comes in handy.
Important: you have to agree to change the extension; if desired, you can always return it to the original one.
Open file by link
The method is a little confusing, but it can be effective, again, everything will depend on the type of damage to the document. So, we create a document, add text to it, copy that text, then paste the special text into the new document as a link, and finally update this link to point to the damaged file, not the original one. Phew! Let's start.
First open a new Word document and type something like “Hello Word” and then save the document somewhere.
Now select the text you just typed and copy it to your clipboard. You can select it and press CTRL + C or just right-click on it and select Copy.
Then create a new Word document through the menu ” File ” – ” New “. Select a blank document if you like. Now click on the little arrow on the Paste button and select Paste Special.
Here you need to select ” Rich Text (RTF) ” or ” Unformatted Text “. It doesn't matter which one you choose. If you get any error message when you try to paste the link, close this new document, copy the text, and create a new document again.
See also: “Here and Now” Microsoft Word Document Recovery
The end is near … Right-click the link text that you just pasted into the document, select Linked Document Object, and then select Links.
Click the Links button and navigate to the directory where the damaged file is located. Select the file and click ” Open “.
After the link source is updated, click OK and hopefully the text from the damaged document will appear in place of the text you copied earlier. In my case, I got an error message and I was unable to open the corrupted file. However, my test file got corrupted in several ways and this could be the reason the text was not recovered. You should still try!
Tmp temp folder
As you may have noticed, method # 4 is not much different from method # 3. Nevertheless, regardless of their similarity, it is able to help restore not only the documents that this article affects, but also any other file, depending on your needs.
The path to the folder with temporary files is different for different versions of systems, so we will present several of them:
Windows 8 / 8.1 / 10: C: UsersAppDataLocalMicrosoftOfficeUnsavedFiles
Windows 7/XP: C:UsersnameAppDataRoamingMicrosoftWord
Now locate the temporary files of the Microsoft Word program. Usually their names start with ” $ ” and ” ~ ” characters with .TMP format at the end.
Save these files in a safe folder by changing the .TMP format to .DOC or .DOCX.
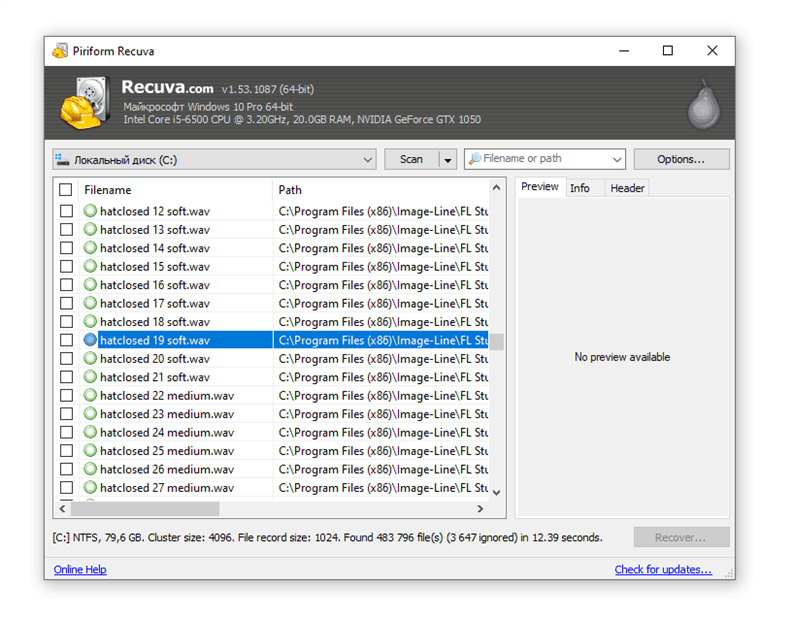
Recovering overwritten files with Recuva
If the listed methods did not work (or the quality of the restoration did not suit you), turn to a more universal method. Of course, in the case of overwriting a file, there are very few chances, but you should not miss them.
A few tips:
- To avoid overwriting files again, install the program to another disk or storage medium; do not save the recovery results to the same disk from which the data was deleted.
- Try different scan modes, use Deep scan function for in-depth analysis of deleted files. The search will take longer – but there will be more results.
- Check out different folders. The files may have been stored on other sources of information.
Recuva has quite decent (and also free) analogs: PhotoRec, TestDisk, DiskDigger. They differ little in interface, but there are some differences in scanning methods. However, the miracle is unlikely to happen if the files were indeed overwritten and critical information destroyed.
Double conversion
Let's convert the file to a different format, and then return to the previous state:
- Go to “Word” → Open → Browse → select the damaged file and click “Open”
- Click File → Save As → Select the type of file you want to save as RTF Type (.rtf).
- Close the file and open it again. Similarly, convert it back to Word Document (.docx).
Advice! If the problem persists, you can try converting to other formats. When converting to text format .txt, all pictures, diagrams and formatting are lost. Remember this.
Restore a previous version
If you had system protection enabled, then you can quickly restore the previous version through the properties. First, make sure that system protection is activated and Windows automatically creates backups from which you can restore data:
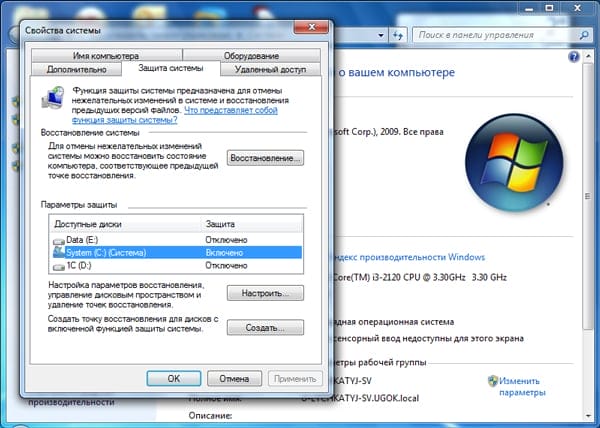 If protection is disabled, activate it for the future, so that if necessary, you can quickly return the previous version of the data. How it works in practice:
You just have to select the desired file by the date of modification and click “OK” to restore it. The lack of data backups can be attributed to several reasons:
- The “System Protection” function is disabled.
- You are trying to restore system data that contains user or system information (it is not backed up by default).
- No changes were made to the file or folder.
- The backup data has been deleted as part of the temporary data by CCleaner or other cleaning utility.
Remember that backups are not kept forever: they are constantly updated, old data is erased, replaced by new information. Therefore, it will be possible to restore only the version of the file that was saved recently. To be sure that the backup is saved, set up data archiving using the built-in Backup and Restore tool.
Software
But theoretically anything can be brought back to life, although no one will give a 100% guarantee. Files of different formats – photos, videos, music, text documents of other editors – are likely to be returned to the car or removable media using special software, which must first be installed.
Recovering overwritten data
If system protection has been turned off, then you have another chance to return the replaced file – use the universal HEX editor WinHex, which examines and modifies all types of data, restoring erased or replaced information.
The program can be installed or run in portable mode. If the replaced file was stored on the hard disk, then it is recommended to use the portable version of the editor, since when installed, new data will be written to the hard drive, which can overwrite the necessary information, which will prevent it from being restored.
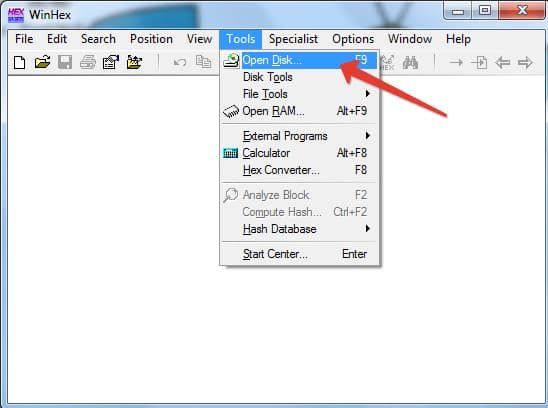
- Start WinHex. Expand the Tools menu and click Open Disk.
![How to return an overwritten file to its original location (after saving). How to recover an overwritten Word file]()
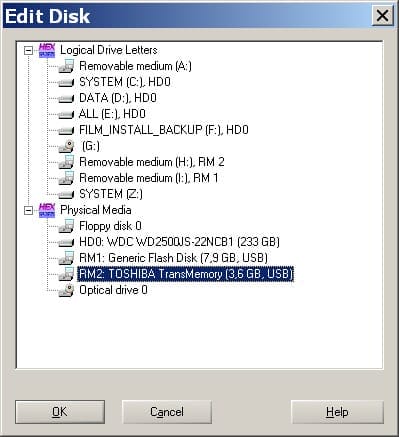
- Select the drive where the replaced data was stored. If you are going to restore information on a USB flash drive, select it in the “Physical Media” section.
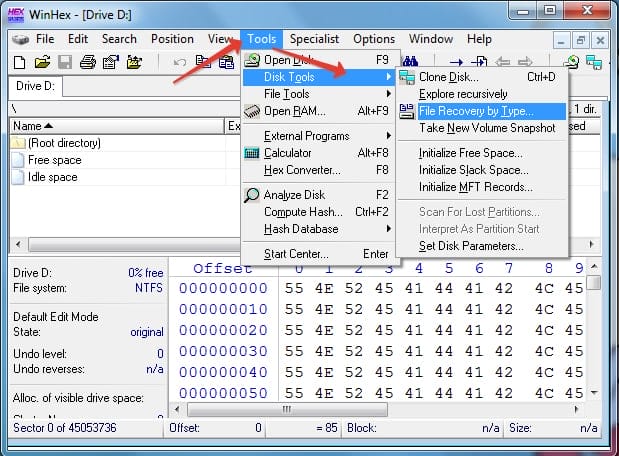
- After opening the drive, its contents will appear in the program window in the form of hexadecimal codes. Expand the Tools menu, hover over the Disk Tools section and launch the File Recovery By Type tool.
![How to return an overwritten file to its original location (after saving). How to recover an overwritten Word file]()
- A window will appear warning that the information needs to be restored to a different disk, and not to the drive where it was replaced. Click OK.
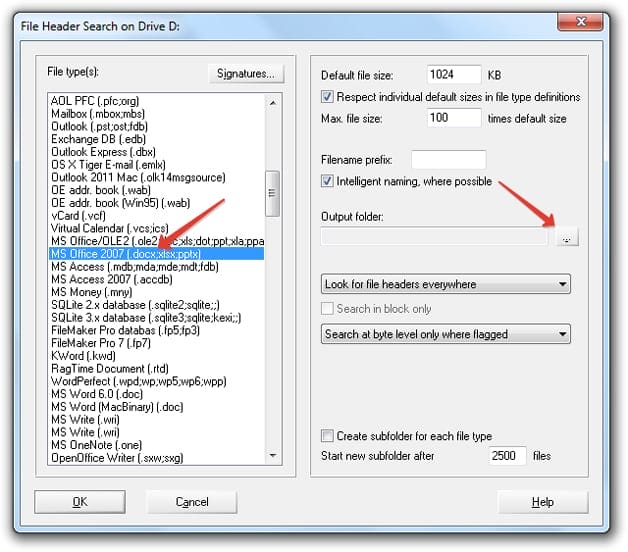
- Select the file format that has been replaced with the new data. If it is a Word document, choose MS Office / OLE2 or MS Office 2007, if the picture is JPEG, PNG, or GIF depending on the extension.
![How to return an overwritten file to its original location (after saving). How to recover an overwritten Word file]()
- Click the “Output folder” button and select the folder where you want to save the recovered data. The folder must be on a different drive, and not on the one from which you are recovering.
- Click OK to scan your drive and search for files.
After the restoration is complete, go to the folder, the path to which you indicated by clicking the “Output folder” button. Inside you will see all the data that could be recovered. The names of the files will be replaced with numerical values, so you will have to search for a document or picture by content. If the program finds several versions of a file, it will restore all of them. Select the appropriate file and transfer it to another folder so as not to lose it.
Surely, many Microsoft Word users have faced the following problem: you type calm text, edit it, format it, perform a number of necessary manipulations, when suddenly the program gives an error, the computer freezes, restarts, or the light just turns off. What to do if you forgot to save the file in time, how to restore a Word document if you have not saved it?
There are at least two ways that you can restore an unsaved Word document. Both of them boil down to the standard features of the program itself and the Windows OS in general. However, it is much better to prevent such unpleasant situations than to deal with their consequences, and for this you need to configure the autosave function in the program for a minimum period of time.
So, if you are the victim of a system crash, a bug in a program, or a sudden shutdown of a working machine, don't panic. Microsoft Word is smart enough, so it backs up the document you're working with on its own. The time interval with which this happens depends on the autosave settings set in the program.
In any case, for whatever reason you have not disconnected Word, when you reopen it, the text editor will offer to restore the last backup copy of the document from a folder on the system drive.
1 Start Microsoft Word.
2 On the left, the “Document Recovery” window will appear, in which one or several backup copies of “emergency” closed documents will be presented.
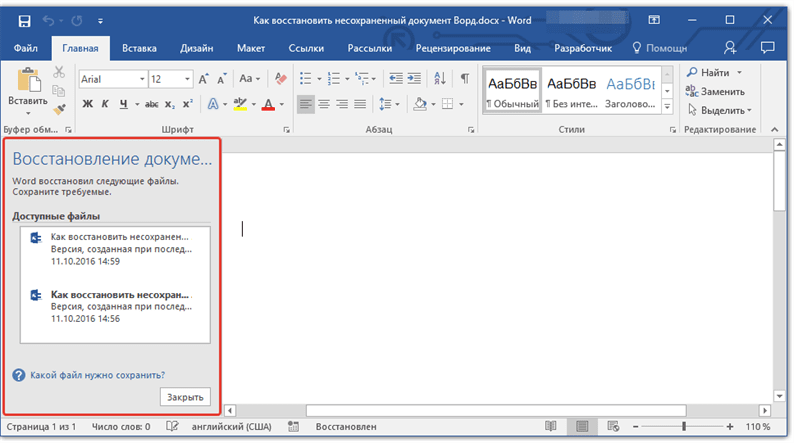
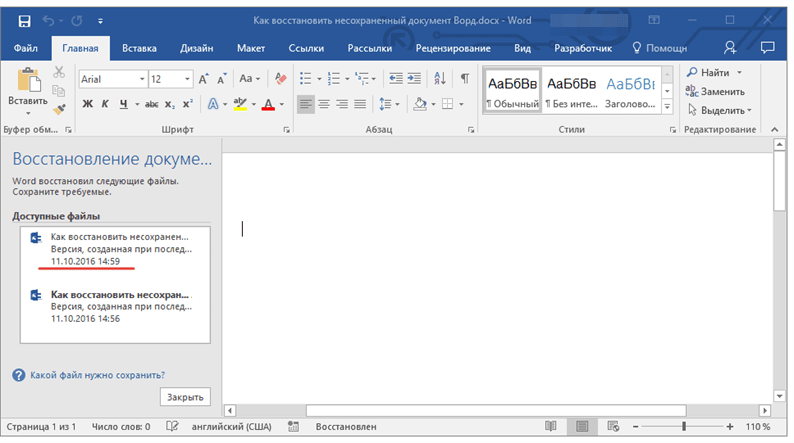
3 Based on the date and time indicated in the bottom line (under the file name), select the most recent version of the document that you need to recover.
4 The document you selected will open in a new window, re-save it to a convenient location on your hard drive to continue working. The “Document Recovery” window in this file will be closed.

Note: It is likely that the document will not be fully recovered. As mentioned above, the frequency of creating a backup depends on the autosave settings. If the period of time is minimal (1 minute) – great, then you will lose nothing or practically nothing. If it is 10 minutes, or even more, plus you also type quickly, you will have to retype a certain part of the text. But this is much better than nothing, agree?
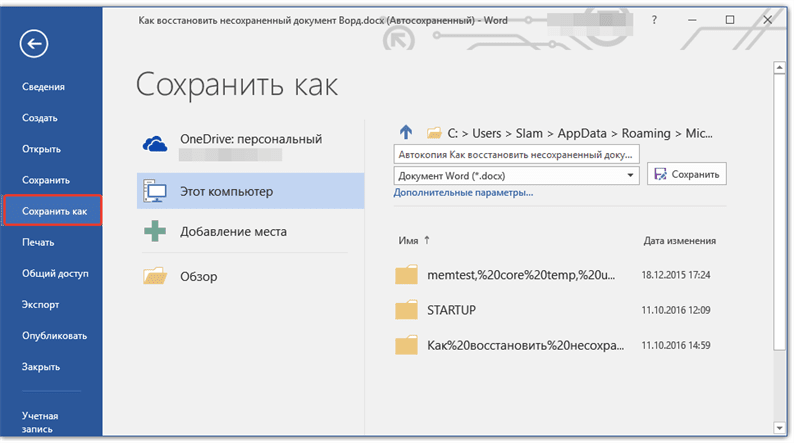
After you save a backup copy of the document, you can close the file you opened first.
How do I restore a Word backup?
Sometimes a file can get lost, you cannot find it anywhere. In this case, the program usually creates backup copies of the document, in order to open it you need to proceed as follows:
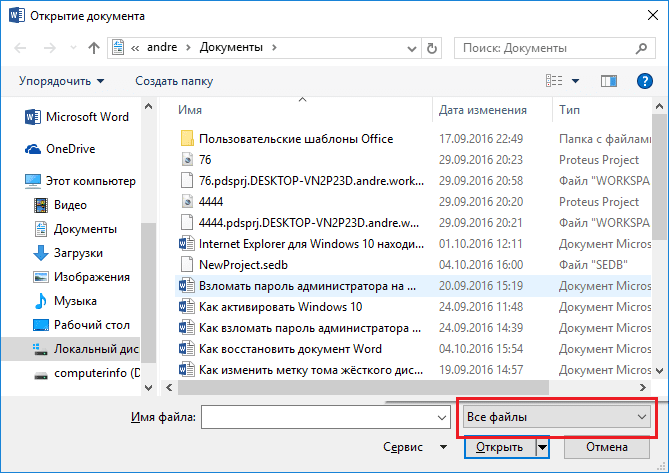
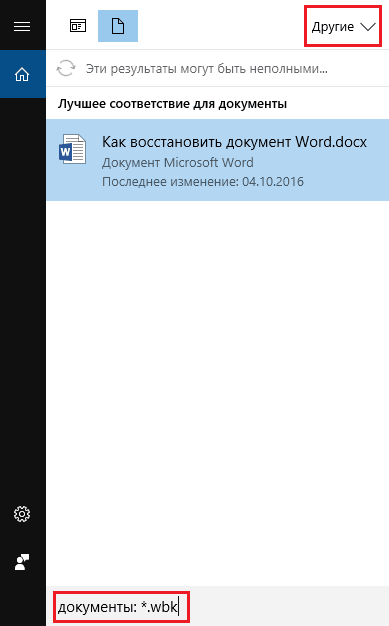
Open Word and go to the “Open” section, then click on “Browse”. Remember where you saved the document and navigate to that folder. In the pop-up tab, select “All files”, look for the lost document. Focus on the name and date. Sometimes such a document may be called “Backup …”.
In case of failure, you can go the other way. Open the search box in Windows and enter the extension of the backup copy of Word files – * .wbk. It is more likely that such a file will open, but the point is that there may be more than one and the names may not match, so you will have to open and watch each one.
Canceling the previous operation
When editing or making edits to Word documents, some users prefer to use Ctrl + Z or the undo arrow to undo the previous operation. This is a very convenient way to revert a document to its previous state. But this method has a limited number of undo operations. Therefore, restoring the last saved version of a file will be the preferred recovery method.
Advanced Document Recovery Tool Starus Office Recovery
Another way to recover Microsoft Office documents is the Starus Office Recovery application. This program combines the best features of Starus Word Recovery and Starus Excel Recovery, making it a versatile software that will allow you to recover any type of file.
To recover documents, use the following simple instructions:
1. Start the application.
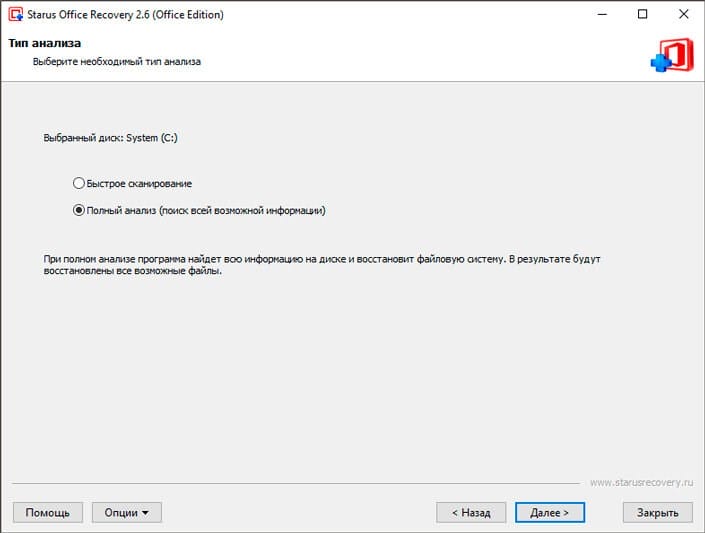
2. Select the drive you want to scan.
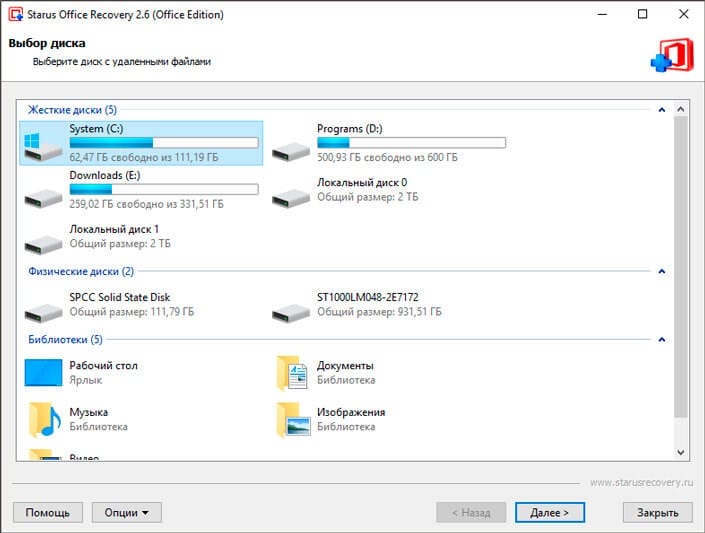
3. Select the type of analysis.
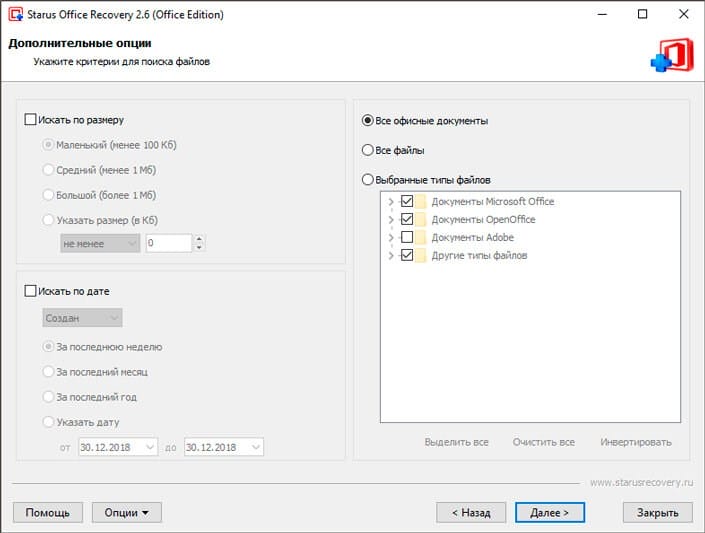
4. If necessary, specify the criteria for searching for files.
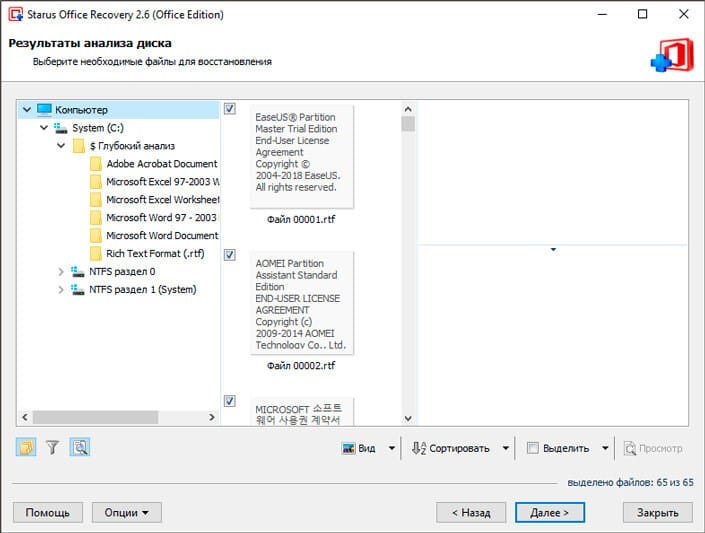
5. Wait for the scan to complete.
6. Select the files you want to recover and click Next.
7. Select the type of export.
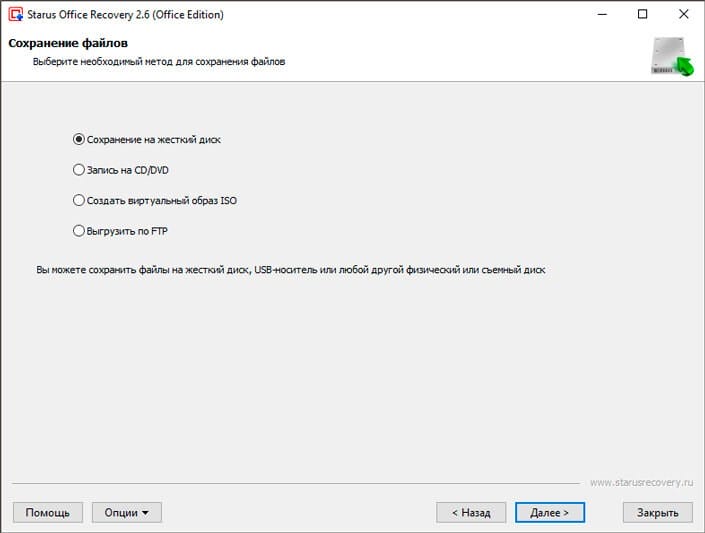
8. Specify the recovery path and complete the process.
Note:
Under no circumstances should you export data to the drive you are recovering from. Such an action can lead to permanent loss of files without the possibility of their further recovery.
Remember, any file can be restored and you can return it as soon as possible, if you do not make a simple mistake – writing new data before you have time to return the old one. Following this rule will ensure the success of all the recovery processes you run.
Changing the template
Relevant if you switched to a new version of Microsoft Office, and all old documents are damaged. First, determine which template is being used:
- Open Word, on the File menu, click Options.
- Select “Add-ins”, from the bottom in “Manage” select “Word Add-ins” and click “Go”.
- If “Normal” is displayed in the “Document Template” field, follow the instructions further, if another template, go to step 9.
- Close Word to rename the template.
- Go to Explorer and write the command in the line:
- Turn on the File Name Extension feature.
- Right-click on the Normal.dotm template, select “Rename” and change the name to Oldword.old.
- Start Word, open the damaged file and check it.
- If a different template is displayed, click Attach and select Normal.dotm.
- Restart Word and check if the damaged file is working.
If the document method didn't work, try resetting the options to their defaults.
The sequence of file recovery in Windows 10:
- Right-click on the file;
- Select “properties” in the drop-down context menu;

- Open the “Previous Versions” tab;
- Select the version of the file you want to restore.
![How to return an overwritten file to its original location (after saving). How to recover an overwritten Word file]()
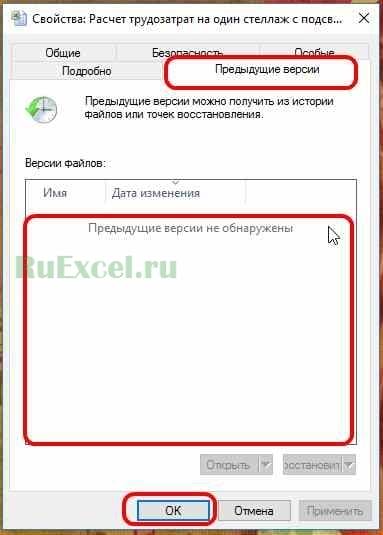
If the versions of the file are not displayed, as shown in the figure, then this means that your computer does not save the history of file changes.
The option to save file history appeared in Windows 8 and continues to exist to this day.
How to enable saving file history in Windows 10 so that you do not lose important information in the future.
Step 1. Open the control panel. You can open the control panel by typing the phrase “control panel” in the address bar and pressing the “Enter” button.
Step 2. Enter the menu “Saving backup copies of files using file history”;
Step 3. Press the “Enable” button;
Step 4. In the additional parameters tab, you can specify the frequency of saving and the duration of storing files on the PC;
Step 5. Now, when you change files on your PC, a backup copy of them will be saved.
Draft mode
If the Word file is damaged thoroughly and you cannot open it using the previously described methods, you will have to sacrifice a number of data, in particular – attached images. The user will need:
-
Start Word, go to the File menu, and then to the Options section.
-
In the window that opens, switch to the “Advanced” tab.
-
Scroll down the page and, reaching the “Show document content” section, check the box “Show overlapping picture frames”.
-
Here, in the “General” section, uncheck the “Automatically update links when opened” checkbox – this will allow Word to access directly the contents of the file, which is damaged.
-
And activate the option “Allow document opening in draft mode”.
-
That's all – it remains to click on “OK” and try to open the Word file again; usually this recovery method works better than the first.
Find and recover temporary autosave files
If you did not find a backup in the document folder, you can check the autosave files that are created every 10 minutes while working with any Word document. They can be located in different locations, depending on the version of the operating system and Microsoft Office.
- До Windows Vista:
“C: Documents and SettingsApplication DataMicrosoftWord”
“C: Documents and SettingsLocal SettingsTemp” - On Windows 7 and Vista the files are located:
“C: UsersAppDataLocalMicrosoftWord”
“C: UsersAppDataLocalTemp” - On Windows 10 I found the files here:
“C: UsersAppDataRoamingMicrosoftWord”
In the examples below, the characters “xxxx” replace numbers:
- The Word document will look like this: ~ wrdxxxx.tmp
- The temporary document will look like this: ~ wrfxxxx.tmp
- Automatic file recovery will look like wraxxxx.tmp or will be called “Auto-save” with the expansion of ASD.
- The backup copy of the saved file has the WBK extension .
If you cannot find the folders where temporary files, autosave files, or the document itself are stored, use Windows search. You can also use our programs to find and recover documents deleted by mistake after reinstalling Windows, formatting disks. If you cannot restore the file to its location, analyze the entire disk and check the folders where temporary backup files and autosave files are stored.
Word with default options
A fix from Microsoft will allow you to set the original default settings. Go to the site, download and run it. Then follow the prompts of the assistant.
Advice! If you open a file with unreadable characters, there may be an encoding problem. Follow the recommendations for elimination.
Conclusion
Using one of the above methods will most likely give a positive result and will allow you to recover data from a damaged Microsoft Word file. You must first use the easiest method (recovery using Microsoft Word), as in most cases this is sufficient.
Used sources and useful links on the topic: https://recovery-software.ru/blog/repair-corrupted-word-document.html https://pomogaemkompu.temaretik.com/1132446126056409349/kak-vosstanovit-dokument-word-kotoryj -povrezhden-ili-poteryan / https://geekon.media/vosstanovlenie-povrezhdennogo-fajla-word/ https://HetmanRecovery.com/en/recovery_news/how-to-recover-lost-or-damaged-document-in -microsoft-word-2016.htm https://AppleInsider.ru/promo/3-sposoba-vosstanovit-povrezhdennyj-fajl-microsoft-word.html https://softdroid.net/kak-vernut-perezapisannyy-dokument-na -prezhnee-mesto https://ru.wikihow.com/%D0%B2%D0%BE%D1%81%D1%81%D1%82%D0%B0%D0%BD%D0%BE%D0%B2%D0%B8%D1%82%D1%8C-%D0%BF%D0%B5%D1%80%D0%B5%D0%B7%D0%B0%D0%BF%D0%B8%D1%81%D0%B0%D0%BD%D0%BD%D1%8B%D0%B5-%D1%84%D0%B0%D0%B9%D0%BB%D1%8B https://zen.yandex.ru/media/starusrecovery/kak-vosstanovit-dokumenty-docx-doc-microsoft-word-5c5abdac2aac0e00ad1eca81 https://mupbv.ru/kak-vosstanovit-predydushchuyu-versiyu-faila-vord-kak-vernut-failu.html https://konekto.ru/kak-vosstanovit-povrezhdjonnyj-fajl-word.html https://itswat.ru/recover-text-document/ https://office-guru.ru/word/kak-vosstanovit-dokument-word-162.html https://i-fix-it.ru/kak-vosstanovit-predydushhuyu-versiyu-fajla-word/
Post source: lastici.ru