DIY organizer: Original ideas. DIY storage boxes: simple master classes
Storage ideas: organizers for every occasion and taste
DIY stationery organizer
Clutter on your desktop should never be allowed. This is very distracting from work and interferes with concentration. We suggest you get rid of this problem once and for all by making an organizer that suits you.
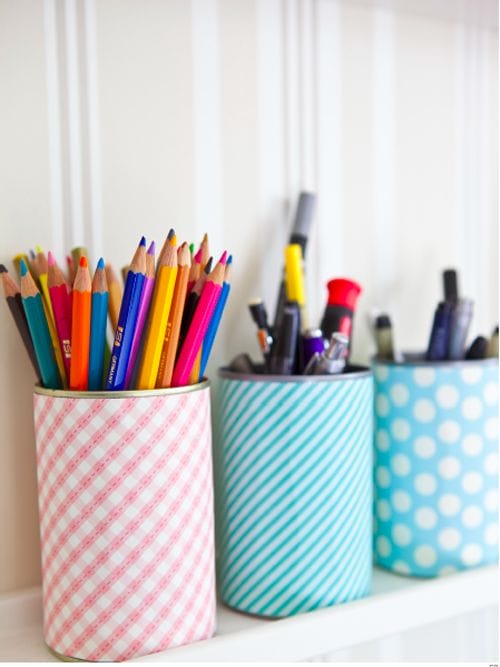
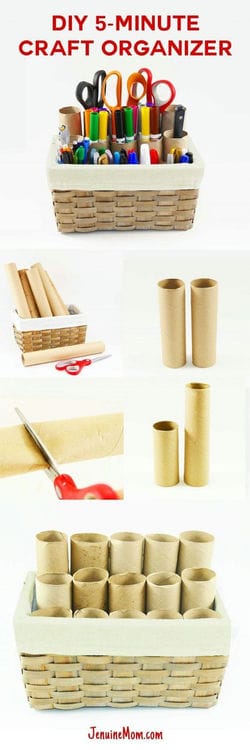
To create interesting and unusual organizers, it is not at all necessary to have too expensive materials. The photo shows a great option for using unnecessary iron cans after processing.
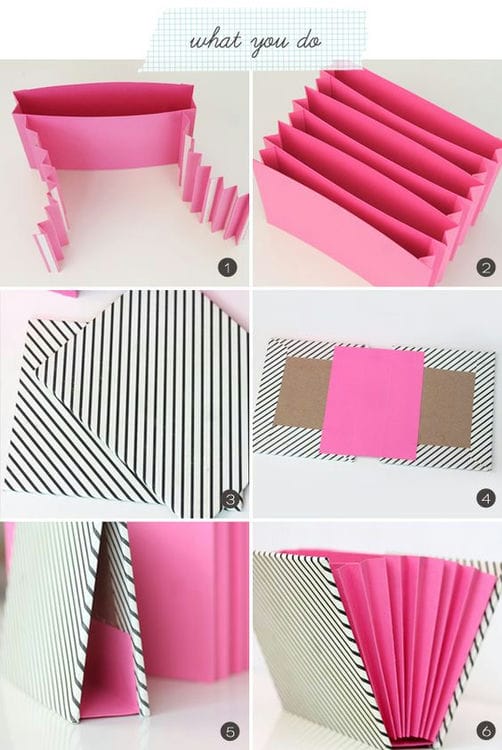
Documents can also be stored in a non-trivial folder. Try to do something really beautiful that will delight you every day.
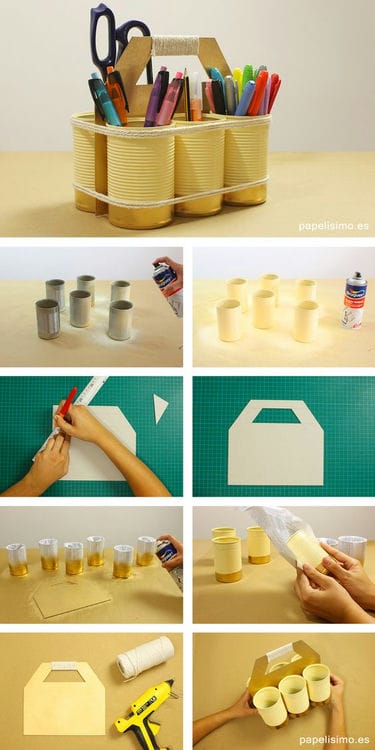
Another way to create an original office organizer. Just use paper sleeves.
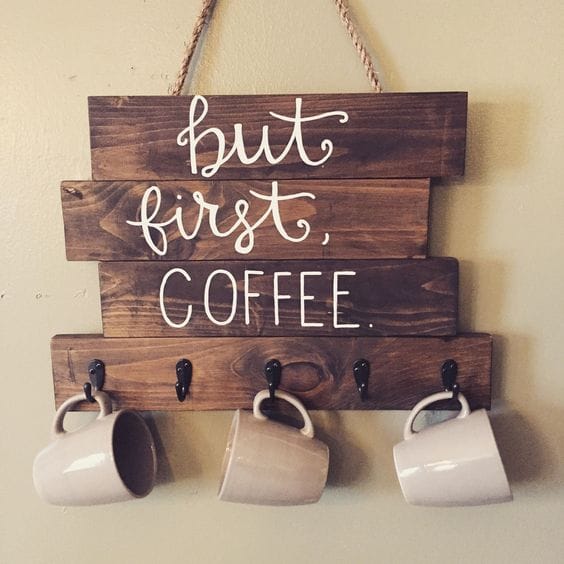
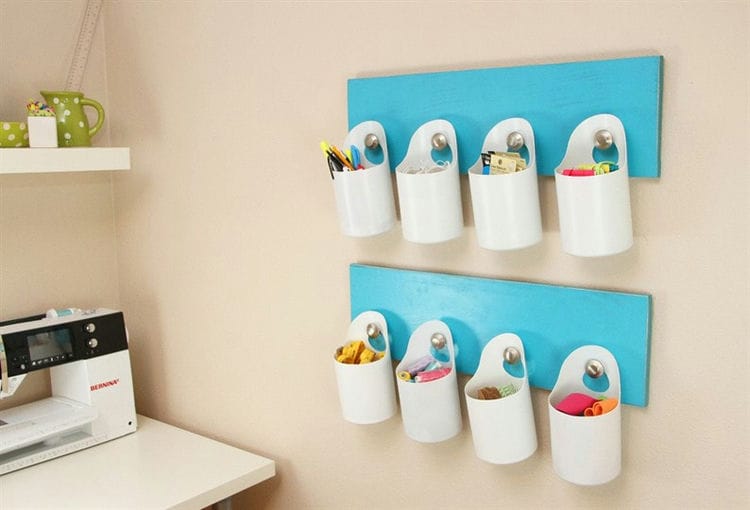
Organizer for cups
Cups are a must-have item in every apartment. Tea drinking is a special ritual in many families. And most of humanity cannot do without coffee in the morning. But despite such a great need for cups, it is extremely rare for them to be allocated a permanent place. Therefore, an organizer would be an excellent option.
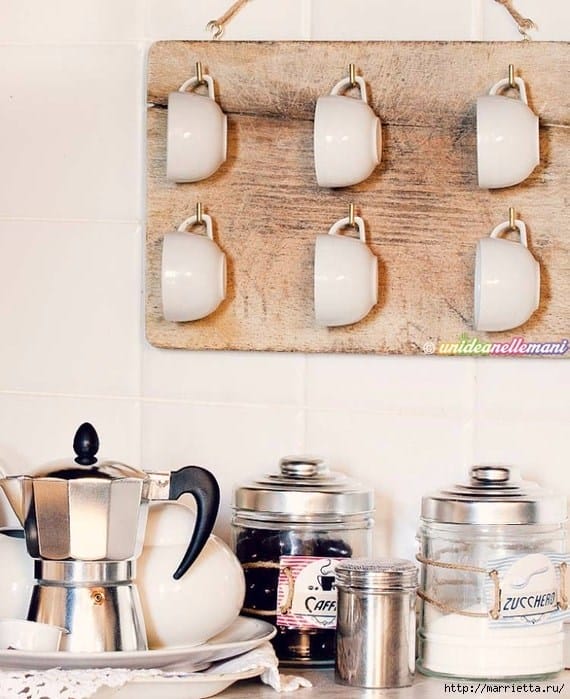
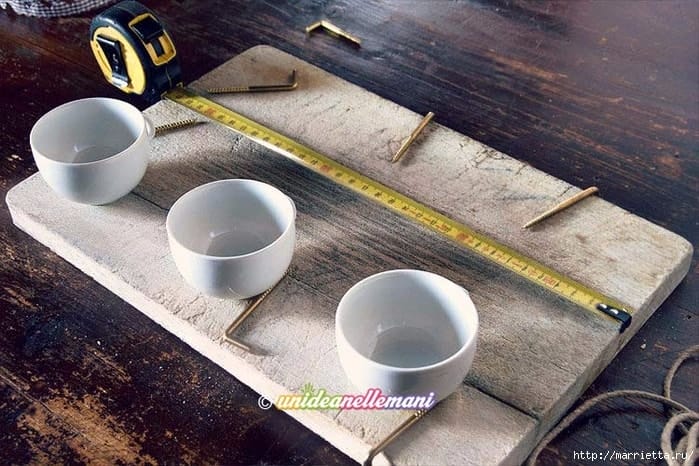
Such an item not only performs a useful function, but also looks great as a decorative element.
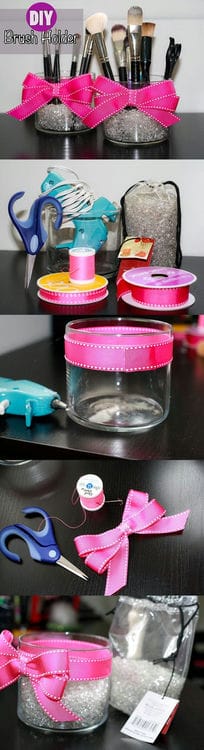
Organizer for cosmetics
Almost every girl has a lot of makeup. But how not to get lost in this variety and quickly find the right thing in the morning? If you are familiar with this problem, then organizer is the perfect solution.
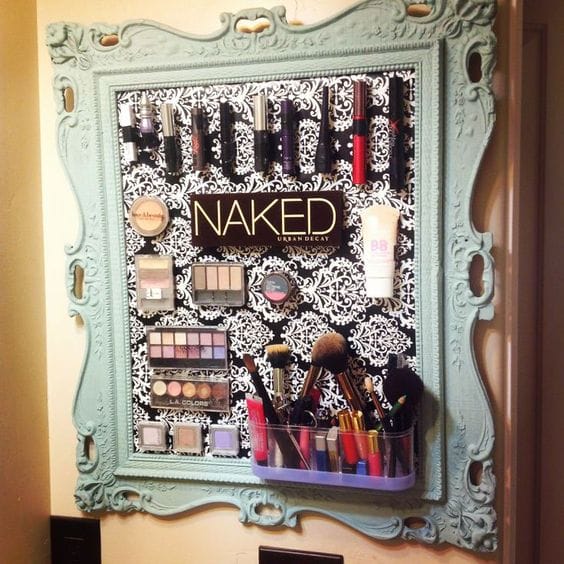
By the way, in 2017 magnetic boards became very fashionable. They are used literally for everything, including cosmetics.
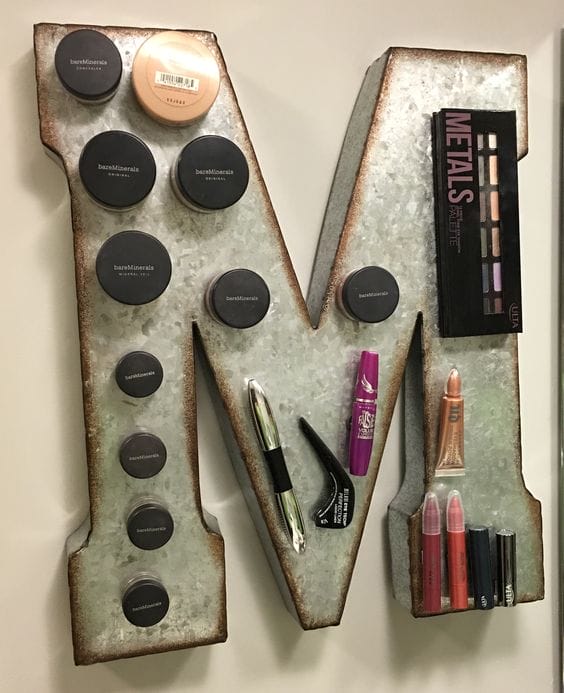
Such a board in an unusual shape looks interesting. For example, in the form of the first letter of your name.
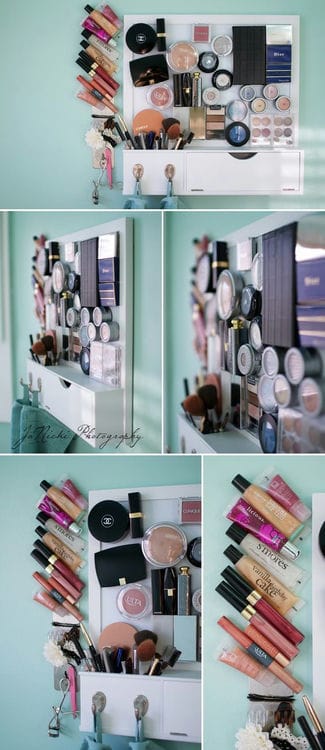
For brushes, you can create another organizer from a clear container. Thanks to the additional decoration in the form of beads, they will have a stable position.
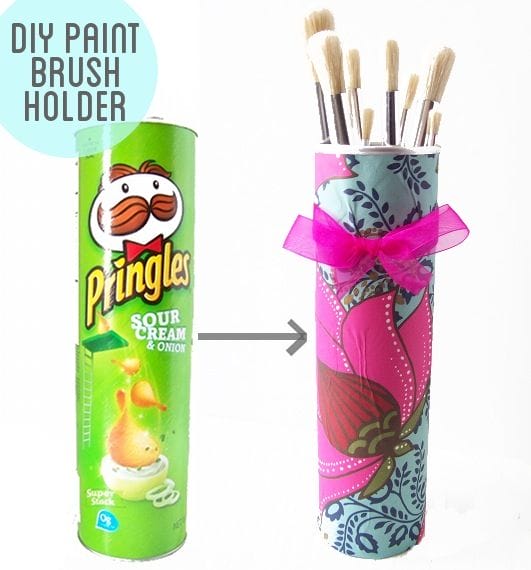
Another budget option is to use chip packaging as a base. Minimal décor will help give it an attractive look. By the way, you can even store paint brushes in such an organizer.
Organizer for accessories
Since childhood, every girl has many different hair accessories. To make them always at hand and look attractive, we recommend making a special organizer.
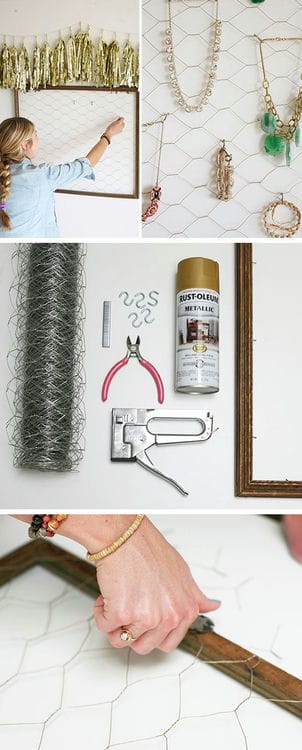
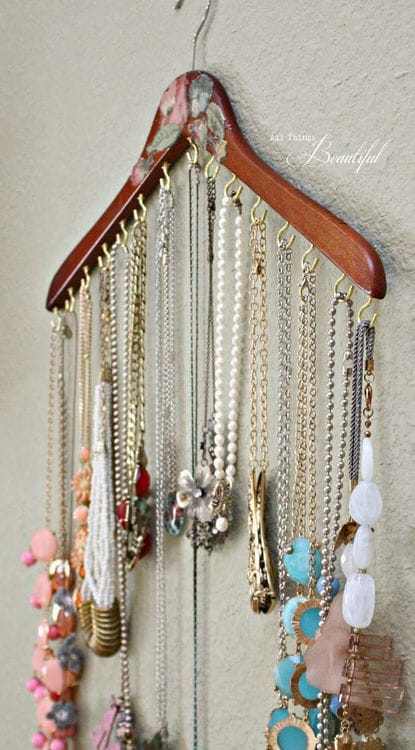
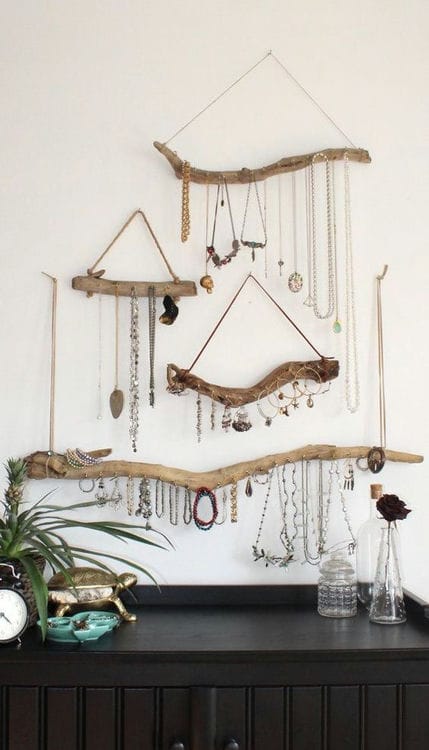
As for organizing jewelry, we offer you some great ideas in the photo. Maybe it is among them that you will find a suitable option for yourself.
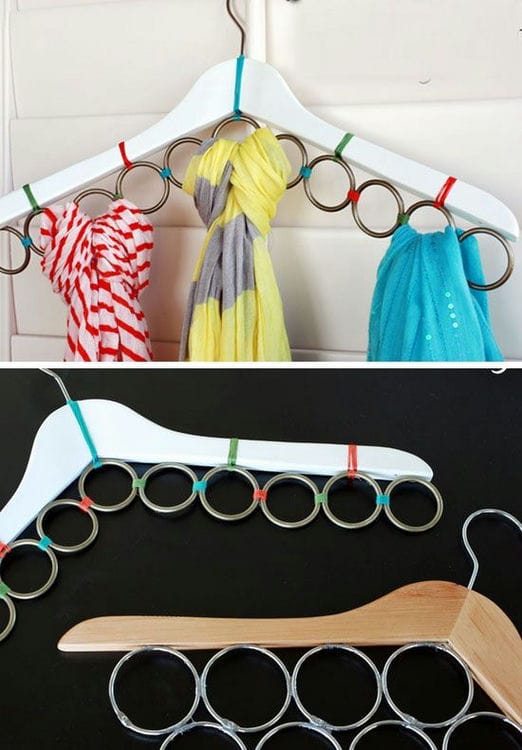
Even if you don't have frames or cardboard at home, you can use a coat hanger. This organizer looks very original.
For creative and creative people – a stunningly stylish jewelry organizer. Rest assured that it will decorate any room.
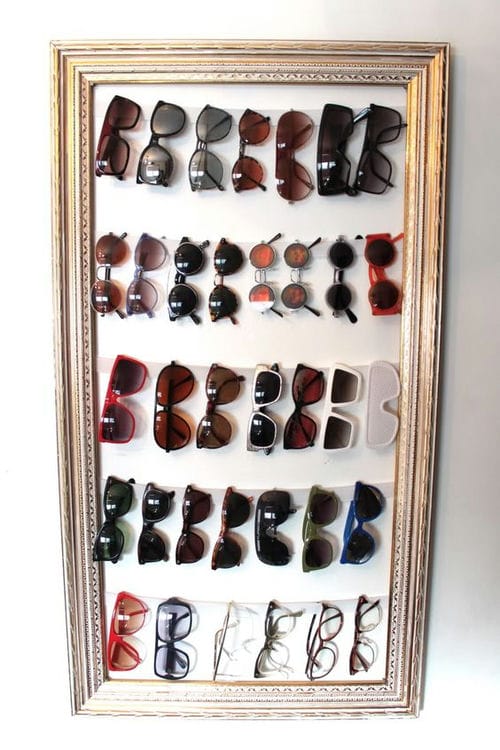
Glasses are an integral part of every girl's image. Apart from eye protection, it is they who make the bow complete. Agree, such accessories should definitely have a beautiful storage space. A vivid example in the photo.
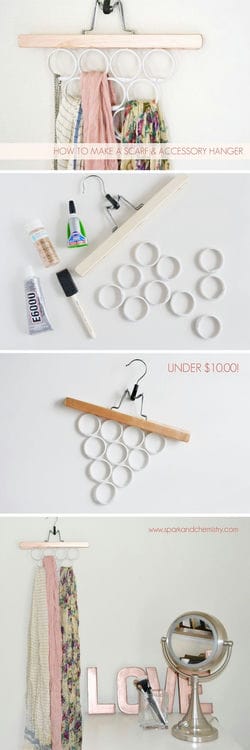
Many girls love scarves, but still they have one drawback – the fabric often wrinkles quickly. To avoid this, we recommend making a simple organizer that allows you to store them upright.
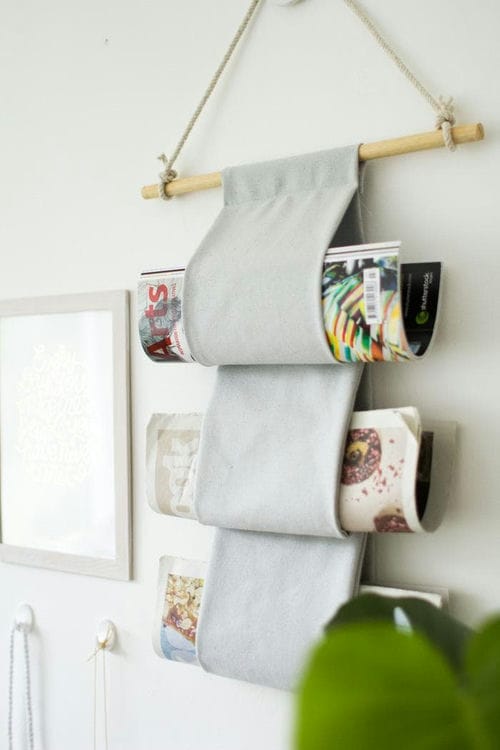
Wall organizer for magazines
If you like to read not only books, but also newspapers or magazines, then a wall organizer for them is what you need.
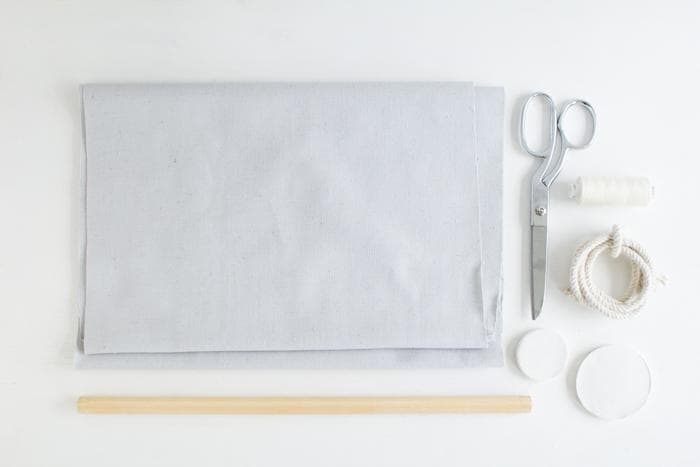
For manufacturing you will need:
- the cloth
- thick rope
- wooden pole
- scissors of any size
- sewing machine with thread
- a decorative element on which you can hang an organizer.
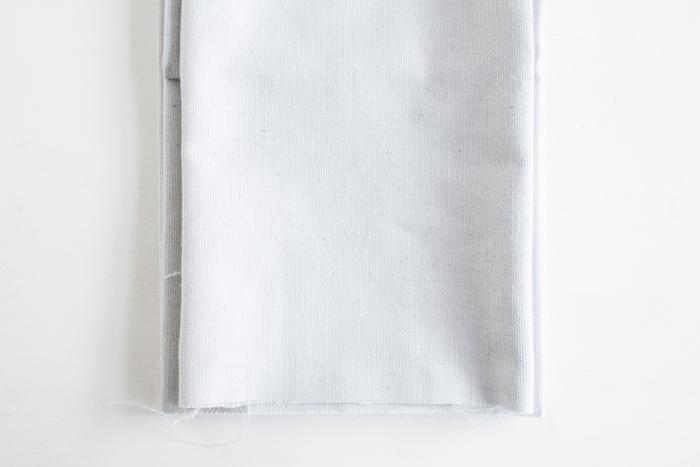
To begin with, we make three fabric blanks of the same size. We fold each of them in half along the long side. We use a typewriter to sew them. It turns out a kind of covers in the form of pipes.
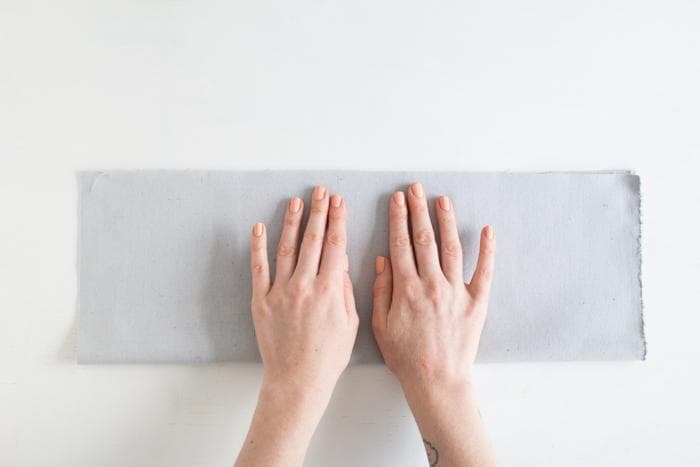
We turn out each of them to smooth out.
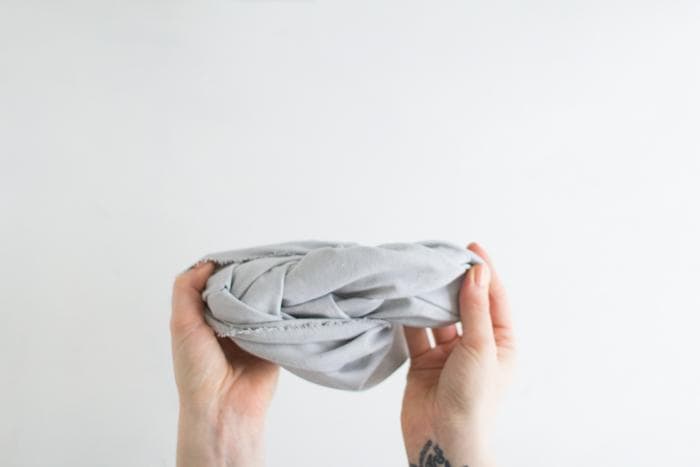
Fold one of the covers in half in length.
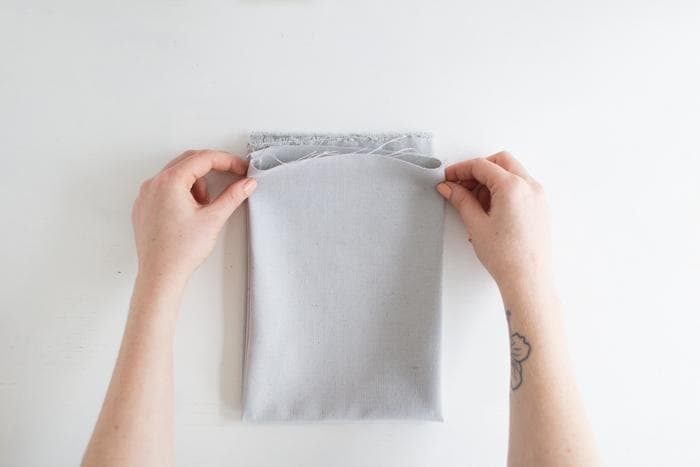
We lay out the second cover on a flat surface. On top of it we put a blank folded in half. It is important that 10 cm of the cover remains at the bottom.
Turn over and fold the third cover in half. Remember, the seams must not be visible.
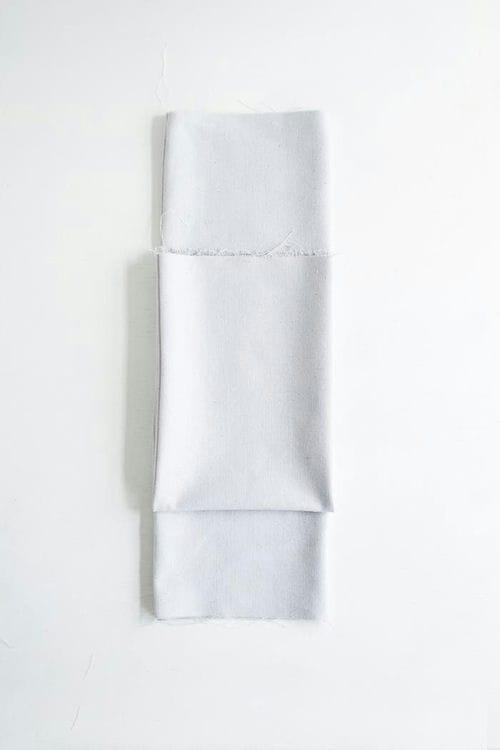
We put the third cover on top of the two sewn ones. We attach the upper edge of the lower layer to the upper canvas with pins and sew.
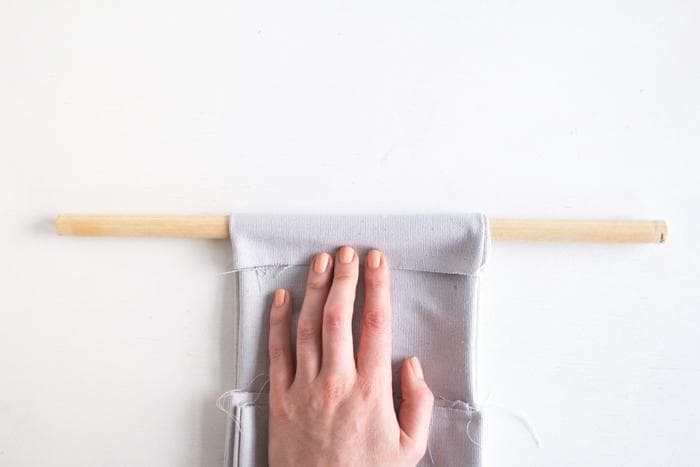
Fold the last sleeve in half so that the front edge is 6 cm higher than the back.
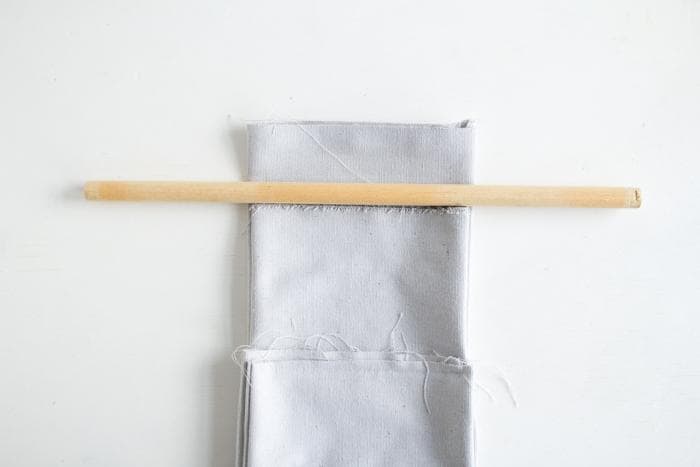
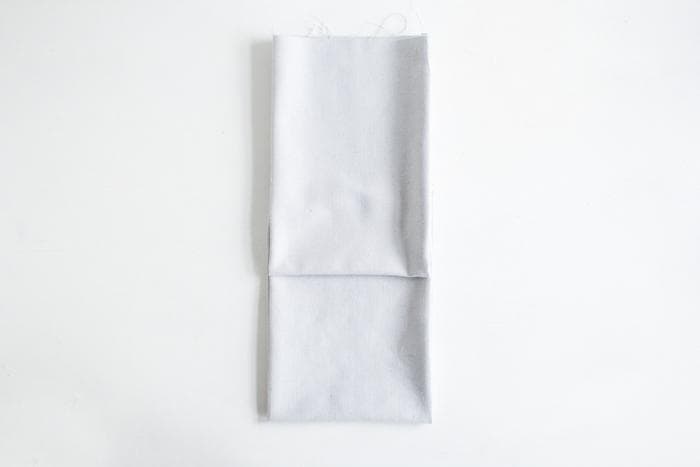
Install the wooden pole and wrap the cover around it. We fix it with pins and sew.
We tie a thick rope to the pole.
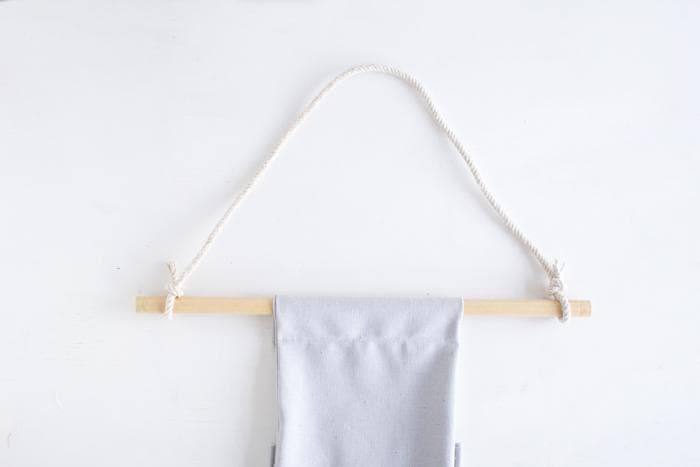
We fix the decorative element to hang the organizer.

From plastic bottles
Plastic bottles, plastic candy boxes, if beautifully decorated, will become a container for different gizmos, decorating the living room or bedroom. They are suitable for beads, earrings, rings, buttons, rivets, beads, paper clips, as well as other jewelry and sewing trivia. In the kitchen, cereals, seeds, spices, dried vegetables are poured there, cutlery is folded.
Five-liter bottles will make large boxes that are not afraid of moisture, therefore they can be used in wet rooms. The upper edge is decorated with fabric, knitted lace, the base is made out with a self-adhesive film, painted with paint from a spray can. A lid is made from a piece of another bottle of the same type – it is attached to the base with a “zipper” sewn into the upper part.
This design is suitable for styles:
- pop Art;
- industrial;
- loft;
- art beliefs;
- modern.
If desired, a large shoe or clothing box is made of two bottles, for this several parts are fastened with a stapler, and handles decorated with soft cloth are cut out in the upper part.

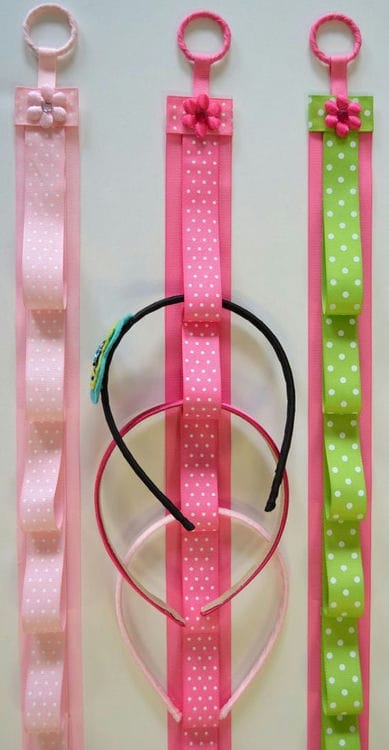
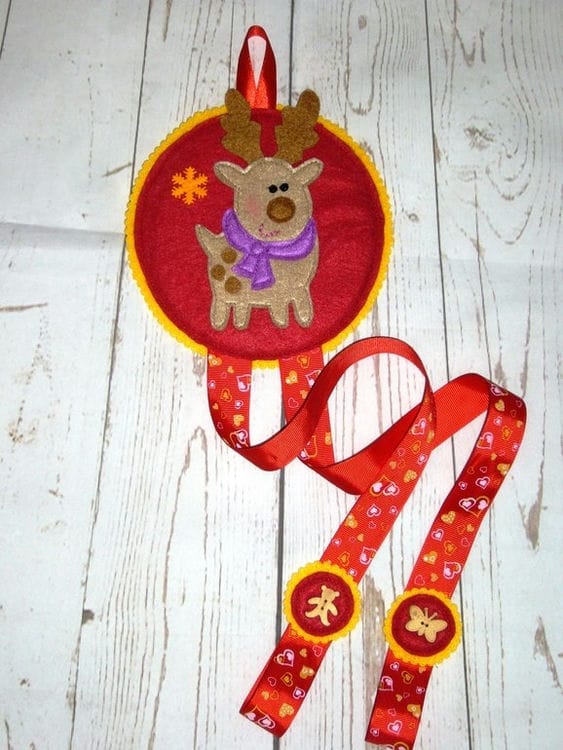
Wall organizer for hairpins and headbands with ribbons
An original product on the wall.
We need:
First, you should choose the material that will serve as the basis. These can be pieces of felt, wool, silk or other fabric. For a girl, it is better to choose bright colors: yellow, orange or red.
Sewing machine, needle with thread to match the selected fabric and ribbons.
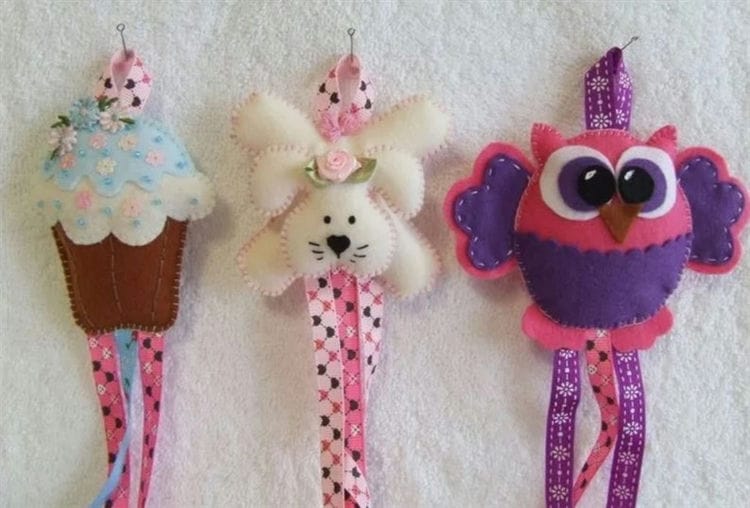
You can find stencil templates for your favorite animals anywhere. You can cut animals out of children's fabric, translate them into tracing paper from a coloring book, fairy tales, or find them on the Internet and print them on a printer.
Two wide satin ribbons in the color of the base, with a pattern (polka dots, stripes, hearts, etc.).
One thin eyelet ribbon for easy hanging on the wall.
Contrasting tape for trim.
Stages of work
Choose your favorite picture with a cartoon or an animal from a book, fabric. According to the drawing, cut out an animal on the fabric; the entire model of the organizer for hairpins and headbands will depend on its size.
The best option would be a circle of about 15-25 cm, it needs to be done in several layers to hold it tightly. You can inside the fabric a circle made of cardboard, pre-cut 0.5 cm less.

The background of the base depends on the color of the selected picture, the animal should stand out against its background. For example, a cartoon is red-blue, the background may be yellowish, it is better to apply it on different fabrics in order to choose the most suitable beautiful combination of colors.
Satin ribbons will be placed vertically, they will need to be sewn into the bottom of our base circle.
For beauty, do not forget the braid, it will become a contrasting trim around the circle.
For convenience, it is better to make 2 more small circles with animals (small copies of a large circle), but it is better to take other characters. We make them similarly to the base, just the size is 6-10 cm, if desired.
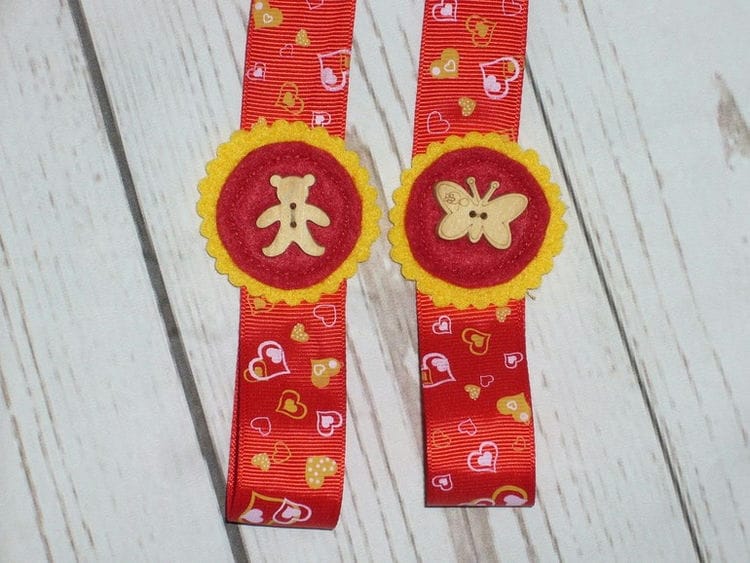
Sew the twisted ends of the long ribbons to the smaller rings with threads to make loops. It is easy to thread the headbands in them.
Important! Remember to cut a small piece of thin ribbon for the eyelet at the top of the garment. It is needed to fix the organizer on a decorative carnation, hanger, etc.
The organizer is ready! Different hairpins, clips, invisible pins will be placed on the ribbons, and headbands on the eyelets at the ends. The rubber bands can be folded into any toy or candy box.
We make a wall organizer with our own hands: the necessary materials
There are many cute organizers made of different materials, but the easiest way to show your creativity is by sewing a pendant for storing small items from fabric. In order to make such an interior decoration you will need:
- a piece of fabric, the minimum size of which should be 50 by 50 cm – from a smaller piece it will simply be difficult to cut out the pockets and the base;
- Scissors and needles for sewing the material;
- Hanging loops and hooks;
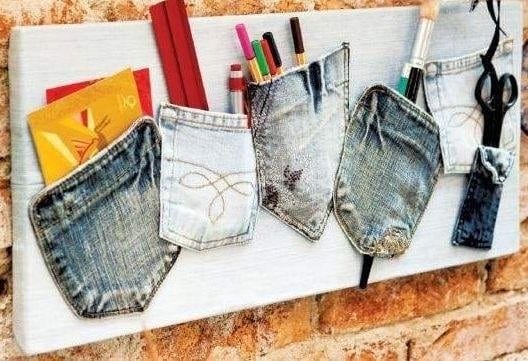
- Decoration elements. It is difficult to name a specific element – there are a great many of them, for example, in the photo below, these are ripped off pockets from old jeans.
The process of making crafts comes down in general terms to preparing a fabric base for a wall organizer, cutting out the necessary pieces of fabric for the pockets according to the markings with your own hands, determining the method of attaching the product to the wall and decorating an already finished souvenir. On average, such work takes 3-4 hours and is quite affordable for novice needlewomen. By the way, children can be attracted to her too!
Let's analyze the types of wall organizers and the nuances of their manufacture
So, having decided for yourself that the organizer will be made of fabric or leather, you need to decide on the room for which this thing will be done. The hallway is where they are most often placed. One of the simplest “stitched” organizer options is shown in the following photo:
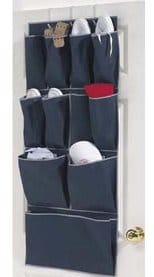
This craft is not very bright, but there is a huge advantage: it is not easily soiled, and convenient pockets will allow you to place a lot of things lying around at the entrance to the apartment in your homemade product – from keys to mittens and scarves.
Another convenience: this organizer can be hung on the door of the closet or hallway, or on the wall.
Take any thick fabric (for example, from old curtains), cut two pieces of the same size (45 x 75 cm is ideal, but if you need other sizes, this is not forbidden). Then you need to sew these pieces with the wrong side up, and then, having turned out “there”, sew them along the edges. Next, cut off 3 more strips from the fabric of the same density and make three lines of pockets, each of which can have three (or more) pockets. The upper edges of the stripes need to be tucked up, decorating them with a pretty ribbon or an applique that matches the style.
The final stage of work is giving depth to each pocket by artificially forming two folds along the edges. The stripes must be stitched on three sides, and it is also necessary to make a line separating the pockets.
The simplest organizer can be sewn so that there is order around the phone – no matter what room it is in. It looks something like this:
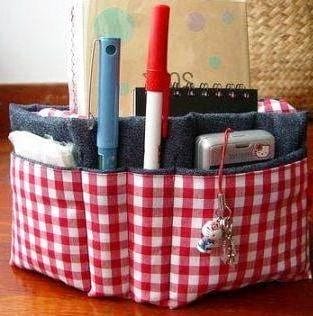
This do-it-yourself organizer can be not only wall-mounted, but also, if convenient, desktop. Taking a base of dense fabric of bright colors, you should stitch on it a rather long narrow pocket for a fountain pen. In the adjacent, wider compartment, you can store a notebook, and in an even wider compartment, a phone or smartphone.
The organizer is also very practical for the bathroom. If you intend to place it above the bathroom, you can make it small (30 x 45-50 cm). The best option would be when all the pockets will be of different sizes, and to make the product “cheerful”, you can use pieces of fabric with a different pattern from each other. Since we are talking about a bathroom, you can think about using oilcloth as a material.
A manufacturing feature is the need for edging each pocket. You need to insert a wooden bar into the upper link, with the help of which the storage of small things will be attached to the wall. It can look like this:
The organizer for small items can be placed in any room: in the kitchen, in the bedroom, sometimes in the hall. A feature of the model under consideration is the asymmetric arrangement of the pockets and the arbitrary selection of fabric colors for them. This gives the finished product a touch of recklessness and futurism.
For ladies, an organizer located on a carnation near a mirror or dressing table will not be superfluous. There is no point in pockets that are too large, since the items are supposed to be stored in miniature ones. This means that ready-made pockets, ripped from old jeans or women's trousers, are quite suitable.
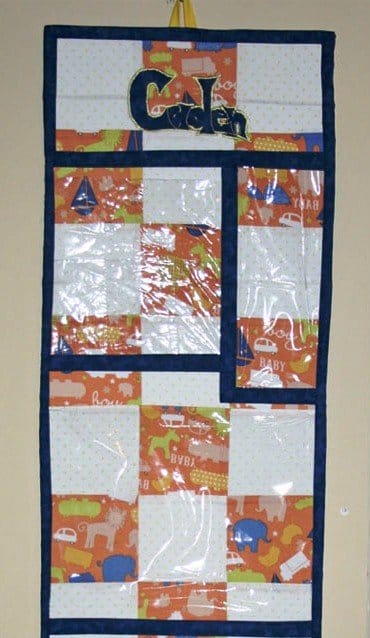
Finally, the children's room cannot be ignored:
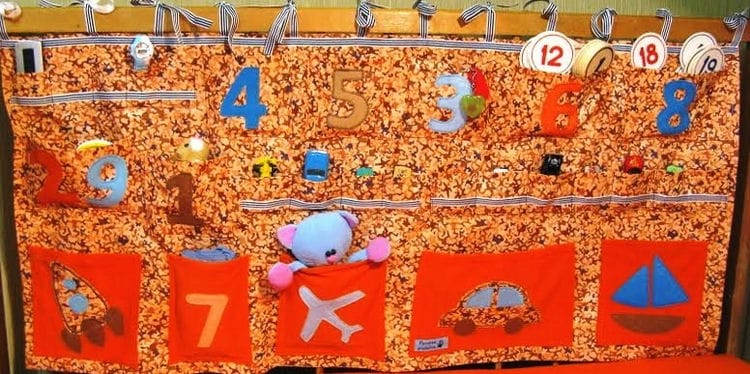
It is better to sew an organizer for storing small toys and stationery from the densest fabric of bright colors. It is better to make the pockets the same size and decorate them with cute appliqués. The craft is attached to the wall with a wooden lath, tied in several places with ribbons. In the free space of the organizer, you can place information useful for the child, for example, the alphabet or the multiplication table.
Hanging organizer ideas with pockets
An interesting and useful item can be used in all rooms of any apartment.
Bathroom. A similar thing in the bathroom will be a good solution for placing combs, shower and hair products, foams, creams, gels;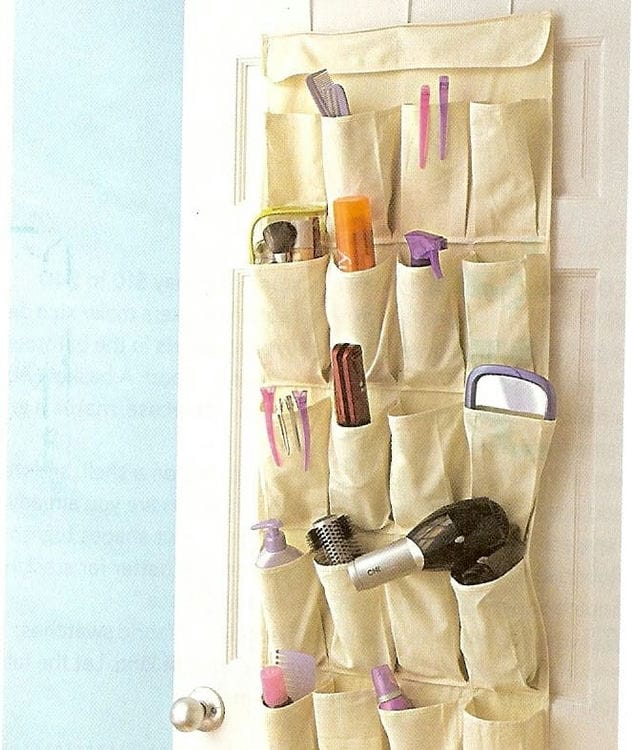
Children's. Here, in general, everything can be covered with lovely little things. Near the desktop, they will serve for placing notebooks, scissors, pencils or felt-tip pens, near the bed and in the play area – for placing small toys;  Hallway. In the hallway, you can compactly place light scarves and hats, fluffy mittens and gloves. Creams and brushes for shoes will also be placed here, and the shoes themselves will take up much less space;
 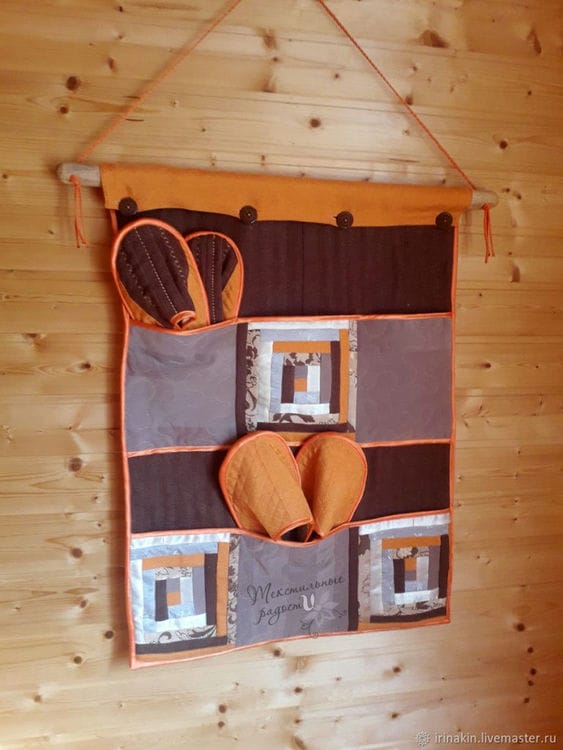 Bedroom. Next to the bed you can find a place to put glasses, medicines, watches, phones, charging;
  Living room. It is convenient to place an organizer with glasses, a TV remote control, a newspaper with crosswords near the armchair and sofa;
Kitchen. In the kitchen, such a storage can be used to store cutlery, spices, and place decorative items.
There are no creation canons for organizers. They can be made from any fabric, have any color, be of any shape.
How to sew a DIY wall organizer with pockets
Having chosen the suitable hanging version of the organizer and having prepared all the required materials, you can start needlework.
- the cardboard is cut to the size of the future organizer;
- the fabric is cut into a base and pockets (they can be made from one fabric or from different ones. It all depends on the imagination of the creators);
- the base is stitched on three sides according to the size of the cardboard with the front side inward, one side remains unstitched. The resulting bag is turned inside out;
- at the pockets, the edges are processed using the hem method;
Reference! For greater beauty and functionality, you can make double-sided pockets. To do this, two parts of the pockets are first stitched together inside out from three sides, then turned inside out and the remaining seam is sewn.
- after that, the pockets are sewn to the base so that there is space inside the pocket. The larger the item will be placed inside, the more space must be left. You can use the method of ironing the side seams of the pocket;
- the base of the organizer is decorated with embroidery, applique, decorative elements, if necessary;
- cardboard is inserted into the fabric and the last seam is sewn. The edges are processed with decorative tape, a cord is sewn on top;
Reference! To strengthen the strength of the structure, you can attach an additional plywood, plastic, iron, wooden strip on top.
- the finished organizer is hung on a carnation and filled with useful things.
Such a necessary device can be made both for yourself and as a gift. For example, on New Year's, it is perfect for cute gifts from Santa Claus; gardeners will be able to keep seeds and fertilizers there, as well as small tools; dads and grandfathers will take a useful creation to the garage, and grandmothers will adapt it to handicraft items.
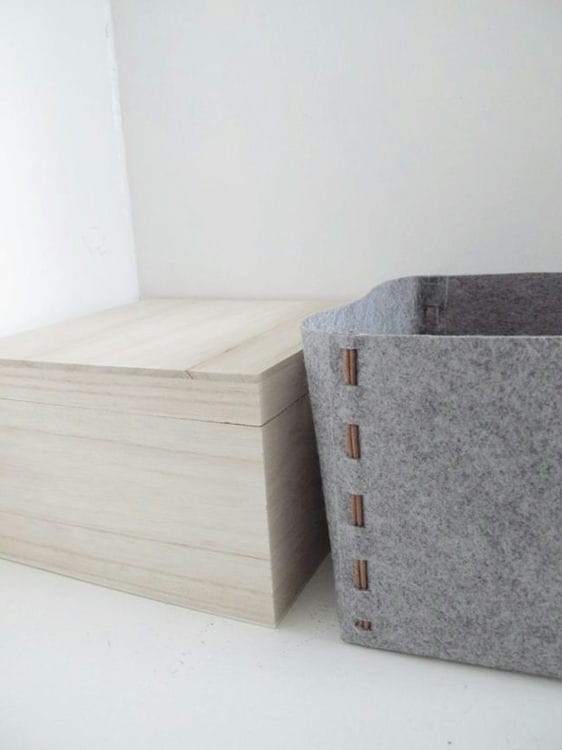
Textile box: master class
Using simple materials, you can create an original textile product for storing various items. For manufacturing, you need a piece of dense fabric.
So, a storage box made of fabric is made in several stages:
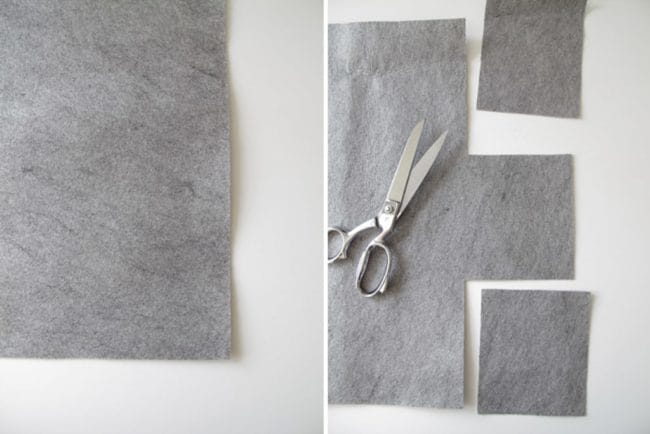
- You will need a canvas of fabric with dimensions of 48 * 43.5 cm.
- This piece of material has squares cut out at four corners, measuring 14 cm by 12 cm.
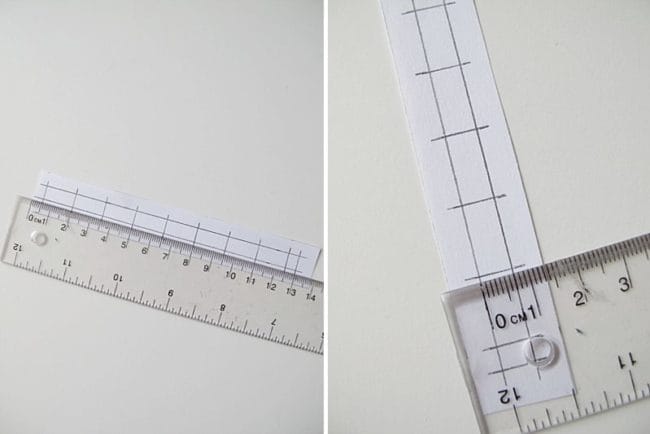
A template is made from paper. With its help, it will be possible to make markings for connecting parts of a textile box.
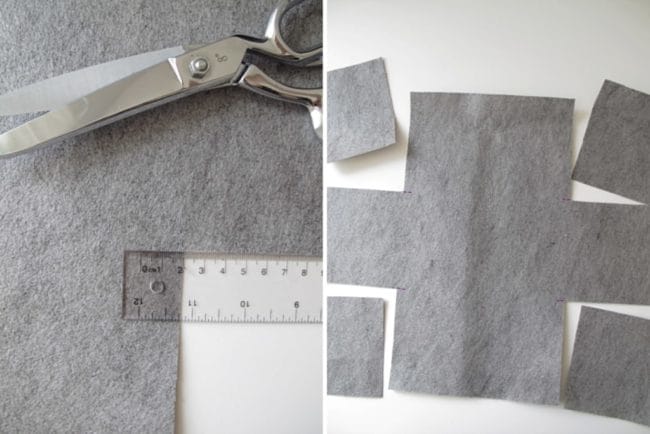
The distance between the marks should be 15 cm in length. When performing calculations, you need to make sure that there is enough material for the job. Labels can be made using a ruler.
Then place the template over the material. According to the marks, cuts are made along the width of the strip of fabric, which will be used to sew the box.
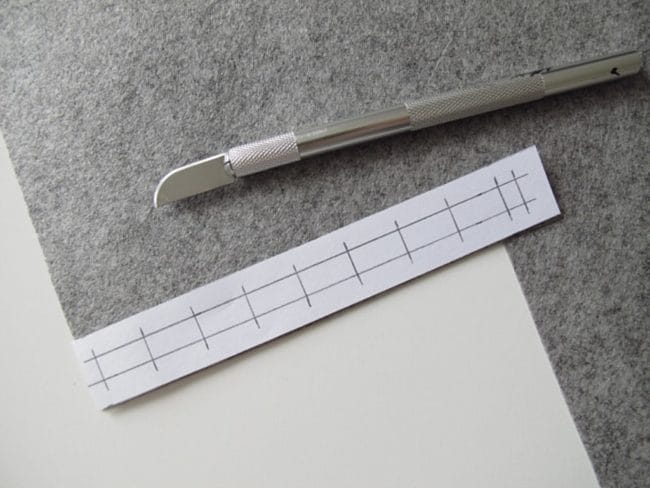
Then the strips of fabric are pulled into the holes made.
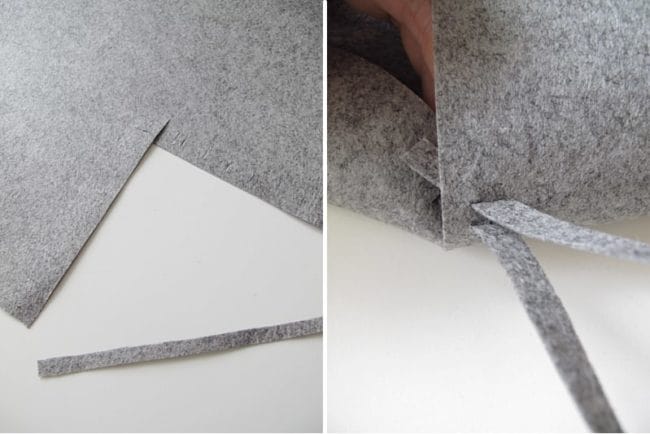
- A total of four strips are required with a width of 0.7 cm and 16 cm in length.
- After pulling the pieces of fabric into the product, they need to be cut off at the top.
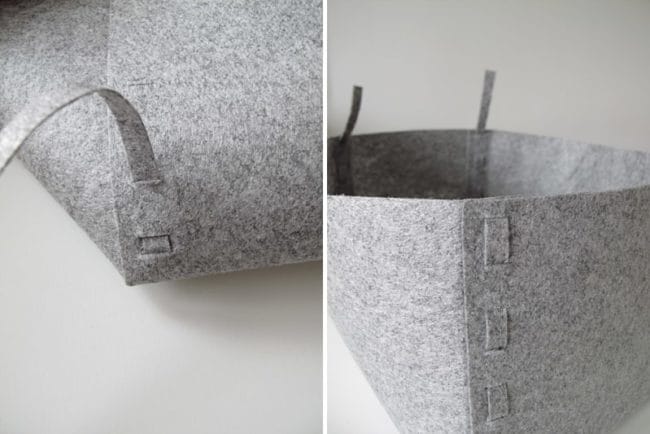
When the box is ready, you need to put heavy pieces of wood in it to give the desired shape.
As strips for stitching, a single-color fabric or pieces of leather are selected.
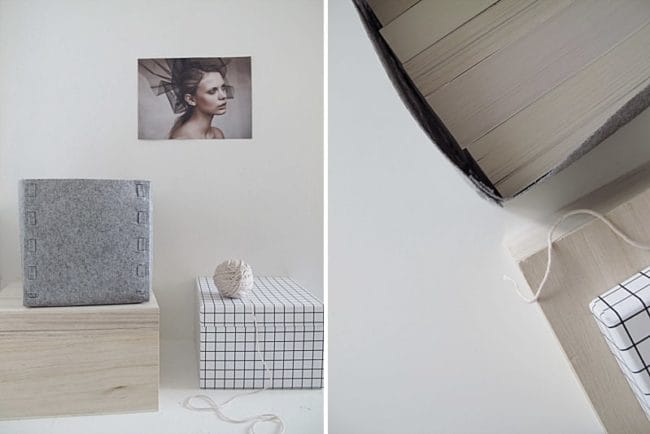
A spacious and original storage container is ready.
How to glue a box with paper: master class
Let's find out how to make boxes for storing things with your own hands out of paper. A cardboard product is a beautiful and simple project for a competent organization of space. A homemade paper box can be made with children, since manufacturing is not very difficult.
To repeat this master class, you need to prepare the following components:
- cardboard box for storing shoes;
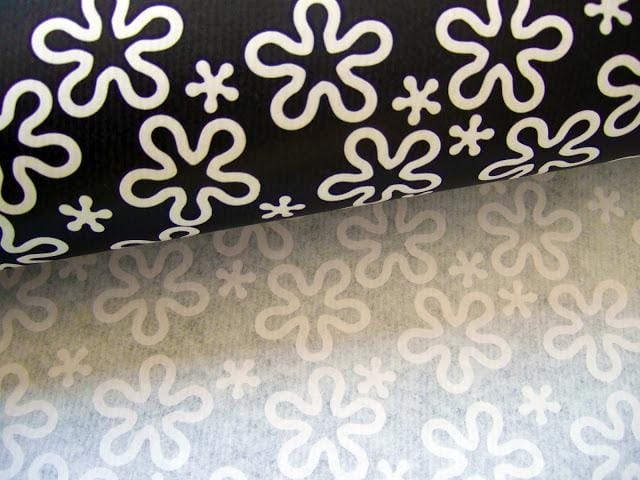
- gift kraft paper;
- the pencils;
- scissors;
- ruler;
- glue solution;
- rag.
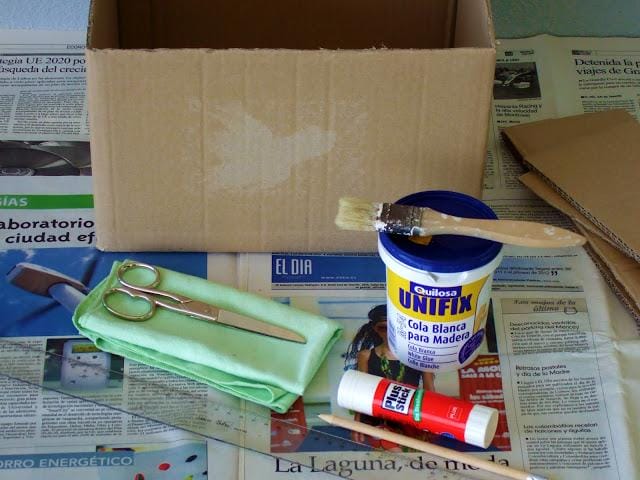
Kraft paper is shown in the photo.
Now let's look at the process of how to make a beautiful and decorative box:
- Attach the box to the paper and trace the contours. Then cut out pieces on each side, leaving a 1 to 2 cm margin.
- For better adhesion, make cuts in the corners as shown in Figure 1.
- Glue two opposite sides first and then the rest.
- The protruding parts of the paper are glued from the inside of the box.
- The bottom of the box must be carefully glued.
- Then the box is pasted over from the inside.
CAUTION: When gluing the paper, use a rag to smooth out wrinkles and bubbles.
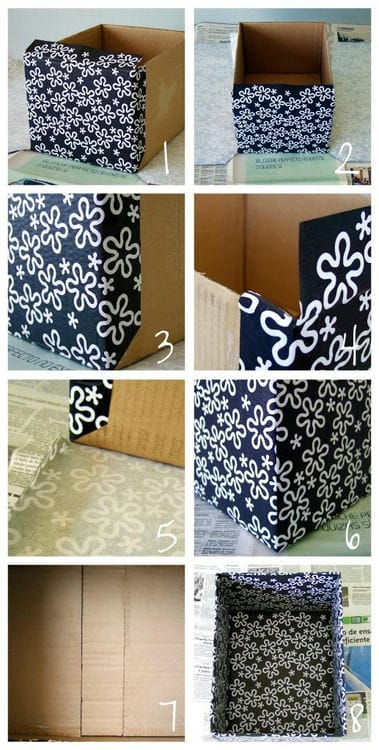
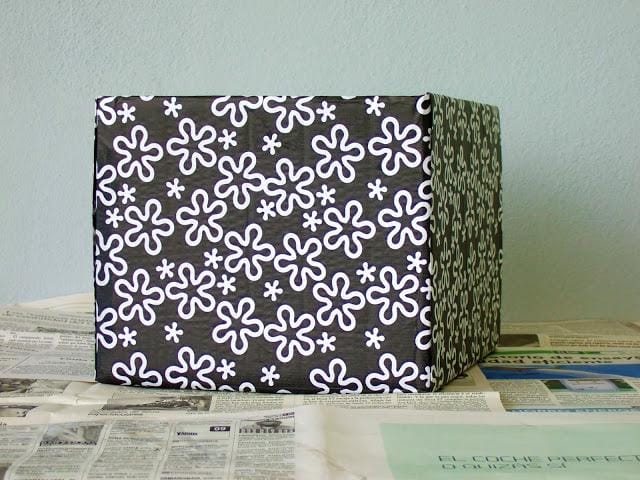
The result is a beautiful box with a smooth and even surface.
How to decorate with rope: master class
There are different ways to arrange a storage box. From ordinary cardboard containers, you can create an original basket for threads, socks, toys or for cosmetics. An interesting solution is a product with a rope decor.

For manufacturing, you need an ordinary cardboard box, rope, glue gun. Then we start making a decorative container:
Take the box.
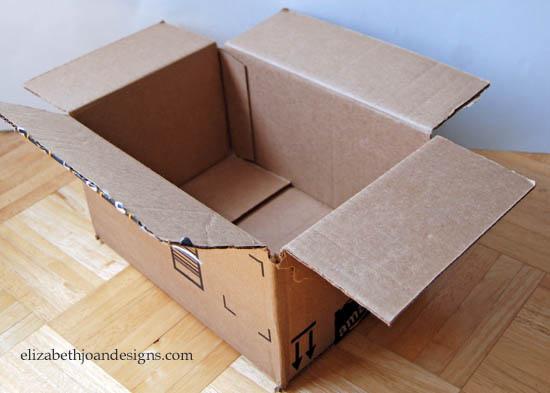
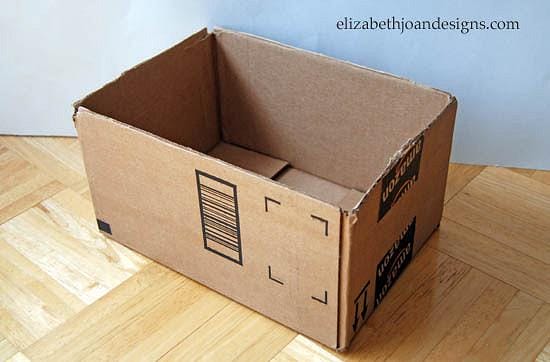
Use scissors to cut the valves from the box.
Then wrap the rope around the box. In the process, you need to glue each part of the harness.
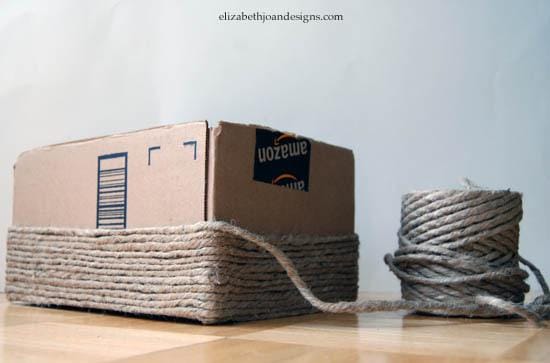
- The rope must be glued to the very edge of the box.
- In order for the product to acquire a complete look, it is necessary to make an insert of light material. The lining is folded in and the fabric is folded out.
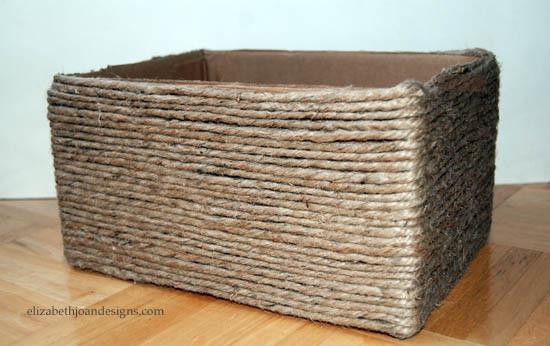
This beautiful homemade basket can be used for various interior solutions.
Cloth decoration of the box
You can make a beautiful and functional box for your home from fabric. To repeat the master class, you need to prepare the following materials:
- cardboard box;
- the cloth;
- special glue;
- pins for decoration;
- tape.
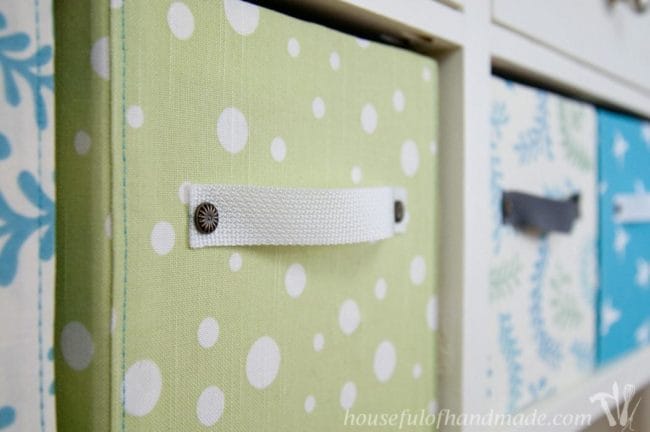
IMPORTANT: Such boxes can be made for a specific shelf. They will be pulled out using a special handle. Products should be selected according to the height of the rack or shelf. To sew boxes, you need to use material of different shades.
Making a box includes the following steps:
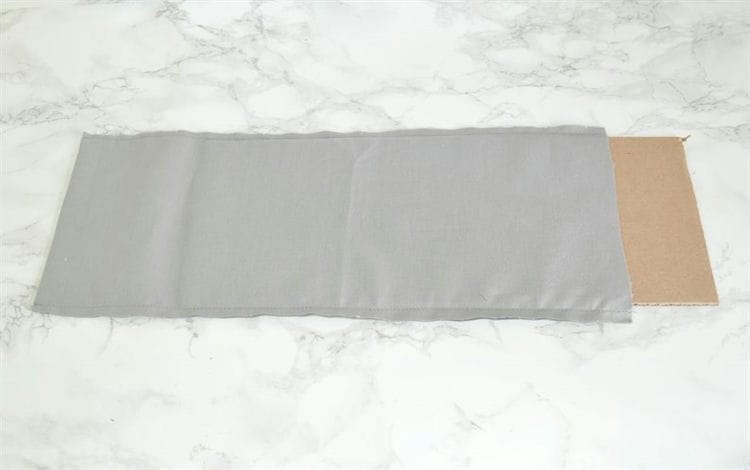
First, cut out the fabric for all the boxes. You need to cut pieces for each side with a margin of 1-2 cm.

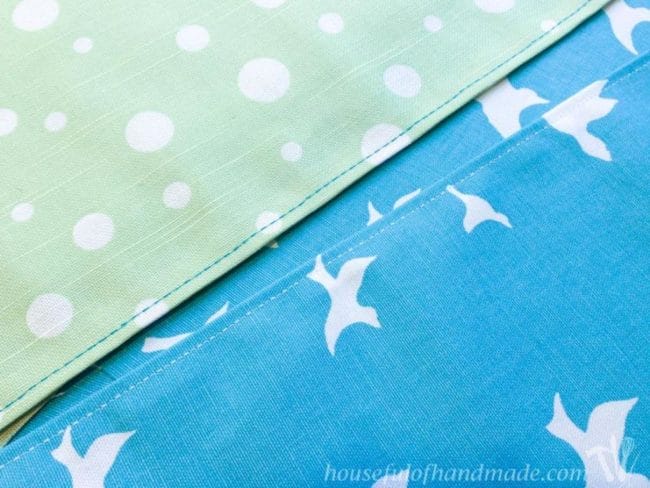
Bend the fabric at the edge by 0.5 cm and fix the material with an iron.
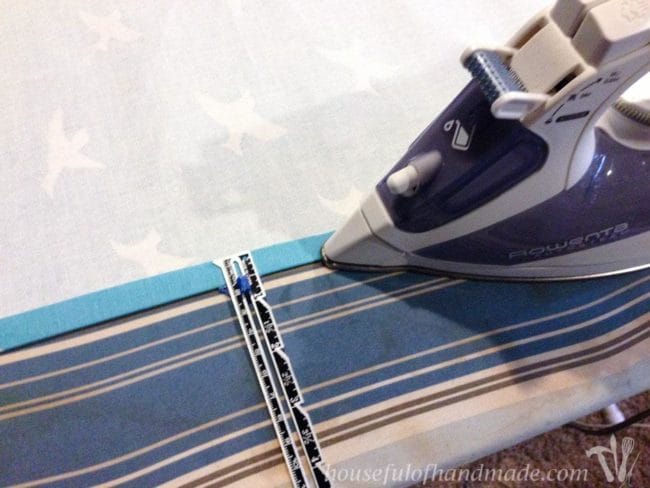
Then use the sewing machine to sew the seams at the folds.
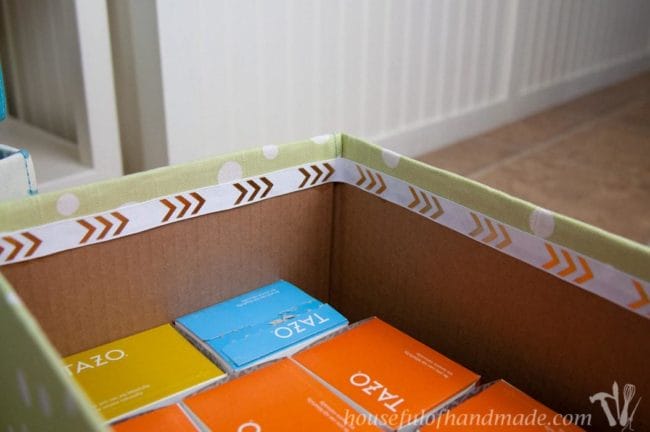
- After that, you can start gluing the canvases to the base of the box. The adhesive should be spread very carefully so that no drops form on the façade parts.
- The corners at the bottom of the box should be trimmed to tuck the canvas.
- The fabric is also wrapped inside the box. For better fixation, it can be attached using special adhesive strips. The quads must be attached especially tightly.
- A beautiful tape will help hide uneven edges and hold the canvas firmly.

Use decorative pins to attach the handles for the product. For this, special tapes of special strength are used.
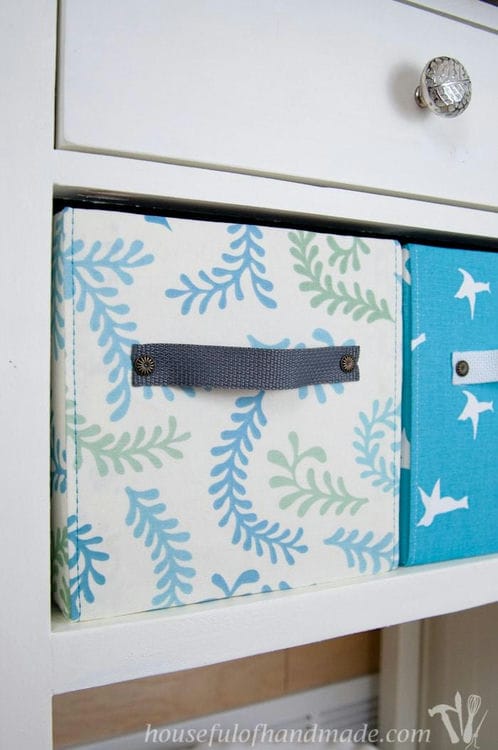
And now the original drawers on the shelf are ready. They can be used to store small items, folders, or even books. Depending on the size, you can create an ergonomic organizer box.
Functional and comfortable products can be made in 4-5 hours. When using a plain fabric, the boxes can be additionally decorated.
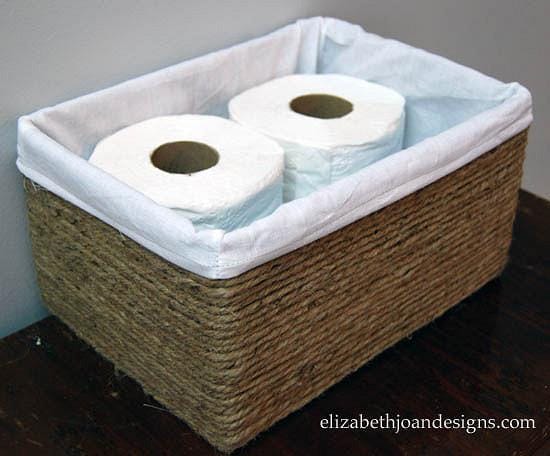
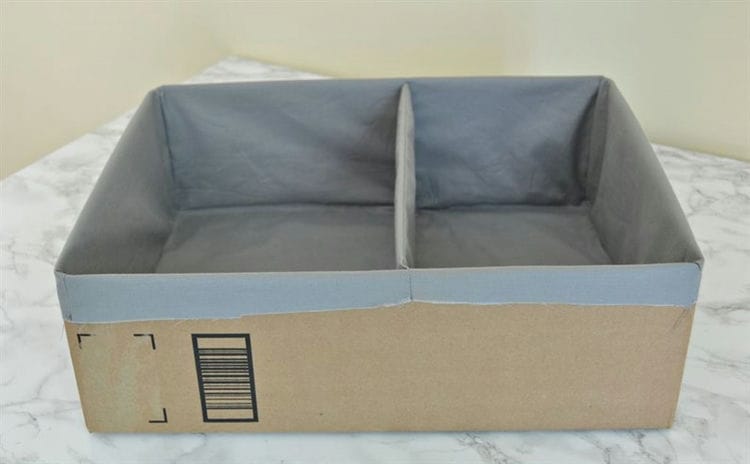
Storage box with compartment
Containers with fabric liners, which have several compartments, are very often used to organize the space near the changing table, because diapers, powders, rattles and other necessary items for childcare are conveniently placed in them. To make such a box, you should prepare:
- cardboard box;
- the cloth;
- a sewing machine or fabric glue;
- hot glue gun;
- yarn;
- strap for pens;
- stationery pins (brads);
- stationery knife;
- scissors;
- a nail and a hammer or awl.
Stages of work
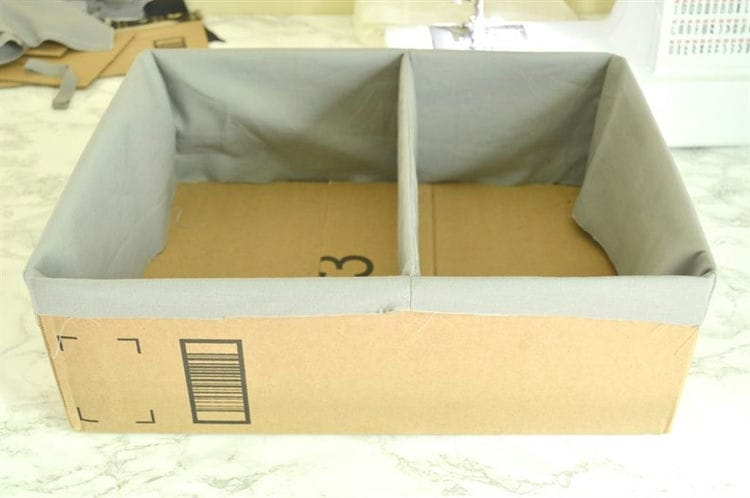
Use a tight, rigid box of the right size. Using a clerical knife, carefully and as evenly cut off the top flaps – the cover. Try on one of the valves in the middle of the box so that it fits easily and serves as the basis for the partition.
From the fabric, measure one piece equal in length to the outer perimeter of the box, and enough in width to wrap the box in height and make an overlap of 1.5-2 centimeters on the hem on one and the other side. Cut out a piece and sew it into a ring.
Wrap the part that you cut out for the partition with a piece of cloth, cut out two identical parts along the contour, stepping back one centimeter for the seam allowance, and sew a bag out of them. Cut the corners close to the line, turn the piece right out. Place a cardboard partition in the resulting bag, carefully sew up the hole.
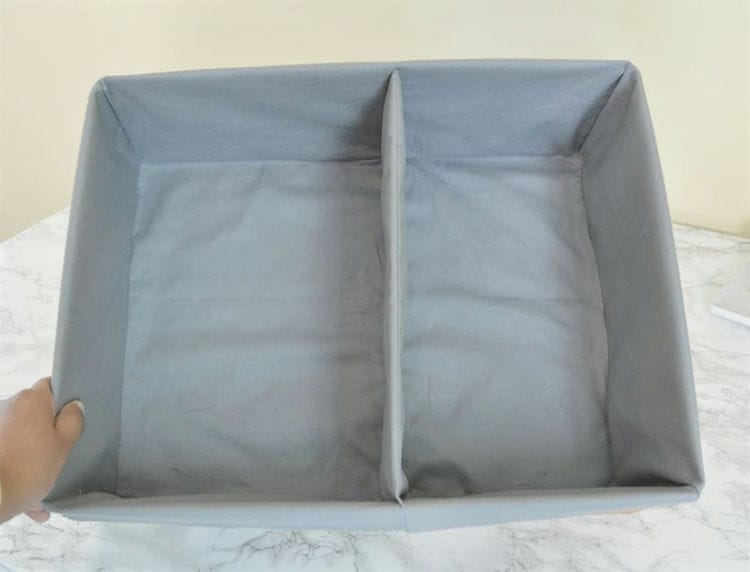
Wrap the box with the prepared fabric, fold the excess to the bottom and inside the organizer. Use hot glue to secure the fabric along the outer edge so that it does not slide out.
Cut a bottom out of a piece of cardboard so that small items do not roll under the flaps. Sew a cloth cover for it too, so it can be washed. Put the cover on the bottom and put it inside the organizer. Extend the partition.
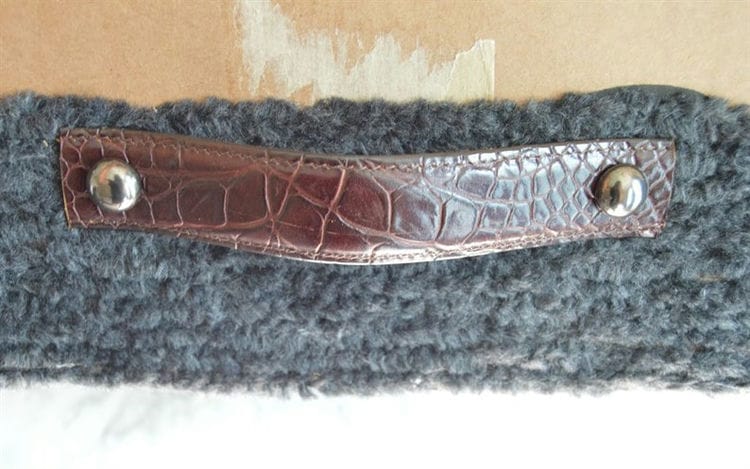
The inner part of the organizer is decorated, you can proceed to the outer decoration. Decorative yarn was used in the project. You can use any material – yarn, braid, jute cord, clothesline. Use hot glue to secure the end of the thread or braid to the bottom. Then, gently start wrapping around the box, securing the thread to keep it from slipping. After the entire outer side of the organizer has been decorated, the thread must be cut and the tip must be glued, trying to make it as inconspicuous as possible.
Cut two identical parts from the belt, long enough to make handles for the organizer. Remove the baffle and bottom from the organizer and fold back the inner fabric. Use an awl or nail and hammer to make holes for the brads. Secure the handles with pins. If you did not find the pins, then use small bolts and nuts for them.
Re-arrange the organizer – lower and straighten the fabric, insert the bottom and the partition.
The organizer is ready.
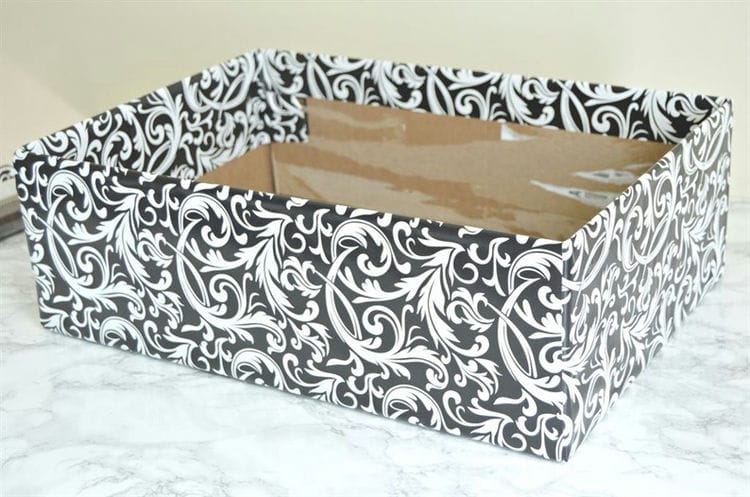
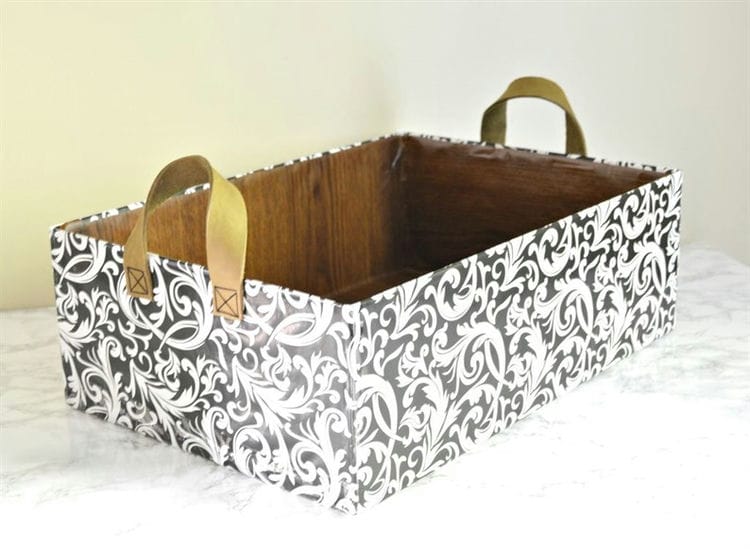
The second design option for the storage box
In order to arrange an organizer for storing various things, you must use:
- a cardboard box of the desired size
- wrapping paper;
- adhesive paper;
- thin double-sided tape;
- scissors
- pieces of eco-leather;
- a needle;
- thread;
- stationery knife;
- a nail and a hammer or awl.
Stages of work
Just as in the first option, start by preparing the box – cut off the top flaps, trying to maintain an even horizontal line around the entire perimeter.
Place the wrapping paper you want to use on the outside of the box on the table. Mark the paper along each side so that there is a hem allowance at the top and bottom. Cut the paper along the marks and secure with double-sided tape.
Cut out two handles from a strictly belt. Mark the location of the handles. They will be sewn with two criss-cross stitches or whatever you like. Pierce the required number of holes with an awl or nail and hammer to make it easier to secure the handles in place.
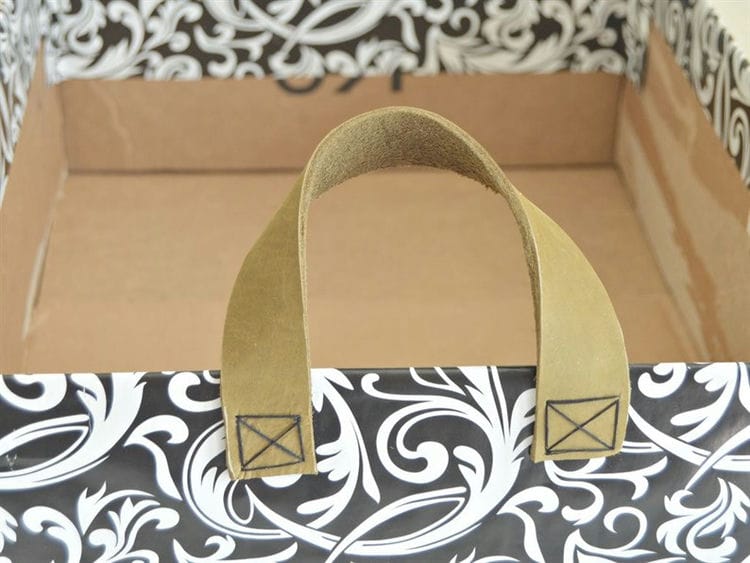
Insert the thread into the needle and carefully sew the handles with the start and end knots on the inside. For reliability, secure the threads with all-purpose glue.
It remains only to arrange the box from the inside. For this, you can use self-adhesive tape or decorative paper. Glue the bottom.
You can make partitions from additional pieces of cardboard. Cover the cardboard with foil or paper and secure with tape or hot glue.
Another storage box is ready.
DIY knitted box
Craftsmen who love crocheting will love this storage box.
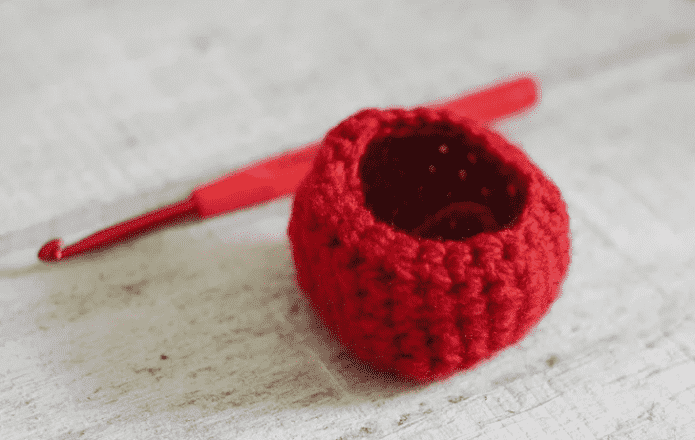
In the photo there is a small knitted basket of a round shape, into which it is convenient to fold jewelry.
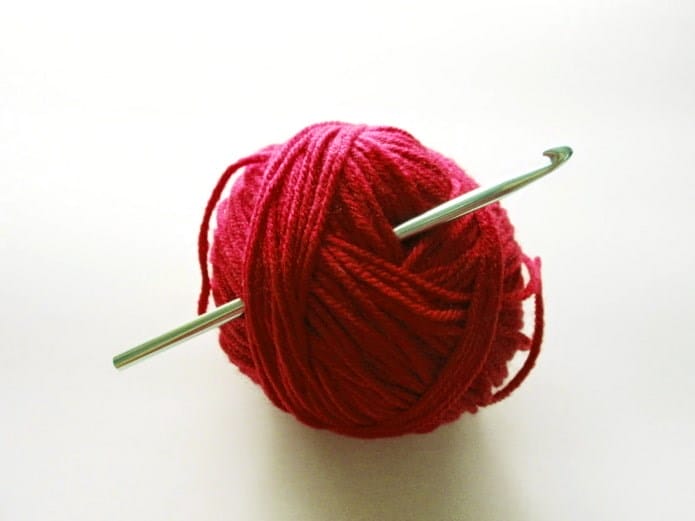
Tools and materials:
- Hook.
- Yarn (you can use knitted).
- Wallpaper glue and brush.
Step-by-step instruction:
-
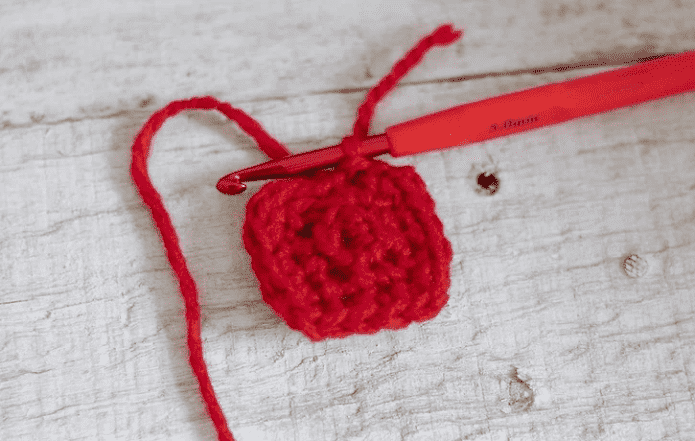
We knit the base for the future box. The larger the square, the more voluminous the product will turn out:
![DIY organizer: Original ideas. DIY storage boxes: simple master classes]()
-
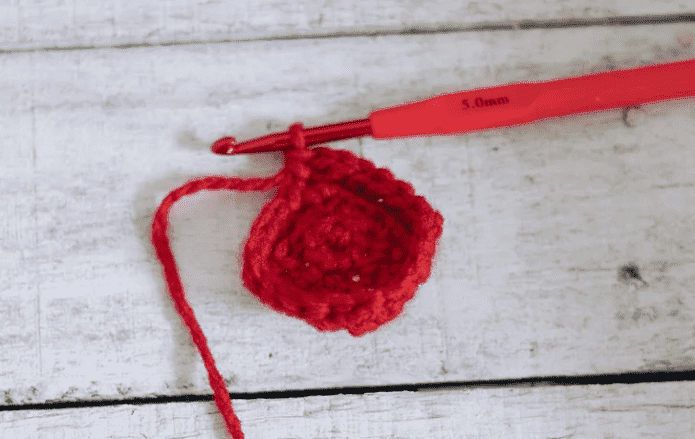
We tie the base with single crochet, knitting each loop:
![DIY organizer: Original ideas. DIY storage boxes: simple master classes]()
-
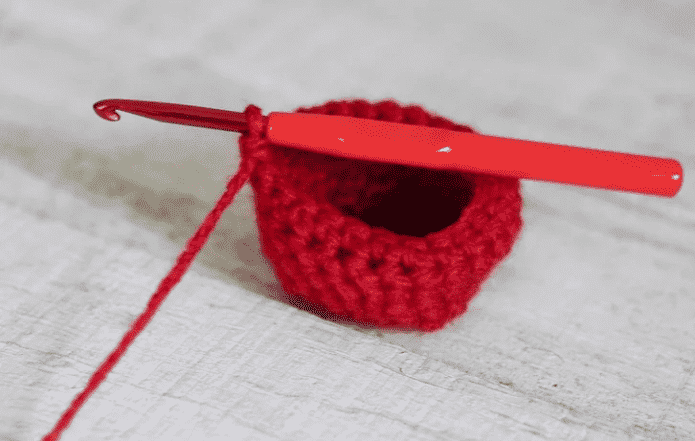
We continue to knit until we reach the required box height. We cut the working thread.
![DIY organizer: Original ideas. DIY storage boxes: simple master classes]()
-
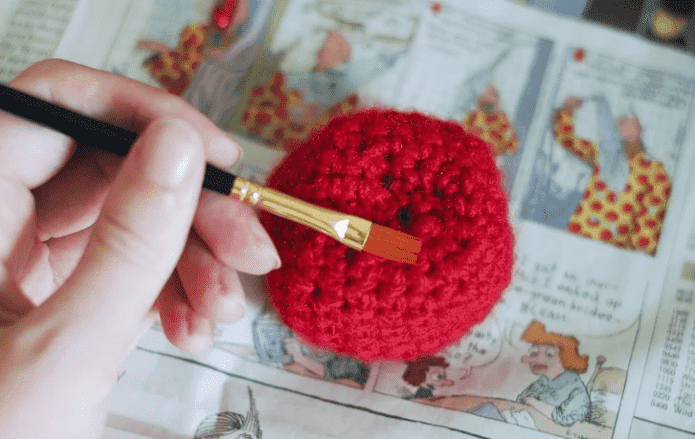
We fix the product with wallpaper glue, dry it with a hair dryer.
![DIY organizer: Original ideas. DIY storage boxes: simple master classes]()
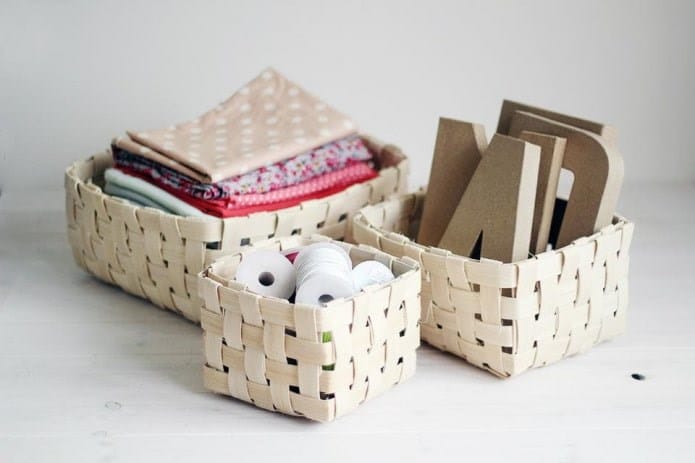
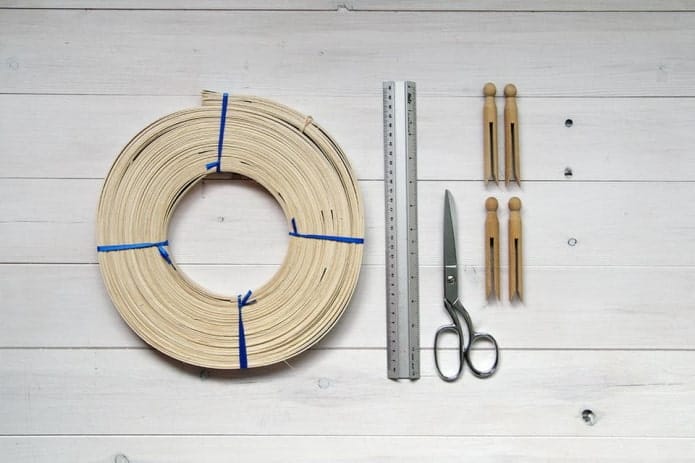
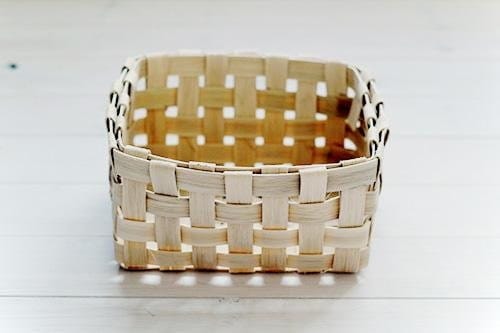
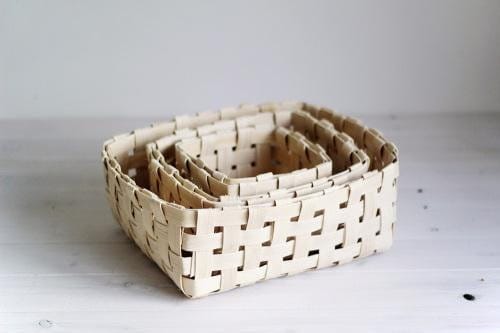
Wicker box made of wood
To make a sturdy DIY storage box, you can weave it out of veneer. It will be a wonderful decoration for your kitchen or living room.
Pictured are eco-friendly wicker boxes for storing various little things.
Tools and materials:
- Veneer.
- Clothespins.
- Glue.
- Masking tape.
- Scissors.
- Ruler.
Step-by-step instruction:
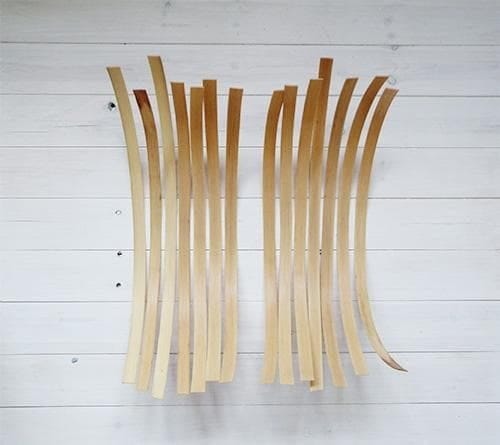
-
Let's get to work. First, soak the veneer in warm water. Hang dry. We cut into equal strips depending on the size of the desired basket.
![DIY organizer: Original ideas. DIY storage boxes: simple master classes]()
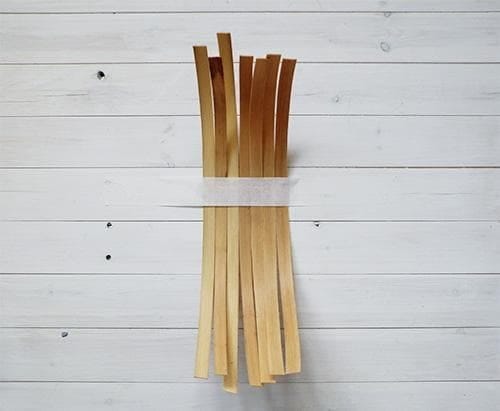
-
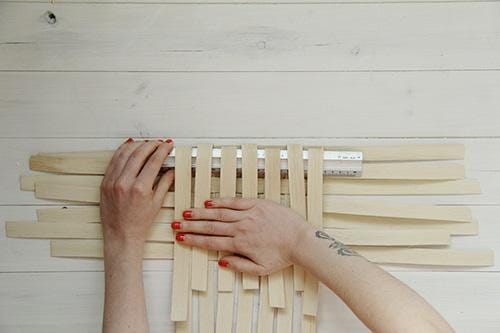
Divide the number of strips in half and secure with masking tape.
![DIY organizer: Original ideas. DIY storage boxes: simple master classes]()
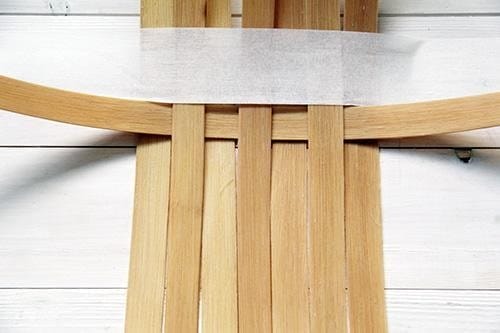
-
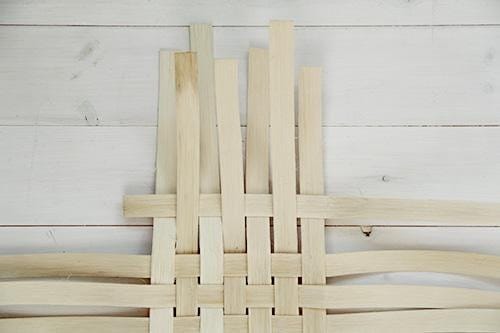
We take one strip and weave it as shown in the photo:
![DIY organizer: Original ideas. DIY storage boxes: simple master classes]()
-
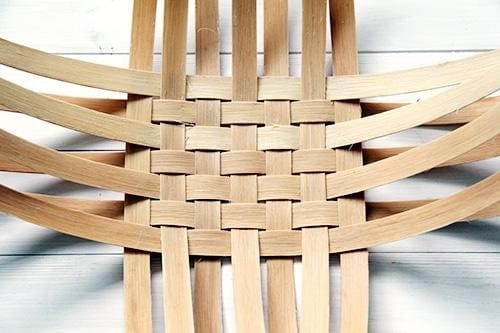
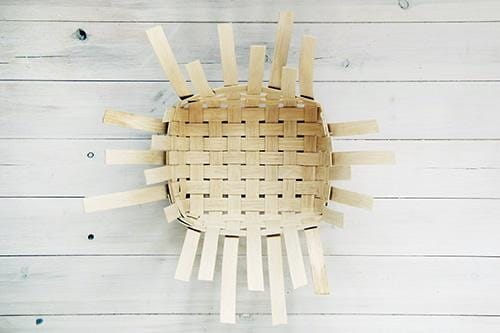
We continue to build up the square in the traditional way of weaving the basket:
![DIY organizer: Original ideas. DIY storage boxes: simple master classes]()
-
When the stripes are over, we get the bottom of the box:
![DIY organizer: Original ideas. DIY storage boxes: simple master classes]()
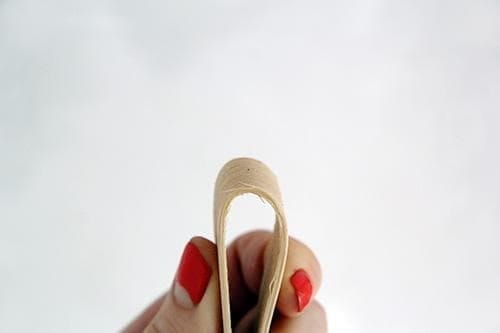
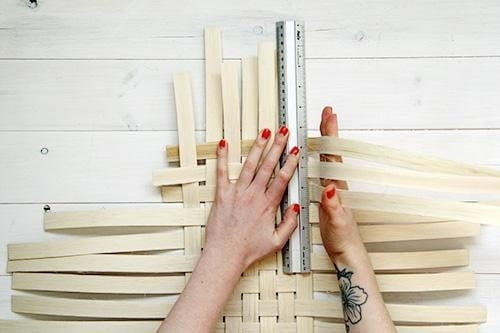
-
We check on which side the veneer does not exfoliate. To do this, bend one strip like this:
![DIY organizer: Original ideas. DIY storage boxes: simple master classes]()
-
Using a ruler, bend all the details in the direction where the material does not exfoliate:
![DIY organizer: Original ideas. DIY storage boxes: simple master classes]()
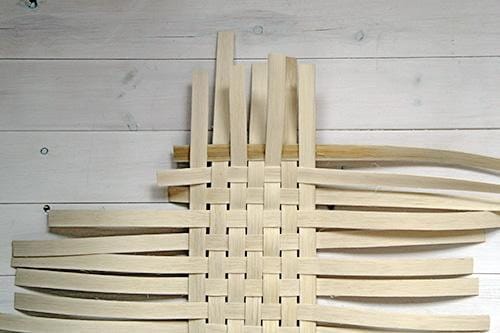
-
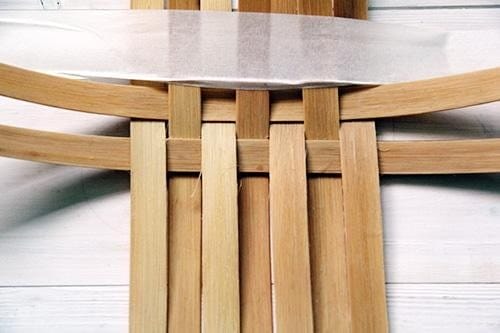
We take a long strip equal to all sides of the box and weave it along one of the sides:
![DIY organizer: Original ideas. DIY storage boxes: simple master classes]()
-
We weave two more details in the same way:
![DIY organizer: Original ideas. DIY storage boxes: simple master classes]()
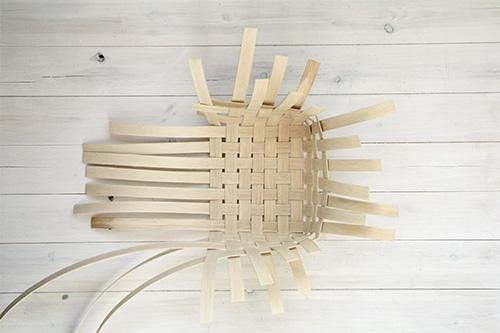
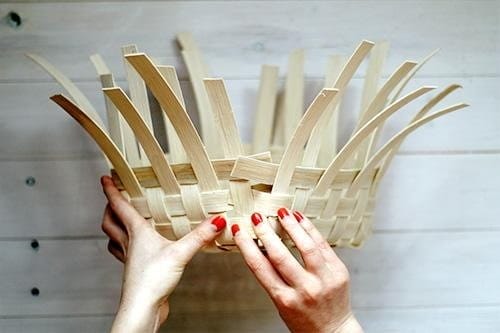
-
We bend one of the walls, starting to form a basket:
![DIY organizer: Original ideas. DIY storage boxes: simple master classes]()
-
And weave long elements into the second wall:
![DIY organizer: Original ideas. DIY storage boxes: simple master classes]()
-
We continue to weave:
![DIY organizer: Original ideas. DIY storage boxes: simple master classes]()
![DIY organizer: Original ideas. DIY storage boxes: simple master classes]()
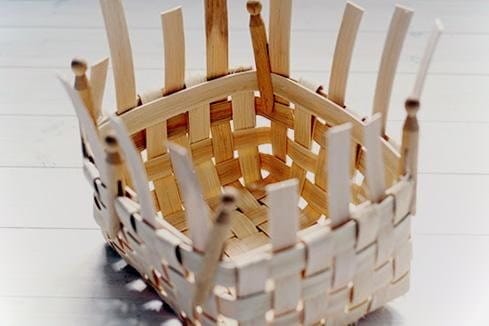
-
We leave the tips about 5 cm long, cut off the rest:
![DIY organizer: Original ideas. DIY storage boxes: simple master classes]()
-
We bend the strips inward, embedding them under the third row:
![DIY organizer: Original ideas. DIY storage boxes: simple master classes]()
-
We glue a long strip along the inner perimeter of the box, fixing it with clothespins:
![DIY organizer: Original ideas. DIY storage boxes: simple master classes]()
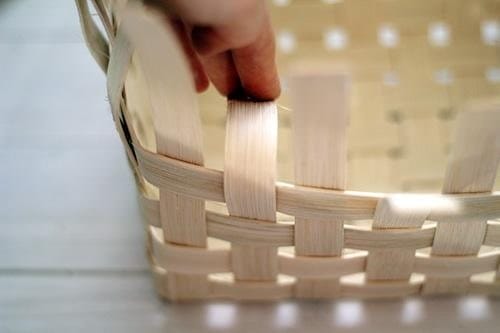
-
Weave the remaining strips over it:
![DIY organizer: Original ideas. DIY storage boxes: simple master classes]()
-
The wicker decorative box is ready!
![DIY organizer: Original ideas. DIY storage boxes: simple master classes]()
![DIY organizer: Original ideas. DIY storage boxes: simple master classes]()


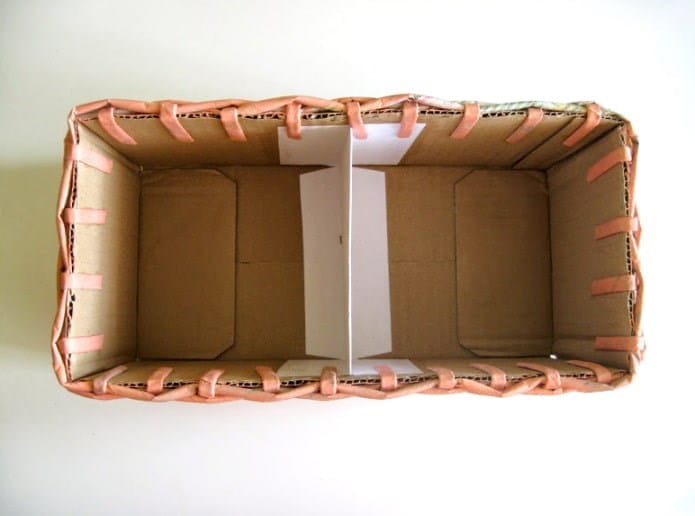
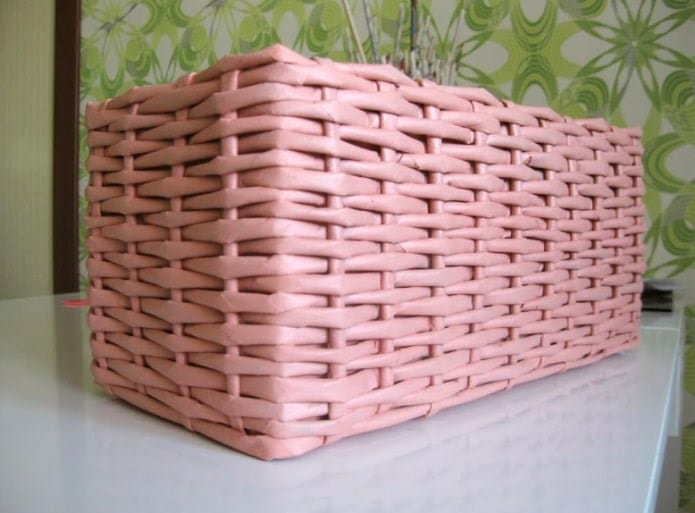
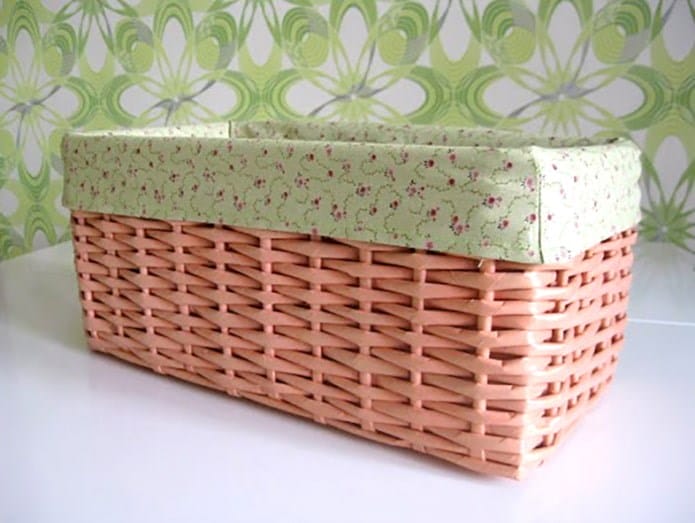
From newspaper tubes
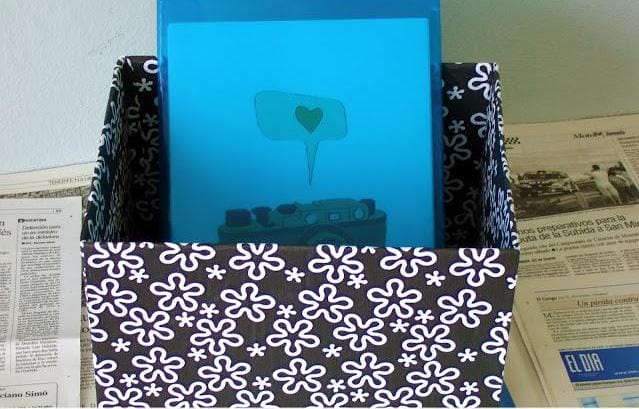
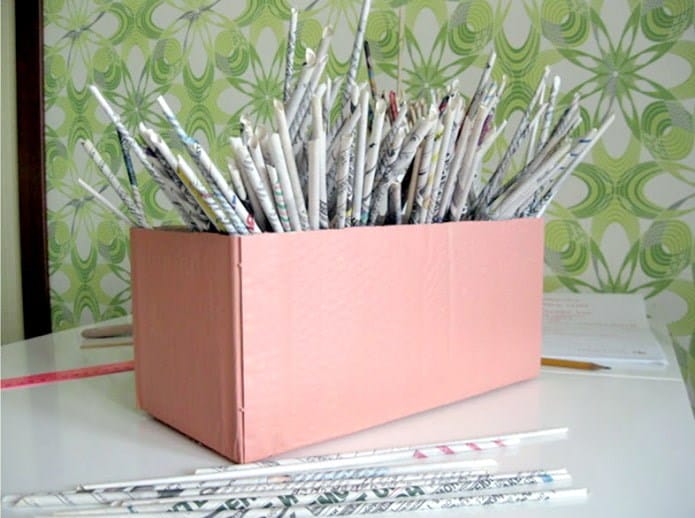
Such an interesting basket will look great in a nursery, bathroom or living room. If a lot of newspapers have accumulated in the house, if you wish, you can create a useful and beautiful box out of them with your own hands.
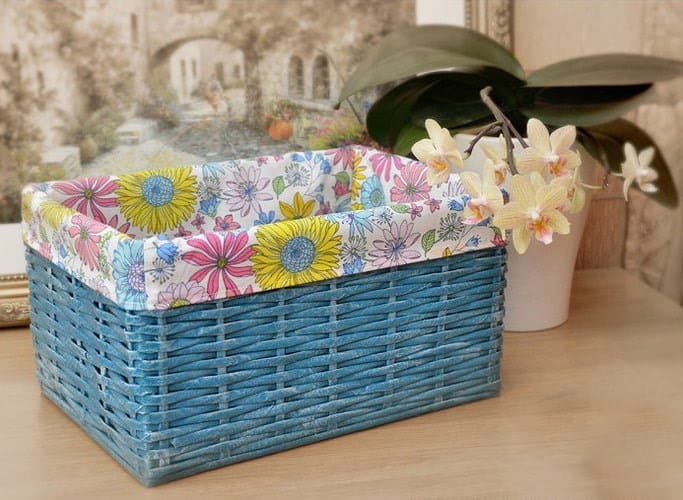
Pictured is a storage basket made of newspaper tubes, painted blue and decorated with fabric.
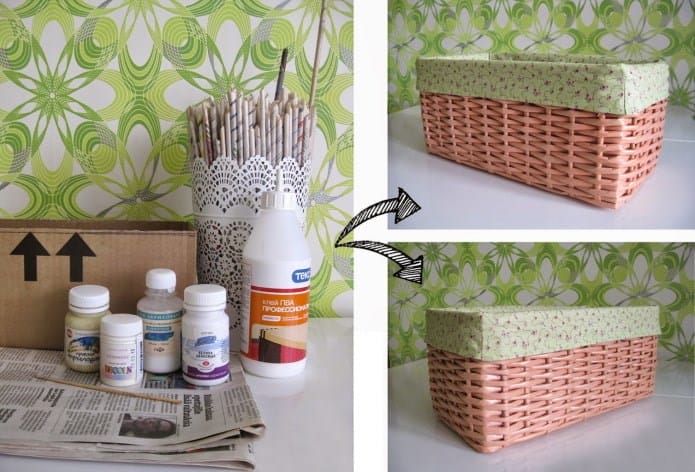
What you need:
- Newspapers.
- Knitting needle (you can take a skewer).
- PVA glue.
- Scotch.
- Cardboard box.
- Acrylic paints and varnish, brushes.
- The cloth.
- Scissors, ruler.
Step-by-step instruction:
-
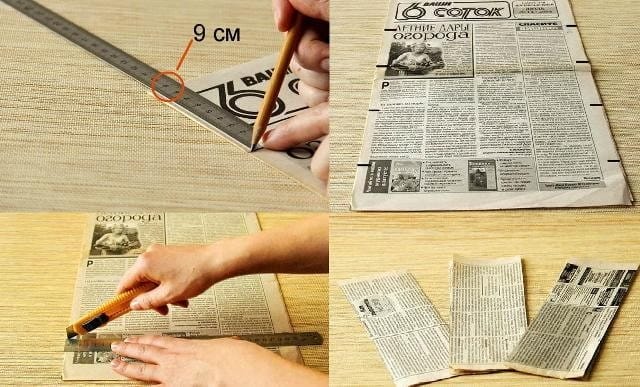
We cut the newspaper into equal strips about 28×10 cm in size:
![DIY organizer: Original ideas. DIY storage boxes: simple master classes]()
-
Apply the knitting needle to the edge of the strip at an angle of about 45-60 degrees. We wind the paper on a knitting needle, fix it with glue:
![DIY organizer: Original ideas. DIY storage boxes: simple master classes]()
-
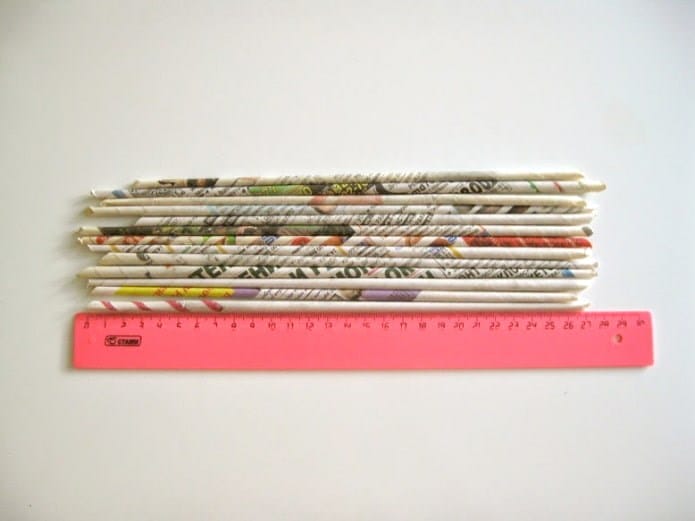
We take out the knitting needle. You need to follow the same steps over and over to get enough tubes:
![DIY organizer: Original ideas. DIY storage boxes: simple master classes]()
-
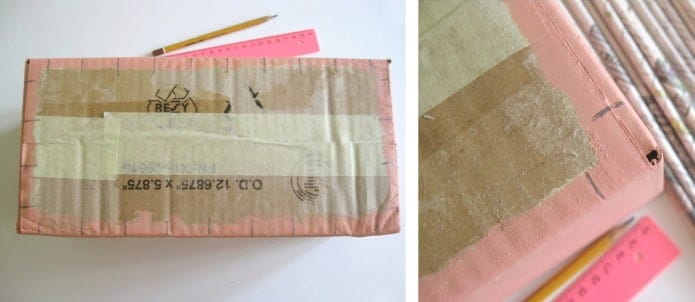
We strengthen the bottom of the box with tape and paint it in any color:
![DIY organizer: Original ideas. DIY storage boxes: simple master classes]()
-
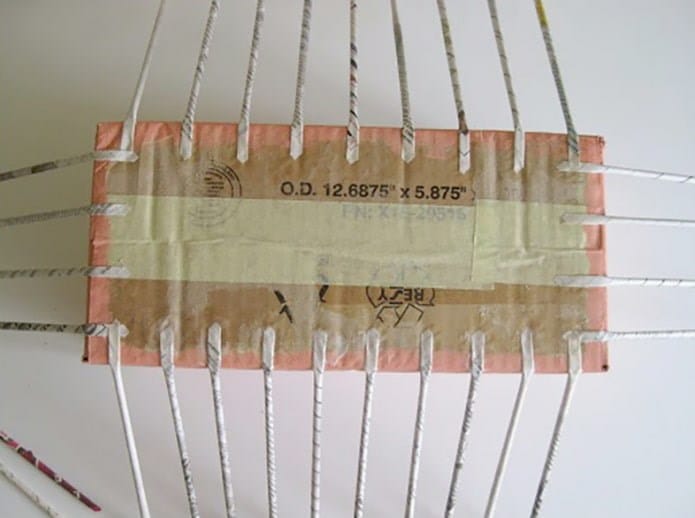
We make markings for the main tubes, marking equal segments on the box:
![DIY organizer: Original ideas. DIY storage boxes: simple master classes]()
-
We glue the tubes according to the markings:
![DIY organizer: Original ideas. DIY storage boxes: simple master classes]()
-
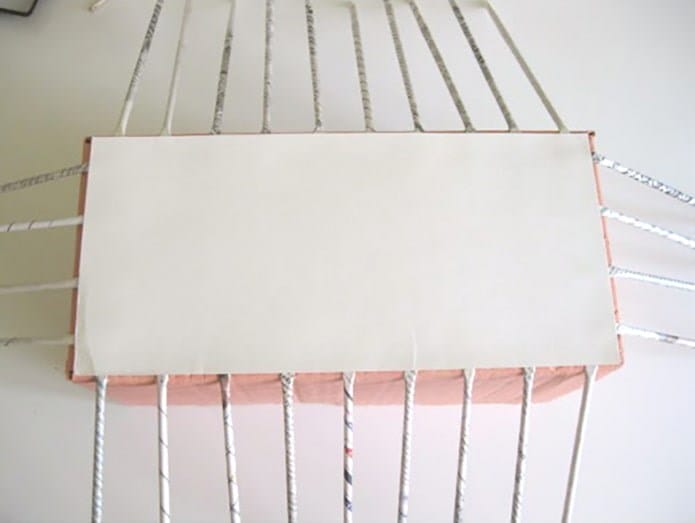
We fix the additional cardboard bottom with glue:
![DIY organizer: Original ideas. DIY storage boxes: simple master classes]()
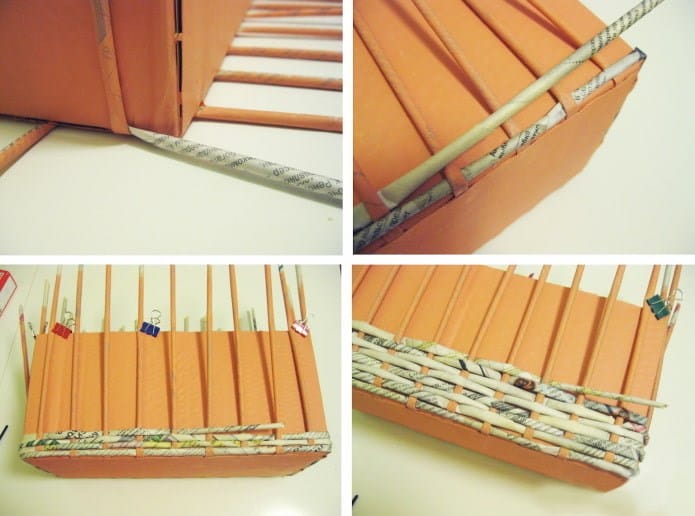
-
We paint the resulting workpiece. We start weaving. To create the first row, we braid the extreme tube-rack about the next one. We lengthen the horizontal tubes by inserting one into the other. We fix the vertical tubes with clothespins.
![DIY organizer: Original ideas. DIY storage boxes: simple master classes]()
-
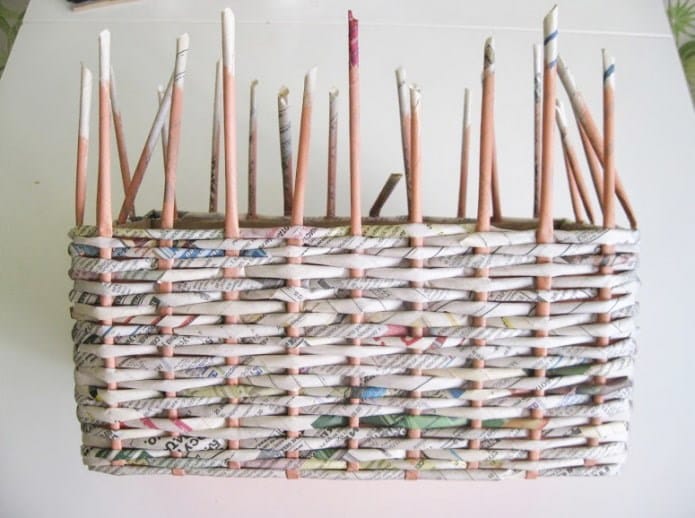
If necessary, glue the tips. We braid the entire box:
![DIY organizer: Original ideas. DIY storage boxes: simple master classes]()
-
We glue the inner walls, fixing the ends of the racks on them.
![DIY organizer: Original ideas. DIY storage boxes: simple master classes]()
-
We paint the basket in two layers, letting the product dry. We cover with varnish:
![DIY organizer: Original ideas. DIY storage boxes: simple master classes]()
-
We sew a removable cover from the fabric. The basket is ready!
![DIY organizer: Original ideas. DIY storage boxes: simple master classes]()

Conclusion
Organizing storage and decorating the interior along the way using a variety of boxes is a great idea, especially in conditions of small spaces or limited finances. This is an original way to add something new to the familiar “picture” of the room. Cardboard and bottles, newsprint and linen, yarn and napkins – all this can become a functional decoration of any apartment. Interesting master classes on making interior drawers for storing all kinds of items with your own hands can be found on the Internet or on the pages of popular magazines.
Sources used and useful links on the topic: https://ratatum.com/organajzer-svoimi-rukami/ https://roomester.ru/dekor/svoimi-rukami/korobki-dlya-hraneniya.html https://tkaner.com / aksessuary / zakolki / organajzer-dlya-zakolok-i-rezinok-svoimi-rukami / https://sdelala-sama.ru/podelki/2410-nastennyy-organayzer-svoimi-rukami.html https://tkaner.com/ vsyo-dlya-rukodeliya / podvesnoj-organajzer-s-karmanami-svoimi-rukami / http://kallibry.ru/korobki-dlya-xraneniya-svoimi-rukami/ https://FB.ru/post/diy/2020/ 6/7/216114 https://design-homes.ru/sdelaj-sam/171-kak-sdelat-korobku-dlya-khraneniya-svoimi-rukami
Post source: lastici.ru