How to set up the correct equalizer. What is an equalizer?
Definition
Timbre block, EQ, equalizer are all the same. The definition sounds like this: this is a program or a device designed to raise or lower the volume of various areas of the sound frequency range. The equalizer is able to equalize the entire frequency amplitude and the characteristic of the signal itself as a whole. It is important to know that this program or device works only with a sound signal and adjusts it selectively, depending on the selected frequency.
This definition is complex and it is difficult for an ordinary user to understand the whole point, therefore now – in simple words. An equalizer is a program (in this case) that works with specific frequencies of sound. As you know, there are low frequencies and high frequencies. Low is bass, high is falsetto, or as it is also called – squeak. So, the equalizer can lower or increase the volume of these areas. But the sound can be divided not only into two frequencies, it is divided into n frequencies. So the equalizer has several bands, the eight-band version is more common.
Most often, this program is used in the audio industry, but now let's talk about how it can help an ordinary person.
Equalizer types
I would like to say right away that there are two types of equalizers, but they perform the same function – they change the volume of a separate sound frequency range.
So let's talk about the parametric equalizer first. This type is never present in the standard set of programs for a PC or phone, but if you wish, you can download it from the Internet. It differs in that there is a setting for the width of the bands. That is, you yourself can choose a separate piece of frequencies in the sound and then work with it. Basically, the work proceeds in the same way as in all other types.
Now let's move on to the type that you will find everywhere – this is the graphic type. In its functionality, it always has fixed frequency bands. You will not be able to select the range you want. However, this type of equalizer is used most often. The bottom line is that there are many variations of it. The simplest is three-lane. It allows you to adjust bass, squeak and mids. It can be found on almost all devices, but it is not fully effective.
As you might guess, the more bands there are, the more flexible the sound setting becomes. So, at present the maximum number of bands is 31. But such equalizers are used most often in recording studios, and in everyday life they are not needed.
On PCs and devices, you can often find five-band equalizers. They do not overload with unnecessary settings and allow you to work with sound to the fullest.
Equalizer on Windows
Initially, we started talking about how to improve the sound quality of your speakers. We return to this topic. So, let's say you bought the most expensive speakers that were sold in the store, and when you came home and plugged them in, you did not even hear the difference compared to the past. Do not rush to despair, first open the equalizer and turn the knobs, you yourself will hear how the sound changes. More details now.
Windows Media Player
Equalizer for Windows can be found in two places: in Windows Media Player and directly in the Sound settings. Now we will focus on the first option.
By adjusting the equalizer for Windows in Media Player, you can only have an effect on the playback of music files in this player. That is, if you run the same file in another player, the sound will be the same as before the changes.
So, you have turned on music or video, then right-click and select “Additional features” from the menu. Next in the list, click on “Graphic Equalizer”. For Windows 7, this instruction works one hundred percent.
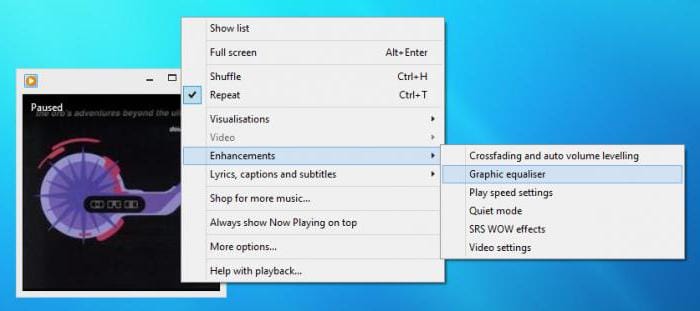
That, in principle, is all, the equalizer is open in front of your eyes on the monitor. You can change the position of the sliders and notice the difference in the sound, it is also possible to select a preset (Preset), but more on that later. It makes no sense now to tell you how to set up an equalizer for Windows, since it is the same in all operating systems. Therefore, now we will talk about how to open it in each of them, and in the end we will analyze in detail how to set it up.
Equalizer in “Sound”
So, we figured out where you can find the equalizer in the first way, but as mentioned above, its setting only affects the Media Player. Now it's worth talking about how to adjust the equalizer for Windows 10 so that the sound changes in all sources. Of course, this method works not only on the “top ten”, but also on other Windows operating systems. Just now let's analyze the setting of this particular version.
Initially, you need to get to the “Sound” menu. To do this, go to the “Control Panel”. There you need to click on the “Sound” line. As soon as you have done this, the same menu will open in front of you. The list will display all audio playback devices connected to your computer. Select the required and click the right mouse button in the menu, select “Properties”.
An additional window with properties will open, go to the “Improvements” tab. There will be a combo box, scroll down the slider and check the box next to the “Equalizer” line (Windows 7 implies the same actions).
Further in the drop-down list you can select different presets. Each of them will change the sound, you can try them all and stop at what you like. After that press the “Apply” button and you can close all windows.

As you can see, this method does not allow you to independently adjust the equalizer, you can only use templates, but, on the other hand, it affects all players.
Extraneous programs
It is also possible to download an equalizer for PC. For example, there is the NeonVisual program. By installing it, you can flexibly adjust all frequencies, thereby improving the sound of your speakers.
In addition, the program offers a user-friendly interface. Even an inexperienced user can independently figure out all the intricacies.
In principle, there are an unimaginable number of such programs, but it is pointless to talk about each of them. They are all similar, and if you know how to use them, then there will be no problems.
In the meantime, we are moving from the Windows operating system to Linux.
Equalizer options
The main parameters of the equalizer are:
Number of equalizer bands (number of filters used) – 4-band equalizer; 10-band equalizer, etc.
Cutoff or Freq – cutoff frequency of the filter or center frequency (frequency of the selected EQ node); units of measurement – Hertz (Hz).
Quality factor or resonance (Q or Res) – bandwidth (the number of affected frequencies around the center frequency); units of measurement – conventional units.
The level of gain / attenuation (Gain) – the level by which the frequency band around the central band will be reduced or increased; units of measurement – decibels (dB).
Cutoff slope – the slope of the frequency cutoff curve when using cutoff or shelf filter types; the unit is decibel per octave (dB / oct.).
Often, virtual equalizers (VST plugins) have the ability to change the type of filter for each of their nodes. Analog EQs have fixed filter types. Such devices are usually equipped with several bell-shaped (peak) and two cut-off filters (Low Pass and High Pass).
Why is it needed
To understand why this is necessary, first of all, you should know what are the reasons for the distortion of the sound recording.
It can be a poor-quality speaker system or interference in space. For example, dips in sound will occur due to the absorption of sound waves by surrounding materials.
And the main purpose of the equalizer is to improve the acoustics in the sound space in which the listener is.
How to set up an equalizer
Now almost every device, be it a PC or a smartphone, contains a player, which means it has a built-in equalizer. And you can customize it yourself.
Instructions for it
setting in the mobile phone
:
- We go to the settings menu.
- We turn it on.
- Choosing a ready-made profile for your genre (rock, pop, jazz, hip-hop, electronics)
- We manually move the frequency controllers to our taste.
- We save the created profile.
If a priori it is not in the settings, the equalizer can also be obtained using the appropriate application, which must be downloaded and installed on your phone.
How to use a software equalizer and which one to choose (TOP-4 best apps)
Let's see what options for smartphone equalizers are and how to use them.
-
Sound Booster
This is an application that will help you to set up an excellent playback quality of music compositions. It is a five-band equalizer with a powerful bass amplifier.
The program adjusts the sound so that it best suits the style of the songs you listen to.See also: What can be done from an old smartphone.
It is possible to create your own sound style in the music editor, edit and save it. Suitable for listening in a small, confined space (apartment).
-
Equalizer Music Player Booster
This program allows you to change the sound quality for better playback with a professional 5-band equalizer and powerful bass booster.
The program is distributed free of charge, it has a simple and intuitive interface. -
Dub Music Player
Those looking for a simple, functional and easy-to-use equalizer for their mobile phone can take advantage of this application.See also: What is FLAC in a smartphone, how it differs from other audio recording formats.
Improves any style of music. Allows you to create your own melody playlists.
-
Ttpod player
This program – an audio player for smartphones, has many interesting features: support for files of different formats (MP3, OGG, AAC, MP4, MID, AMR), 10-band equalizer, music search, alarm clock, playback modes and more.
To improve the effect, it is recommended to purchase high-quality headphones.
Features of the device
The first use of the equalizer occurred in the 30s of the last century – it was then that the sound of audio systems in the cinema hall was changed by John Volkman. He just put the equalizer into the sound reinforcement circuit.
1967 saw the release of a pilot kit that included 1/3-octave passive filters. It was named “Acousta-Voice”. He opened a new era in sound equalization. The next 20 years may be characterized by a great upsurge in the production and configuration of equalizers – developers have come up with a huge variety of audio devices using a variety of technologies, from semiconductors to digital circuits.
Equalizer (from the English Equalize, generally accepted abbreviation – “EQ”) is a device or application for a computer that allows you to adjust the volume of individual parts of the frequency spectrum and provides equalization of the amplitude-frequency properties of an audio signal.
As for sound recording, the equalizer here becomes a full-fledged part of the audio path. The devices are used for sound recording, built into preamplifiers or combos, or implemented as separate blocks.
For example, the equalizer allows you to highlight the most effective and attractive frequencies for vocal performance, add missing frequencies to them and give them a certain characteristic. It also allows you to customize your guitar or bass sound and drum kit to suit the style of music you are playing. In these, the equalizer is usually built into a combo amp, preamp, or guitar circuit.
The main frequency picture is based on the mix, so the equalizer should be approached very delicately during mastering, and only if its use is justified.
The equalizer corrects a separate part of the audio range, in connection with which there is a decrease or increase in amplitude in a certain range of the spectrum. In other words, the loudness of the spectrum changes without changing the dynamic characteristics of the track as a whole. It belongs to dynamic audio processing tools and is a kind of filter. Devices are of two types: graphical and parametric.
Graphic Equalizers
These devices are usually referred to the conduct of concert activities, where multi-channel adjustment of portals, stage monitors, etc. is required. They are implemented in the form of a panel with a set of sliders, where each increases or decreases the amplitude of the sound at any selected frequency.
The most widely used graphic equalizer is the 31-band, called 1/3 octave. It processes the frequency spectrum audible to the human ear as fully as possible (20–20,000 Hz). In it, subsequent triplets of bands add one octave to the previous one. Bands 2 and 3 adjust the intermediate parameters of 1/3 octave. This range includes 10 octaves. By adding the first band, you get an equalizer that includes 31 sliders.
The advantages of this type of equipment are as follows:
- speed and ease of spectrum exposure;
- simultaneous correction of different parts of the spectrum (increasing and decreasing the amplitude),
- graphical visibility and ease of use.
But there are also a number of disadvantages:
- the lack of an accurate choice of the frequency to be corrected, as a result – a relatively coarse adjustment;
- fixed value of Q factor for each band;
- the inability to change the spectrum completely smoothly, which somewhat distorts the sound of the stream.
Parametric equalizers
Devices of this type are more precise and functional, making them ideal for studio sound processing. Yes, they have fewer equalization bands, but they don't need that much because they are able to accurately determine the frequency to be corrected. Traditionally, parametric devices receive 1-4 bands, assigned separately for a given range, within which their frequency is corrected.
Equalizers are called parametric because their parameters are completely customizable, which is extremely important for sound engineers.
Equalizer options:
- Working (center) frequency. The equalizer is calculated on its basis. Parametric devices allow you to accurately select the operating frequency, so resonance can be easily “damped” without affecting other parts of the spectrum.
- Filter type. Often, software EQs allow you to select the type of filter (cut, shelf, band) that provides control over the frequency spectrum.
- Quality factor (Q). It displays how wide the hump or dip that appears in the region of the processed frequency (bell width) will be. This parameter is inversely proportional – the larger the Q, the smaller the frequency band that changes during adjustment.
- Sensitivity (gain). This is a decibel number that reflects the change in volume of the sound at the frequency being corrected. This parameter affects not only it, but also the frequencies close to it, and the strength of the influence on them directly depends on the quality factor.
A notch filter allows you to cut above / below the selected frequency and applies to both the low-frequency and high-frequency spectrum. Moreover, the slope of the curve is strictly fixed. Most often you can find two-bit (12 dB / octave), four-bit (24 dB / octave) filters, much less often: one- (6 dB / octave) or three-bit (18 dB / octave). Discharge refers to the number of decibels that change in volume when the frequency changes by an octave. As the frequency increases, its effect from the filter increases. The influence of the cut filter of high-frequency tones increases in the positive dynamics of the frequency graph, and low-frequency tones – in negative dynamics.
The operation of the shelf equalizer is similar to the principle of the cut filter, since it also affects the spectrum located above or below the frequency to be corrected. But this similarity is relative, since the principle of its influence on the spectrum is somewhat different. The shelf literally translates as “shelf”, which indicates the order of its work.
Its main differences from the cut-off filter are:
- Uniform change of the spectrum from above and below from a given frequency. And when the amplitude decreases, the filter decreases the volume in equal shares by both an octave and three.
- Effective work in plus and minus correction (the cutoff has only minus work), so you can either lower the frequency or change the sound, giving it the desired color.
- With a minus adjustment, it does not cut the frequency as much as a low-cut filter does.
The band filter is the most common EQ model. It is truly parametric in that it provides accurate parameter settings. It can decrease or increase frequencies in a given range by the required number in decibels and with the required curve graph. It is indispensable if you need to insert two sounds with the same spectrum into the mixer, ensuring that each one is audible.
In a number of situations, the band device ideally corrects the timbre imperfections of vocals or instruments, eliminates the influence on the acoustic properties of the room of acoustic and standing waves, resonances.
For example, when a vocalist sings in a nasal voice, this is masked by reducing the frequency spectrum in the 500-700 Hz zone with an average Q factor.
In addition, by changing frequencies in different regions of the spectrum, you can make the instrument sound more expressive. For example, to give the kick drum attack, you can boost the mids in the 3.5-5 kHz range.
As with any audio processing equipment, the equalizer has a virtual replacement. An important option for modern software equalizers is individual processing of mono and stereo components or separate processing for versatile (L or R) stereo audio channels.
Where Equalizers Are Used
The area of device use is enormous. Their main task is to provide the original audio material with a decent sound.
Multi-band graphic equalizers are often used to process monitors installed on stage. This allows feedback to be suppressed. Or they use digital jammers (the quality factor of which is set to a high level). The equalizer also limits the frequency spectrum of the reproduced material.
Using equalizers, you can add an unusual and unique sound to musical instruments, both during performance and in recording. It is easy to apply individual effects with a strong emphasis on individual ranges. For example, the old radio effect can be achieved by removing all low and high frequency components while keeping only the mids.
DJs widely use the equalizer integrated into the mixing console, which allows them to achieve interesting audio effects.
It is also important to note that the acoustic design of the room makes a significant contribution to the final sound of the recorded instrument, as well as to the sound produced by the loudspeaker. The frequency properties of the audio track also depend on the size and shape of the room, wall coverings, the number of listeners, the level of humidity and other factors. And if the room does not have good acoustic data, then the equalizer can save the day.
In studio life, equalizers are rarely used, since today's studios are equipped with equipment that minimally distorts the frequency properties of the recorded audio material. But with digital mixing and mastering, most of the materials are processed by their software counterparts – this is how the sound is cleared of “unnecessary” frequencies. Most often, it is necessary to process the vocal parts with an equalizer: with the correct configuration, it hides the imperfections of the voice and emphasizes its useful functions.
Secrets of Effective Sound Processing
To use it every time is at least counterproductive, because great sound does not require such serious processing. It is important to try to eliminate errors during the recording process – then equalizer adjustments during mixing are minimized:
- The sound processed by the device is not so natural, so you should not use the equipment in every situation.
- If possible, use an equalizer only as a minus.
- It is worth pressing all the bypass EQs regularly to ensure that the adjustment improves the sound.
- Adhere to the principle of opposites: remove high and high-mid frequency ranges that sound high (for cymbals and guitar parts), but introduce low and low-mid frequency ranges, and vice versa.
- To accentuate the “competing” tracks in the audio track, they should be separated by highlighting and removing dissimilar frequency ranges from it.
- You can add richness to bass and kick drum in a low-power audio system by boosting the environment and treble tones.
- It is possible to smooth out the sound produced by the snare drum or the sound of the guitar part, to make it more “tube”, if you remove the high-frequency tones a little and introduce a little low-frequency ones, and to add density to the sound, you should add a little bass.
- You can remove AC-specific backgrounds by simply cutting out a narrow portion of the signal within 50 Hz (as well as 100 Hz), but this can affect the sound of bass and kick drum parts.
- Wind instruments should not be corrected at all, but it is better to select a high-quality microphone.
- If after a sound correction (especially a strong one) you still don't like the result, reset all settings and try again.
Although the equalizer is widely used, it takes some skill. This does not prevent many arrangers and sound engineers from overusing equalization during work, and this makes the sound unnatural. Remember, if you don't know how to use the equalizer, don't touch it. If you approach sound correction responsibly, then the effect will surely delight you!
What is equalizer for android
By it is meant an application that helps to change the volume level of individual zones in the frequency range. Adjusting the signal amplitude allows you to achieve the desired effect: to muffle or emphasize certain ranges, to change the final parameters of the amplitude-frequency characteristics (AFC).
Appearance of the program
Experts consider two types of equalizers:
- physical. They are used during sound recording. In the process of work, his participation is considered indispensable: it helps to emphasize or mask the peculiarities of the voice, to give the desired sound to individual instruments;
- software. This option is used when listening to music tracks. They can help correct abnormal sound from headphones or speakers.
For your information! Equalizers for Android are more often used to give a particular color to a piece of music according to the user's preferences.
Where is the equalizer on android
Cell phone companies, in most cases, have not provided an equalizer, Android devices come without a system built-in application. Users are having trouble customizing and improving audio quality on their devices.
Where is the equalizer on the iPhone 6 and other models
Equalizer for android can be downloaded from the official Google Play app store. Some programs are provided for use free of charge, but they lose compared to paid content.
Note! For beginners, the simplest utilities are enough that will help you learn how to work with music tracks and set the sound level according to the preferences of the cell owner.
How to set up equalizer on Android
How to remove a virus from Android – detailed instructions
To obtain the expected effect, you can make a selection of compositions with different sounds and reference quality levels. A good option would be to download licensed Digital Audio CDs or digitized tracks recorded in high-resolution format: Hi-res (FLAC).
The setting is carried out according to the following algorithm:
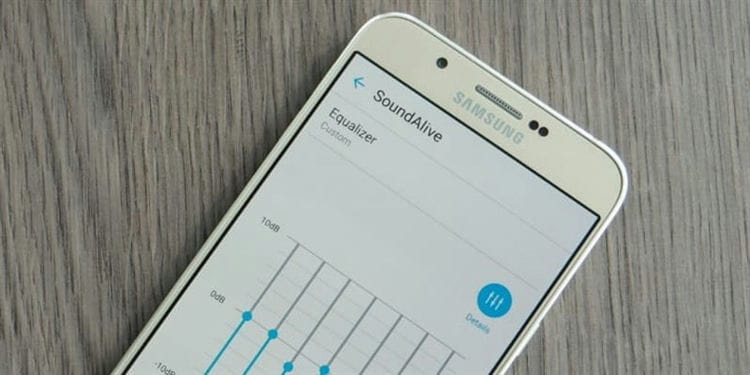
- The equalizer is set to “Default” mode. All frequency controllers must be at zero.
- Turns on the mode of viewing the level of frequency bands (present in many applications). If there is no such functionality, you need to install a utility with a visual display.
- Make a control listening, in parallel adjusting the sound level in each of the ranges. The picture is captured in screenshots, saving images for each music track.
- After that, fragments are launched, the quality of which is not satisfactory. Frequency levels are set for each version of the music – they make them as similar as possible to the saved screenshot.
- Good quality programs have a setting memory function. The last step is to save the selected settings under the correct names. This approach will make it easier to find them in lists.
Equalizer setting
Important! In the future, it is enough to turn on the saved settings when listening to your favorite music tracks. The need for constant selection of frequencies will disappear.
How to use Equalizer on Android
How to remove the pattern from Android – detailed instructions
The correct setting of the equalizer for the android phone is not unambiguous. Users carry out it at their own discretion and in accordance with the accompanying factors:
- according to the parameters of a certain genre of music;
- the quality of the recording;
- having a playback source and headphones / speakers.
Note! Depending on the manufacturer, the presets may differ in the software versions. When setting up an application, it is recommended to make several options: for different genres, environmental conditions and mood. If you provide for all kinds of settings, then in the end you get a successful and ideal assembly of your favorite music.
Equalizer setting for regular headphones and bluetooth
Equalizer for bluetooth headphones on an android device (wireless) is adjusted step by step:
- All program settings are switched to the “Default” mode.
- Include the song on which you are going to adjust the frequencies.
- Initially, the peaks are removed – each engine is alternately lowered below the zero mark. This helps to remove unpleasant over-level frequencies.
- Compensate for failures – in turn, they raise the regulators, which remained at zero. The rest of the engines do not touch.
- After obtaining a comfortable sound, the settings are saved, adjustments are made and the files are renamed.
Important! If you have a lot of music tracks and use an android headphone equalizer, it's better to break them into groups. Each needs to be given its own name and save the settings under each category. In this case, the desired preset can be activated at any time.
Adjusting the equalizer on an android connected to a radio tape recorder
The process practically does not differ from the adjustment on a personal computer or cellular. The tuning takes place according to the same principle: the stripes are shifted to “plus” or “minus”. On basic models of radio tape recorders without additional devices, regulation is carried out using buttons or knobs located on the panel. These equalizers have a small number of bands, which is associated with the minimum volume of the screen.
Expensive radio tape recorders have wider possibilities in terms of sound, they have their own functional equalizers. If they work under the control of the android operating system, then they allow you to download and install any third-party programs (better with Russian functionality).
Modern radio tape recorders reproduce tracks not only from external drives, but also from built-in sources. You can connect a smartphone to the audio jack and listen to music with pre-configured settings. But for the car, additional adjustments will have to be made, since the interior is a different space from an acoustic point of view.
Car radio setup
Important! Installing an equalizer on the rear window of a car does not make it possible to adjust the sound. It relates to the visualization of music tracks and is created on the basis of diode strips. Its success is due to its attractive appearance, which causes the desire to have such a “decoration”.
Bass Booster Pro # 8212 Equalizer for Lenovo Phones
Undoubtedly, many music lovers have faced the problem of incorrect sounding of their favorite music in their smartphones, especially sounding through players that do not have their own equalizers, such as the audio player of the Vkontakte application. The solution to this problem can be a third-party equalizer that can change any sound coming from your smartphone.
Bass Booster Pro # 8212 is an equalizer that does not depend on the audio player installed in your phone and allows you to easily change the sound settings of the device.
Equalizer has various presets, including: dubstep, electro, dance music, techno, bass boost and more. In addition, everyone can create their own preset and save it in the program settings.
A handy feature is the ability to create desktop shortcuts with saved sound settings. Thus, by pressing only one button on the desktop, you get a fully customized equalizer for your needs.
How do I set up an equalizer on my phone?
You can adjust the equalizer in almost any phone that has an Mp3 player function, but not all of them can manually adjust this function. You can find out more about the additional possibilities of playing music on your cellular device by reading the user manual.
On your phone, go to the player settings that you use to play music. There, select the context menu, then the “Equalizer” item. There, configure the function the way you want. You can use the standard setting that each player has, but it contains only the most minimal set of parameters for the equalizer.
If your mobile phone supports manual configuration of this function, then you can perform it, but first by looking at the Internet through the various ready-made templates.
You need to know that many can adjust the equalizers in cell phones according to the equalizer parameters of the speaker system, computer or portable player. And the phone can only contain its abbreviated version, so do not get confused when specifying different values.
You can also try to set the settings yourself, first saving them in order to compare later. It often happens that the sound of music when using the same settings in the phone and other speaker systems can be completely different.
If your cell phone supports a function such as setting the equalizer for the call mode, then you can find it in the music theme or the settings of the current mode. Such a function, in principle, is very rare, and you can check its presence in your phone model in the user manual that came with the kit.
You also need to pay attention to whether your mobile phone software can download additional files to customize the sound system. It is recommended to turn off various effects and 3D signals before starting the setup, but you can also be guided by your musical preferences.
Equalizer types
There are 4 types of equalizers, but they all basically perform the same task: they change the volume level of a certain range.
So, the types of equalizers:
- Graphic;
- Paragraphic;
- Parametric;
- Cut-off.
Cutoff equalizer
The name of this type is directly related to how the equalizer works. The cutoff equalizer allows you to cut off the high and low frequencies, hence the name. A filter tuned to low frequencies will cut only the low frequencies without affecting the high frequencies.
Low frequency clipping is most useful when you need to neutralize low frequency noise: train noise, passing cars, and other street sounds.
High-frequency cutoff is used to combat the noise of musical instruments.
Equalizer application
Why do you need an equalizer? Equalizer is a must when working with sound. The main purpose is to obtain the most adequate, correct sound. The original sound may be distorted due to the characteristics of the speakers, the speaker system, or certain room conditions.
When using the equalizer, remember that changing one frequency can change the overall sound.
Types of settings
It is generally accepted to divide professional soundstage setup into two classes:
- Setting up primitive systems that reproduce sound from a car radio;
- Setting up complex systems that reproduce sound from additional amplifiers.
Adjustment of conventional systems
So, let's start our publication by setting up conventional speakers. This is perhaps the easiest way to make adjustments that any person can handle, regardless of their technical knowledge.
Ordinary systems – by this expression we mean all the elements playing from the GU.
Best Equalizer Setting
Let's get started:
- After the connection of the system has been made, we put on a favorite musical composition (preferably the one that was often listened to);
- We make the sound so much louder until the speakers start to “wheeze”
- Decrease the volume a little;
- We take up the tuning and start slowly pulling out the bass and treble.
Note. There will be no problems with high frequencies, since they, so to speak, cannot be overestimated. As for the low frequencies, they must be set, taking into account the limitation that implies breaking the speakers. In other words, we set the bass to full until we hear the same wheeze.
- After setting the so-called “pure power”, we proceed to setting the time delays;
- Exploring the level controls of both speakers (front / rear or fader / balance).
Note. We note right away that the sound setting should be done so that it is oriented towards the driver. On the other hand, if the fader / balance adjustment is made, so to speak, “in zero”, then this indicates a blurry sound stage. In this case, the sound, as it were, dominates the cabin and needs to be curbed.
- The backstage or balance is set only for the back sound, and the full sound comes from the fader. This is a prerequisite, otherwise, it will not be possible to organize the correct acoustics;
- If the balance is outperforming the fader, then the adjustment is carried out as follows: we set the rear speakers (see Rear acoustics and its installation) by approximately + 15 percent.
Note. In case someone has acquired component acoustics (which is considered by experts as a less profitable option in terms of tuning), it is recommended to adjust the midbass sound using a crossover to -2db. If there is no such crossover filter, then the fader is brought out even more to the front acoustics.
In addition, when adjusting, special attention should be paid to setting most of the balance (10-15 percent) to the right speakers. By doing this, we soften the left speakers and reduce the strength of the entire left side where the driver is sitting.
Right-hand drive cars do the opposite. And finally, when adjusting the balance, you must try to make the sound seem to be heard from the windshield, and not from the speakers.
Correction of complex systems
In principle, there is nothing exorbitantly complicated in this setting. To the techniques described above, filter and amplifier power level adjustments are added.
With this setting, we must not forget about the speaker configuration and check whether they are correctly selected.
Let's get started:
- We match the signal level of the car radio with the signal level of the amplifier;
- We put all the settings under “0”, not forgetting to check that the power level of the amplifier Gain is turned to the position of mini-sensitivity;
How the equalizer should be configured
- We increase the volume, as in the above case, until sound distortion appears;
- We lower the volume level;
- We go to the amplifier (see How to connect an amplifier to a car radio: a master for yourself) and increase the volume there, according to the same principle;
- Reduce the sound as soon as the speakers emit the “SOS” signal. Thus, we match the level of the radio and amplifier;
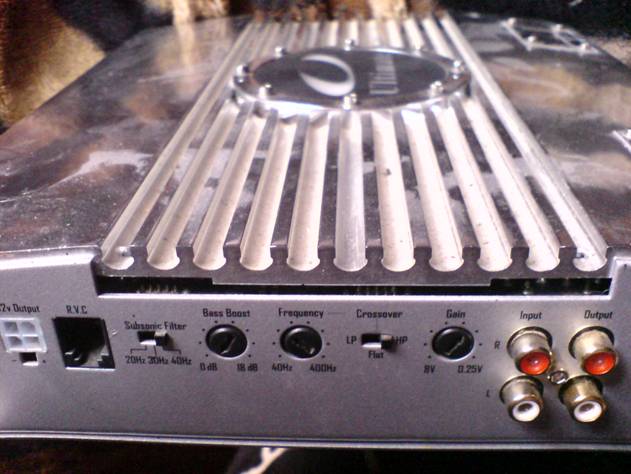
- We turn to the filters that are available on each amplifier. They are for HF and LF – High pass / Low pass.
Note. The first High Pass filter is designed to limit the impact of low frequencies on the speakers. It works like this: if the High Pass is set to 100 Hz, then low frequencies below this mark should not fall on the speakers. In this case, the adjustment scale is usually set in the range of 40-160 Hz.
The second filter – Low pass is needed if the system uses a subwoofer. The principle of operation of this crossover is the same as for the High Pass, only the restrictions are placed on the high frequencies.
Thus, we have made the settings for the amplifier.
How the equalizer works
Equalizers are physical and computer-based. Both are designed for the same purpose and work on the same principles. A graphic equalizer in a computer or laptop usually looks like a set of sliders that move up and down tracks. These tracks are called stripes. Depending on their number, equalizers are, for example, three-band, four-band, etc. The more bands – the better you can adjust the sound using the equalizer.
For home use, an equalizer with three to five bands is often sufficient. For recording and processing sound, an equalizer with a lot of bands is better.
This is what the standard window with frequency settings in the equalizer looks like.
Each EQ slider is responsible for a specific frequency of sound, ranging from low (bass) to high. Moving the slider up, we enhance the selected frequency in the overall sound, and lowering it down – weaken it. Initially, the sliders are set to the “0” position, which corresponds to the normal frequency level.
Frequencies are located from left to right: the leftmost slider is responsible for the lowest frequency, the rightmost one for the highest. Mid frequencies are located between them.
The sliders are labeled with numbers. These numbers represent the frequency range in hertz (Hz) for which they are responsible. The prefix “K” to the figure means thousands and corresponds to high frequencies.
Presets are added to graphic equalizers – ready-made sets of settings for instantly obtaining one or another effect. Presets help, without special knowledge, to correctly adjust the equalizer in music, for example, getting an echo effect or a large hall. There are presets that give your music a certain style of sound – rock, pop or jazz. If you select a preset, the EQ sliders will automatically align to the desired positions, changing the characteristics of the sound.
How to use the equalizer on a computer
The Windows operating system has a basic free equalizer in all versions. But in both Windows 7 and Windows 10, the equalizer settings depend on the drivers of the sound card installed, so this feature may not be present on your PC by default. Typically, the system music equalizers on your computer do not allow you to fine-tune the sound.
Equalizers in audio programs and audio players such as Realtek HD or AIMP offer more flexibility. The latter has a graphic equalizer that can be called from the program window. It allows you to adjust the frequencies over a fairly wide range. However, in order to select the sound quality to your liking, it is better to download an equalizer program.
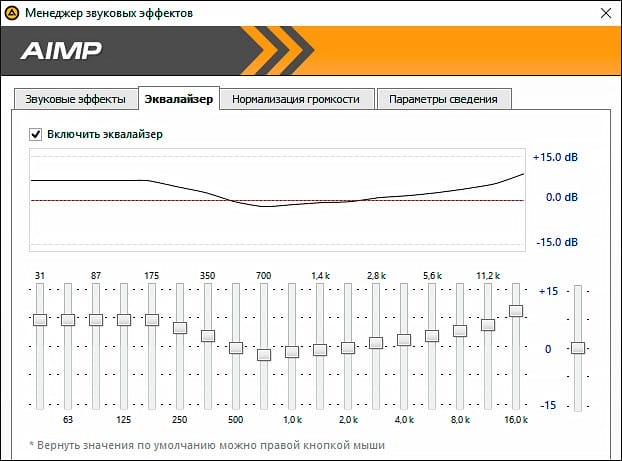 Equalizer in AIMP audio player
Among similar programs for sound processing can be distinguished an easy-to-use audio editor with an equalizer AudioMASTER. It has a lot of settings and interesting effects. Next, we'll show you in detail how to get high-quality sound with it, but first, we'll figure out the basics of working with these tools for ease of understanding.
General rules for setting up sound
Before adjusting the sound on the equalizer, check that the sliders are set to the “0” position.
Now add or subtract the frequencies you want. For example, to tune the EQ for bass, move the leftmost slider up. For EQs with a lot of sliders, you may need to raise two or three of the left ones. Move them until you get the sound you want.
Advice. Don't get too carried away with the equalizer. As a rule, manufacturers of speakers, headphones and audio equipment care about the right quality sound. Therefore, the factory settings are usually already reasonably well balanced.
If, when boosting bass, you get a wheezing sound, then you added too much low frequencies, and the speakers cannot cope with them. Lower the sliders slightly.
Equalizer in AudioMASTER editor
The advantage of the AudioMASTER is its extreme simplicity in work. In the editor, you can adjust the sound for recording, give the finished audio files the desired sound, or equalize the volume of the audio files.
The equalizer is called from the program window by clicking on the corresponding button on the left. It allows you to work with frequencies from 47 to 23K Hz. The equalizer has 10 bands.
The frequency level is measured as a percentage. Initially, each slider is set at 100%. You can bring the level of each frequency up to 200%, i.e. amplify twice. It is also possible to completely cut out any frequency by lowering the desired slider to zero.
Other presets are available to help you enhance the sound of your audio track. Among them – “Effect of presence”, “Understandable speech”, “Telephone conversation”, etc. To return to the original sound, select the “Initial value” preset. After finishing the configuration, click the “Apply” button.
Life hacks for sound tuning
By boosting or attenuating certain frequencies, you can create sound effects and get different sounds. Here is a list of some of the frequencies and the effects they are responsible for.
- Frequencies from 1 Hz to 50 Hz give the music power.
- Frequencies from 80 to 125 Hz add bass to the sound. It is important not to overdo it with them, so as not to get a dull sound.
- Frequencies from 400 to 1000 Hz are responsible for natural sounding.
- Frequencies from 800 to 4K Hz allow you to isolate individual instruments in the mix.
- Frequencies in the 5K Hz range produce a clear sound that is transparent and less dense.
If you are tuning your voice, you can make it intelligible and clear by removing the low frequency level and adding frequencies in the range from 1 to 4K Hz.
If the voice becomes empty and loses its basis, add a frequency at the level of 150-500 Hz. To make it sound less harsh, turn up the frequencies in the 500-1000 Hz range.
Equalizer is a simple tool, although it looks complicated. By choosing the right software for work, you can easily troubleshoot and customize the sound of the track to your taste. Equalizer as part of AudioMASTER – a sound editor in Russian – is perfect for basic processing of audio recordings. Install the program and evaluate it yourself!
Sources used and useful links on the topic: https://FB.ru/article/274911/ekvalayzer-eto-chto-takoe-dlya-chego-nujen-ekvalayzer https://fierymusic.ru/rabota-so-zvukom/obrabotka -zvuka / chto-takoe-ekvalayzer https://mob-mobile.ru/statya/13519-ekvalayzer-v-smartfone-chto-takoe-zachem-nuzhen-kakoy-vybrat.html https://muzmart.com/article / equalize https://mirinfo.ru/android/ekvalayzer.html http://www.oktava-studio.ru/voprosy-kompjuternogo-muzykanta/chto-takoe-jekvalajzer-v-telefone.html https: // ekvalajzer. ru / 6-chto-takoe-ekvalayzer.html https://avtozvuk-info.ru/akusticheskie-sistemy-i-ekvalajzery/ekvalajzer/kak-nastroit-pravilno-ekvalajzer-727 https://audiomaster.su/kak- nastroit-zvuk-ekvalajzerom.php
Post source: lastici.ru