DIY hologram. We paint with light. Holographic Displays
DETAILED VIDEO ON THE PROJECT
-
This video shows the complete and most detailed process of developing and manufacturing the device, as well as an overview of its capabilities and functions.
-
Clear diagrams, OpenSource firmware with comments and detailed instructions are a lot of work. I would be glad if you support this approach to creating Arduino projects! Donate main page
CIRCUITS, CIRCUIT BOARDS
Scheme 1
Scheme 2
FIRMWARE AND CONFIGURATION
IF THIS IS THE FIRST EXPERIENCE OF WORKING WITH ARDUINO – look about the platform for the purpose of familiarization, then download, install and configure the programs necessary for the operation according to SUPER DETAILED INSTRUCTIONS (there is even a video version!).
-
Download the archive with the project directly, or from GitHub (buttons just above)
-
Install libraries (Libraries folder) to
C: Program Files (x86) Arduinolibraries (Windows x64)
C: Program FilesArduinolibraries (Windows x86)
Read more in the 4th paragraph of the article for beginners -
Connect Arduino to a computer using a Data cable
-
Open the firmware file of the desired version (.ino firmware files are in the folders of the same name)
-
Configure Arduino IDE (COM port where the board is connected; connected Arduino model, as in the article from the first paragraph)
-
Configure what you need in the firmware, click download
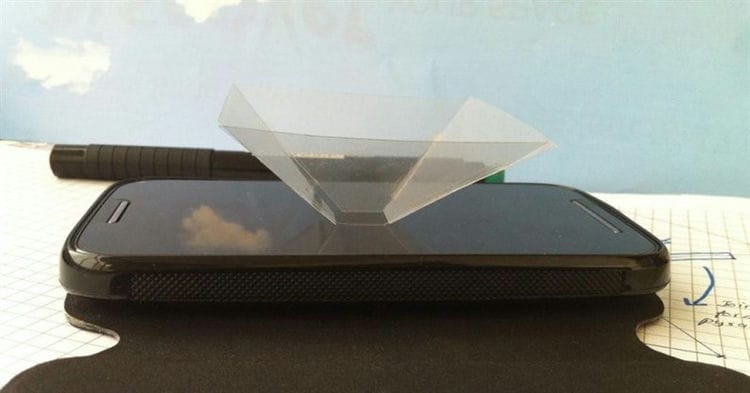
Components
For our device, we need a simple set of components:
- Clear acrylic / plastic sheet 0.5mm (you can use the plastic sheets used in packaging)
- Access to the printer (if possible)
- Scissors
- Cutting blade
- Transparent tape
- Ruler
- Pencil pen
- Smartphone
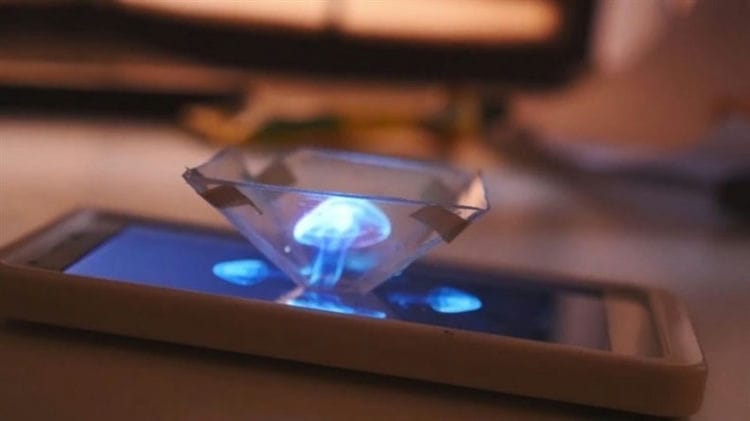
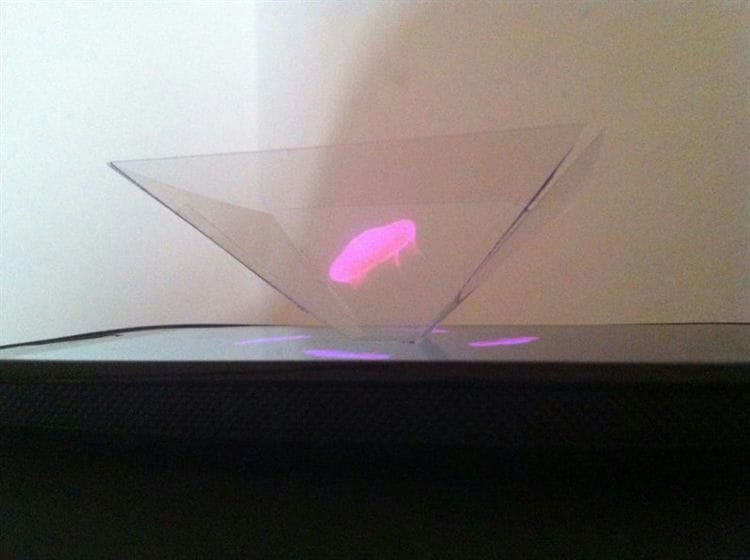
How does the 3D pyramid hologram work?
A holographic pyramid is a simple device that can be made by creating a pyramid shape with a cropped top from a sheet of plastic. The device creates a three-dimensional illusion for the viewer and makes the image or video appear as if it were in the air. Works on the principle of Pepper's Ghost (English Wikipedia). Four symmetrically opposite versions of the same image are projected onto the four faces of the pyramid. Basically, each side projects an image falling on it into the center of the pyramid. These projections work in unison to form a whole figure that creates a three-dimensional illusion.
How to create a pyramid for 3D holograms
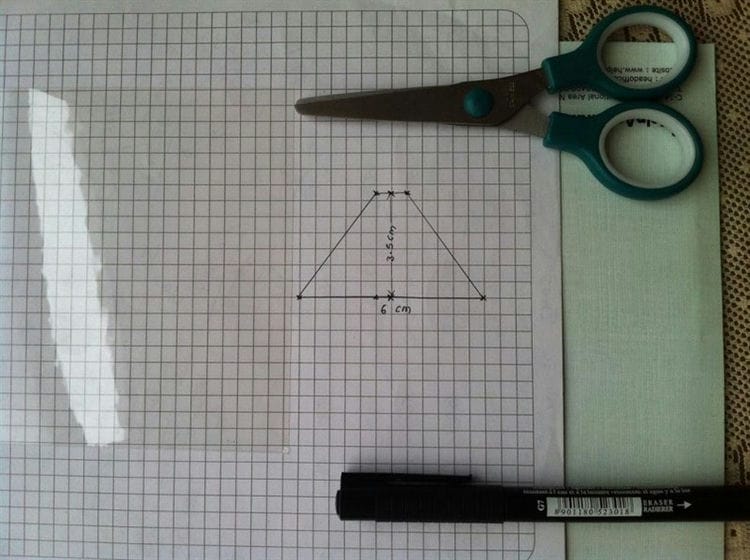
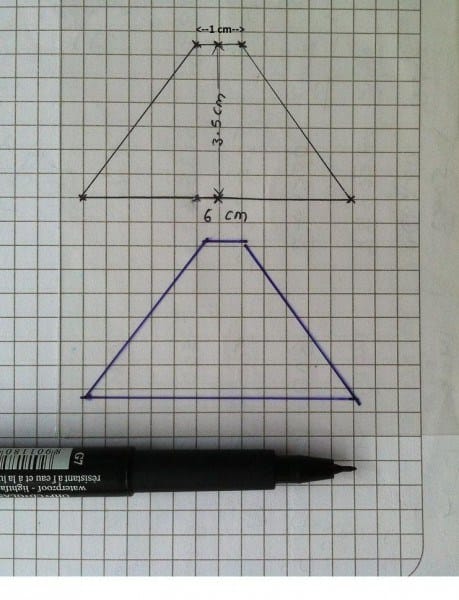
1 Print the template shown below on a sheet of A4 paper.
NOTE. If you don't have access to a printer, you can also create a template yourself. Draw a basic “trapezoid” on a piece of paper using the dimensions in the picture above. Parallel sides = 1 cm and 6 cm, the other two sides are 4.5 cm each. You can always double or triple the dimensions proportionally for use on a large display.
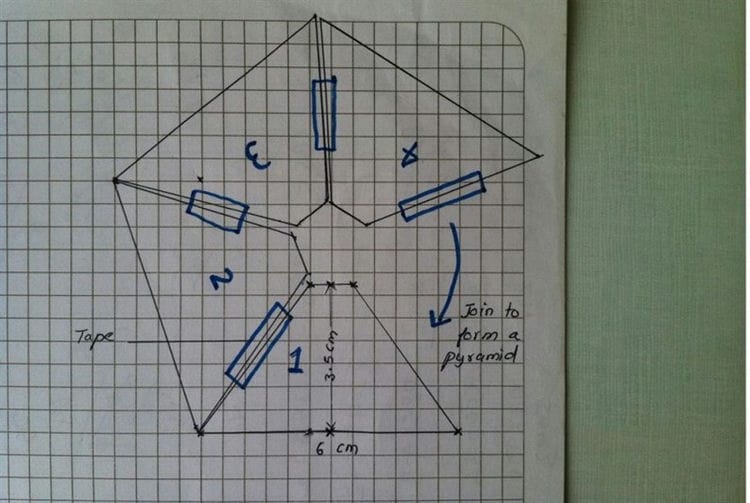
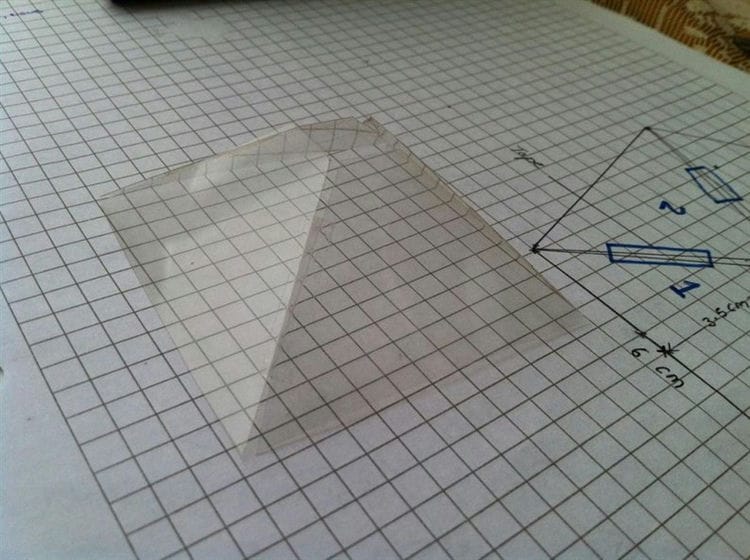
2 Trace the shape on the plastic sheet using a ruler and pen. For the trapezoidal pattern, mark four similar paths on the plastic sheet. Now carefully cut out the outlines with a cutting blade and a ruler. Try to make your cuts as precise as possible to create a more perfect pyramid.
3 If you used the printout template: very lightly cut the red edges with the cutting blade. This will allow you to better fold the edges and form a pyramid shape. Glue the exposed edges of the sheet using transparent tape.
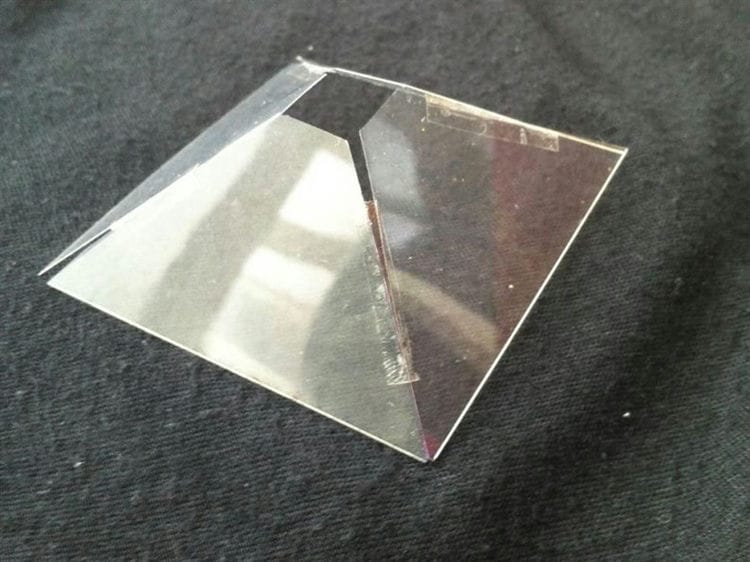
If you used a trapezoidal pattern: join the four edges to form a pyramid shape. Connect them. Either way, you end up with a pyramid like the one shown below.
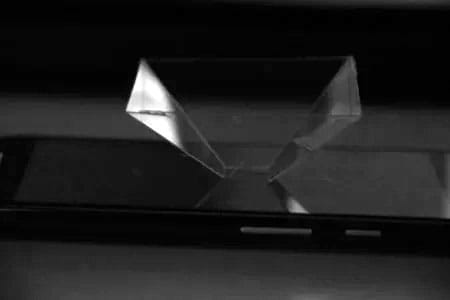
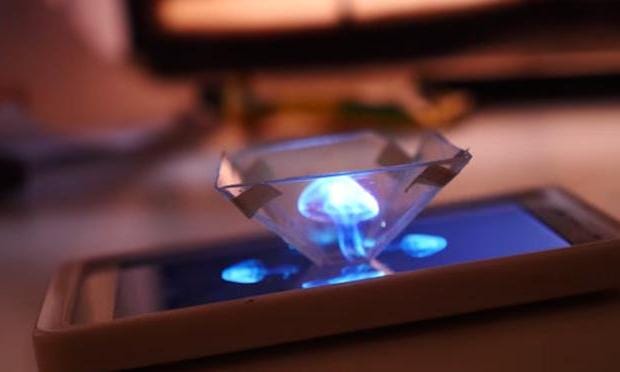
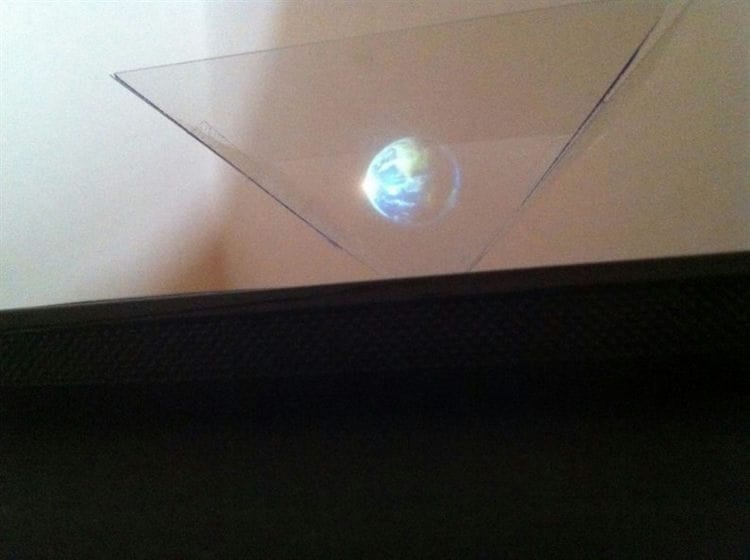
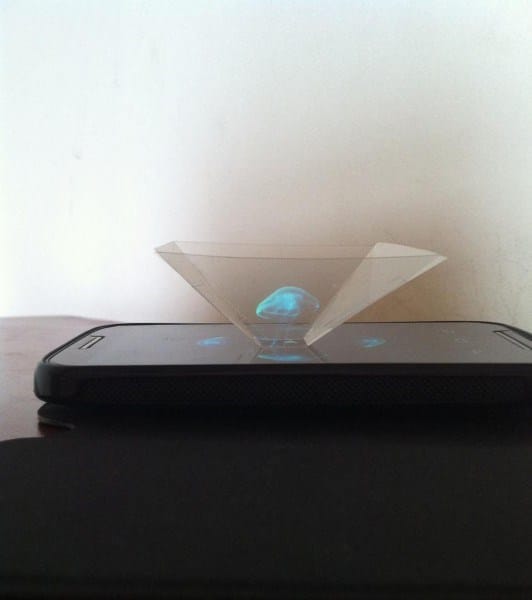
4 That's it! You've made yourself a pyramid for future holograms! All you have to do now is play the hologram on your phone. Place the hologram in the center of the screen as shown in the image below and enjoy the show. Remember to turn off the lights in the room before starting video playback.
5 Now the most important thing! You can find many holograms on. You can see what can happen in the video below.
We need
- Transparent CD box
- Stationery knife
- A sheet of paper in a cage
- Pencil
- Scissors
- Smartphone
Instruction – hologram for smartphone
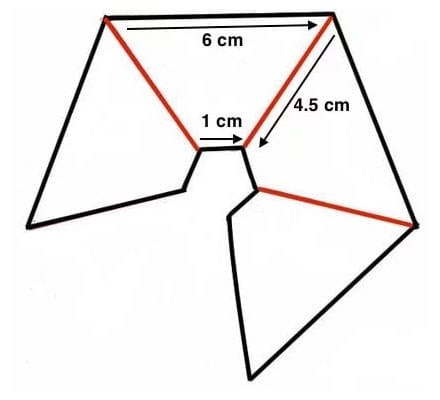
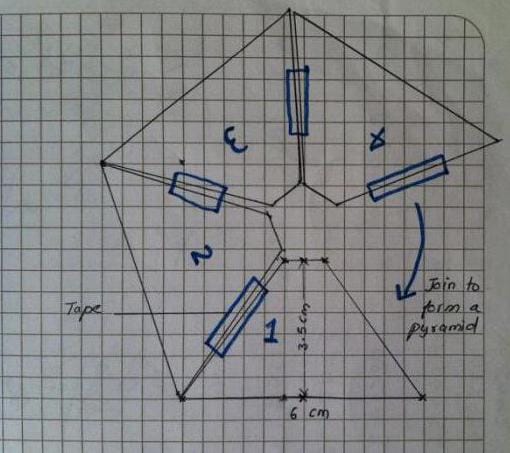
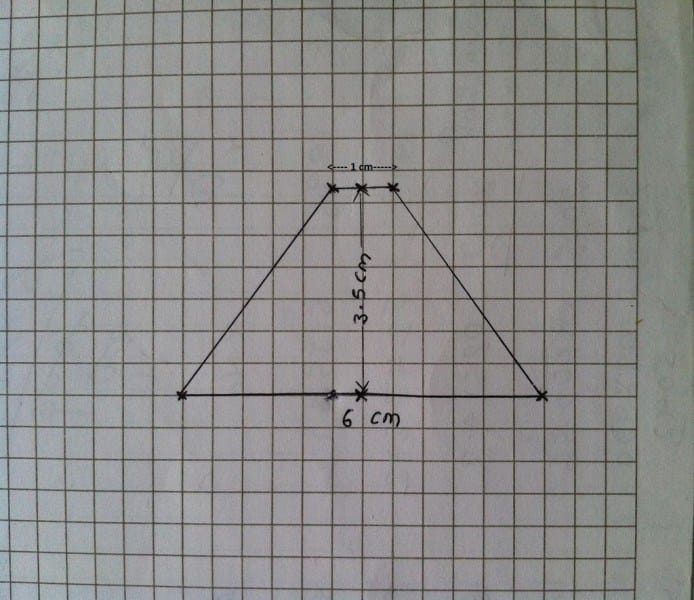
First, you need to draw and cut out a rhombus from paper with dimensions of 1cm x 3.5cm x 6cm – this will be our stencil.
Now you need to cut 4 similar rhombuses out of the plastic box of the CD disc using a stencil. Use a utility knife, but be careful, the box breaks easily. Circle the first part on the stencil, and cut the rest using the first blank.
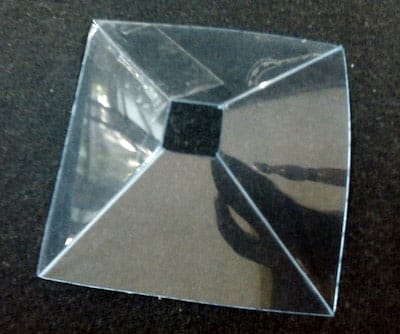
All the blanks are ready, let's assemble our projector. To do this, use transparent tape or glue to connect the 4 walls of the hologram projector. The 1 cm side should be at the bottom.
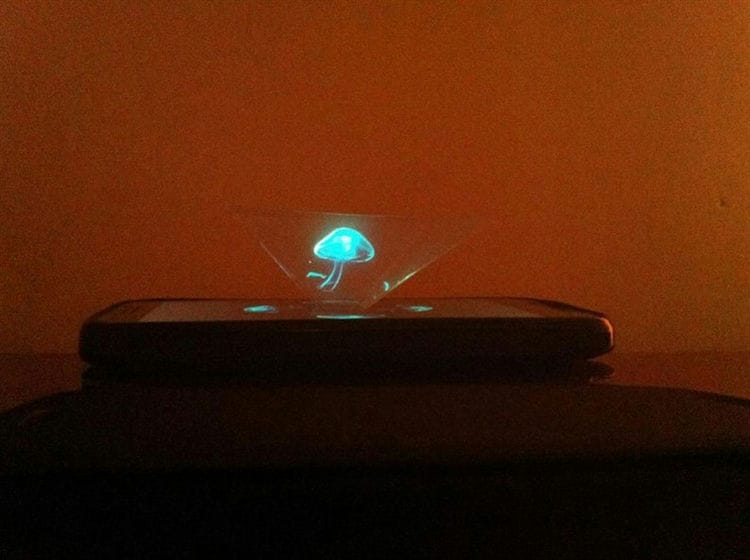
3D projector for smartphone is ready! The last thing we need is to download the hologram video or just run it on our smartphone.
We launch the video hologram on the smartphone, set the pyramid in the center and enjoy. So we made another cool craft. Share in the comments what happened with you.
DIY hologram at home – video master class
In order to make a do-it-yourself hologram at home, we will surprisingly need the simplest and most common materials and tools. You know, when I first saw video clips on the network where people constructed something incomprehensible to me at first glance from transparent CD boxes, and then looked through this prism at the miracle that is happening at the moment …
I thought something like this – “Yes. It's insanely cool and must be incredibly interesting, but … It's so hard. Where to get so many unnecessary, but new, not scratched transparent CD boxes. And then … this soldering iron. Or even a cutter. After all, the plastic is really very dense and thick. This job is more suitable for boys, and my boy probably won't want to do this nonsense. ” It is clear that if I asked, he would do everything, but I am a perfectionist and more often than not I do not like or do not completely like what others are doing for me. In general, I did not even hint to him about it.
And then I saw how one friend of mine from Facebook posted several video reports about how she and her little daughter made such a hologram with their own hands and realized that it was really great!
Say what you like, but when you don't just see how someone abstract did something that you like, but when someone you know did it … even if not personally, but all the same – you are watching this person, he is so or else you are familiar – this at times and instantly strengthens your desire to do something similar too. This is not always the case, but it does happen sometimes. And this time it was just like that, for which I am immensely grateful to that girl and her daughter.
DIY hologram – materials and tools
I remembered about plastic bottles very in time. I still didn't want to spend money on buying a CD-box in order to cut it later. And then, after the bottles, I remembered my plastic file, on the basis of which I made several pendants from felt and beads. First there was a cat, then a swan – the most beautiful of all flying creatures, which I have ever embodied in materials for needlework, and behind them is a lion – the king of beasts.
So this plastic file is just a wonderful material for making a pyramid, through which we will then look at our hologram. And this was confirmed by the same friend of mine from Facebook. She also made a choice in favor of such a file.
- plastic file
- trapezoid pattern
- ruler
- sharp object
- scissors
- Scotch
Here is a list of the essentials and I'm sure that almost everyone has these materials and tools. And then everything is extremely simple and in a five-minute video you can find all the necessary information that a do-it-yourself hologram at home is possible and that technological innovations that once seemed impossible to us are unrealistic (I, for example, even dream of I would not have thought of this in childhood) can be very close to us. Moreover, we ourselves can participate in their creation. Even in such an unusual and slightly primitive way, but still it's incredibly cool!
DIY hologram at home – video
In the video you will find answers to questions about what dimensions you need to set the pyramid in order to get a working funnel for holograms. I will also talk about how you can cheat a little and assemble such a pyramid much easier, more convenient and faster. And, of course, it will not do without a presentation of the most important thing. I will clearly show how to make this unremarkable at first glance plastic funnel work and show us trick-bites.
I would also like to draw your attention to the fact that the video does not say anything about where to get special video clips for playing 3 d holograms. This information is contained in the description under my YouTube video. But I will duplicate it here.
It will be necessary to enter the phrase “hologram video” in the YouTube search, and your attention will be presented with many videos of the format we need. There are jellyfish, and all kinds of patterns, and characters from famous cartoons, and much, much more. Choose at your discretion and surprise yourself, your kids, your loved ones, friends and just good acquaintances. Positive feedback and vivid emotions are guaranteed!
And I want to take advantage of the situation and hint to you about another unusual, but surprisingly healthy for viewing 3 d holograms on the phone. Well, or on a smartphone.
I will not reveal all the secrets to you, since this is the author's know-how. Suddenly, a person wants to patent this chip. ))) But it looks impressive! It took me a while to realize what was happening and I even had to repeat everything Lena did in order to find the same angle and the same (almost) clip. In general, this should be tried!
Share the material with your friends in social networks, add it to your pages or bookmarks, subscribe to my mailing list with new master classes with templates, patterns, announcements about contests and other equally interesting handicraft projects and be always positive and creatively purposeful
How to make a flying block hologram through Holographic Displays?
With the command / hd create test ICON: diamond we can make a flying diamond, it can also be done with any item in Minecraft. To do this, you need to specify its exact name.
How to make a hologram from a picture in Holographic Displays?
- First, you need to upload a picture to your server in the / plugins / HolographicDisplays / folder
- Now we go to the server and write the command / hd create test (test is the name of the hologram)
- Now let's add a picture to our hologram, for this we write the command / hd readimage test bukkit.png 12 (bukkit.png is our picture, number 12 is the width of the hologram)
How to display online on a server in a hologram through Holographic Displays?
With the command / hd create test Players online: {online} we can make a hologram that will be shown online on the server. This is what the hologram looks like
How do I create a hologram through the Holographic Displays plugin?
In order to create a hologram, we must write the command:
/ hd create hologram name
Next, write the command / hd edit the name of the hologram
After that, all the necessary commands for editing your hologram will be registered in the chat. You can also watch the video below, in which I show all the features of the plugin.
Updated plugin to version Holographic Displays 1.16
How to make a 3D hologram at home
In order to view the projection of 3D videos using your gadget, you need:
- a piece of clear plastic (you can use plastic wrap);
- Scotch;
- scissors;
- paper, pen, ruler.
So, we are interested in a hologram, how to make a tool for projection:
-
Draw a trapezoid on paper with the same parameters as in the photo. Cut it out.
-
Circle the template four times on the plastic, cut out the resulting trapezoid plates.
![DIY hologram. We paint with light. Holographic Displays]()
-
Arrange them in the order as in the photo, glue them together with tape.
-
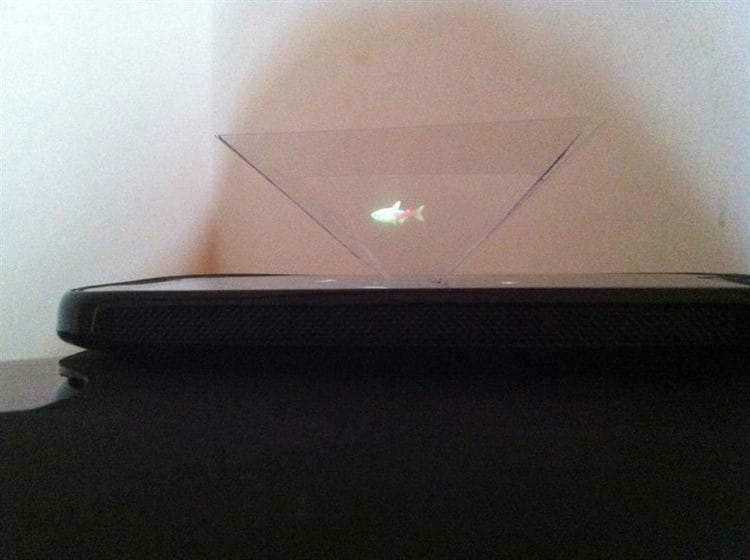
As a result, you should get a pyramid, as in the image below. The area of its “cut off” top is 1 cm2 (all sides are 1 cm).

- Find holographic videos on the web, launch one of them on your smartphone.
- Place your creation upside down in the center of the screen – now all that remains is to enjoy the magical image.
Materials for creating a hologram
Now let's touch on such a topic as “Fixed hologram”. How to make it? Prepare:
- holographic plates;
- laser pointer;
- subject for a future hologram;
- night light;
- a book or a similar subject;
- photosensitive powder;
- 4 containers with distilled water;
- hairdryer.
Hologram: how to make a house card
Getting started:
-
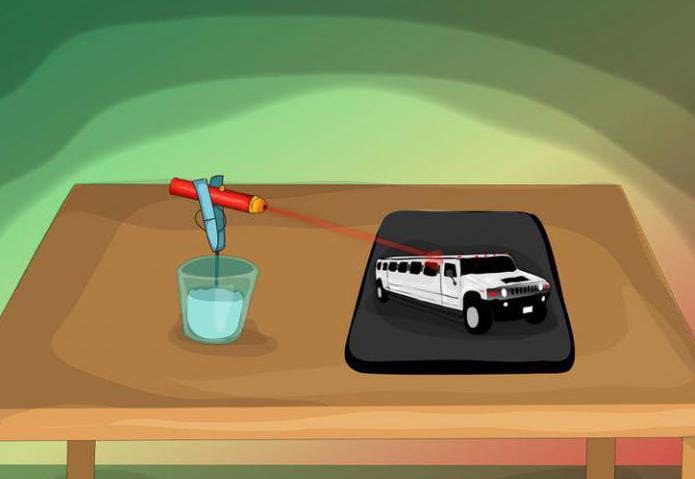
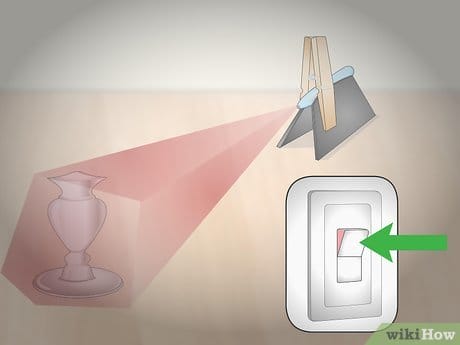
The hardest part is choosing the right place. This should be a dark room, where there are no vibrations, drafts and even creaky floorboards. You can check the suitability of the room by placing a transparent bottle of water on the table. After 5 minutes, illuminate the upper water level with a flashlight so that it is displayed on the near wall – there is no movement, so you can start.
-
For work, choose a non-wobbling table or sit on the floor.
-
Place the object for the future hologram in a tray of sand or on a mouse pad.
-
Now, 30 cm from the hero of the image, place a laser pointer by sticking it with a clothespin into a glass of salt, as in the photo. It is recommended to use red holographic dioid lasers with adjustable lens.
![DIY hologram. We paint with light. Holographic Displays]()
-
Remove the adjustable lens – the beam must necessarily expand, taking the shape of an ellipse at the end, and completely illuminate the subject.
-
Turn off the lights – no direct light should be on your system. For work, put a night light under the table or open the door a little – there should be twilight in which it is impossible to read.
-
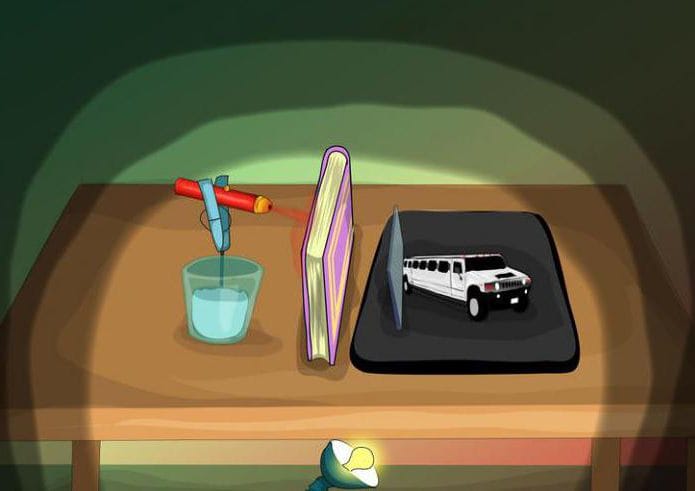
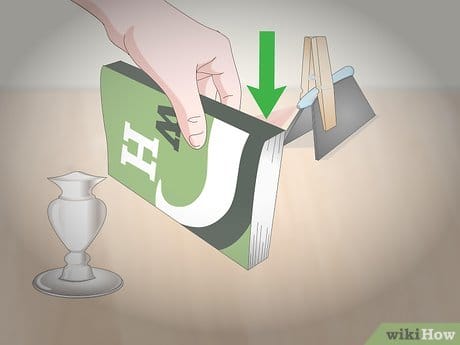
Place the book between the laser and the object – it should completely hide the latter from the beam.
-
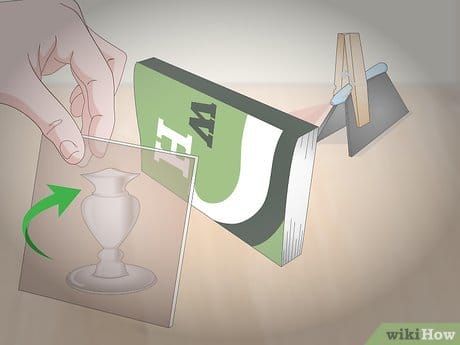
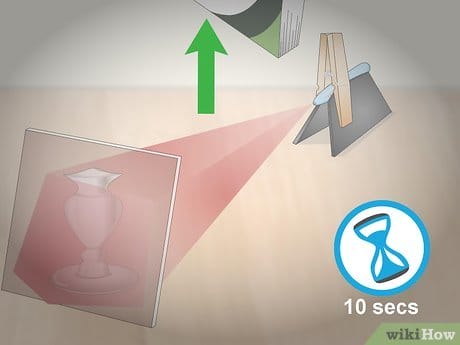
In the darkest part of the room, open one holographic plate, place it perpendicularly next to the object, as in the image.
![DIY hologram. We paint with light. Holographic Displays]()
-
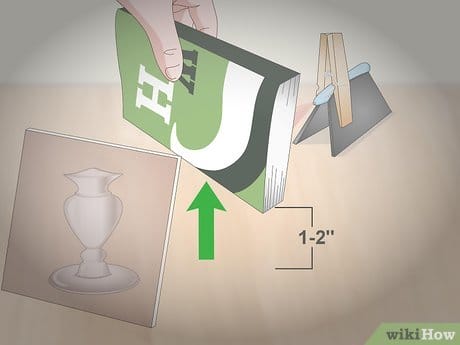
Carefully remove the shutter book so as not to cause vibrations, the laser beam should illuminate the object and the picture for 10 seconds.
-
Replace the flap.
-
It remains to process the plate: dilute the dry photosensitive powder with distilled water in 2 containers, obtaining a developer and a clarifier. Hold the plate for the first 20 seconds, rinse it in a container of clean water for 30 seconds, then lower it into the clarifier for 20 seconds and rinse it again for half a minute in clean water.
-
Dry the plate with a hair dryer, holding it upright, but do not overheat it.
-
After complete drying, you can see the result using spot lighting. In no case do not use fluorescent lamps and frosted bulbs for this, so as not to deteriorate the hologram.
We have fully described how to make a holographic image. The choice is yours: create a projection or find a “magic” picture in your collection
How to make a hologram on a tablet or smartphone
To obtain a three-dimensional picture, a prism is installed on the screen of the device, or rather, a tetrahedral pyramid without a top. Using a specially prepared moving image displayed on the screen and this prism, you can create a three-dimensional image. The image, reflected from the planes of the pyramid, appears as a 3D projection.
Hologram prism
To make a prism, you need to take 4 boxes of computer disks with transparent lids. This plastic is suitable for creating a structure, which is done as follows:
- We break off the transparent lid from the box, free it from the side parts, leaving only a smooth surface.
- Now you need to cut geometric shapes from the blanks using a stencil.
- We make a cardboard isosceles trapezoid with bases of 2 and 12 cm and a height of 8 cm.
- We apply this stencil to the plastic and outline it with a marker (preferably black).
- Using a metal ruler and a clerical knife, we make precise cuts along the outlined lines. The effort must be significant, or it is necessary to apply the tool several times.
- It is easy to break the plastic along this cut. Smooth the edges with pliers.
- It turned out 4 trapezoid. They are the same in shape and size. Trapeziums need to be glued together with adhesive tape, for which we lay them out on the same plane, attaching their ribs to each other.
- After turning the resulting flat figure, we form a volumetric prism from it. Now we fix its ribs from the outside with tape.

If a hologram is created on a smartphone, the whole structure is made from one box for a CD or DVD (from smaller trapeziums). For this, the size of the stencil is reduced. The dimensions of the prism for the hologram can be any, they are determined depending on the screen size of the device on which the 3D picture will be displayed.
Instead of lids for disc boxes, you can use plexiglass or thick transparent film as a material. Any plastic can be used, even very thin and flexible, and ordinary glass.
Dimensioning rules
On the networks today you can find a special video for a 3D hologram. Animated images, usually depicted on a black background, are the basis for the 3D projection that will appear in the transparent pyramid. You need to download them and enable them on the device screen. To check the size match, you need to do the following.
- Place your smartphone (in this case, a tablet) screen-up.
- Place the prism with the smaller base on the screen.
- Look at the image above. A small square (a cut of the top of the pyramid) should be approximately 2 times less than the distance between moving pictures.
- The image itself as a whole should not go beyond the larger square.
- We check the height of the prism by the angle of inclination of the rib – approximately 45 °. Then the image will not be too high, going beyond the transparent structure, or low.
If all parameters are correct, the monitor prism can be considered ready and usable to reproduce a volumetric image.
The picture created in the center of the prism will attract the attention of both the child and the adult.
How to make a hologram of yourself
If you want to make a hologram (3D image) of yourself, you need to hang up a black cloth as a background and take a picture using several different frames. For a start, 2-3 photos are enough as a basis for giving movement (animation). You can record a video with your image on a dark background. From it it is subsequently possible to make a storyboard (splitting into separate frames) and create blanks for a hologram in an animated format.
To create animation, you need to know how to make moving pictures. If you don't know this, the idea of making a three-dimensional moving image yourself may not lead to the desired result. Each frame in the hologram is created in advance, and during playback the pictures are alternated at a given speed.

You can use almost any photo editor and animation program. A special picture for 3D includes a photo of a person repeated 4 times and arranged crosswise. These 4 identical images on a black background must be placed within a square. On the tablet screen, the image will be two-dimensional. Next, you need to look at it from the side through a prism installed on the screen with a base (square). This will be surprising, since the 3D picture will appear in a prism as if real, and not two-dimensional.
Where to get ready-made images to create a hologram
Pictures for the reproduction of holograms should not be ordinary, but specially prepared. As described above, the image should be symmetrical within a square and consist of 4 identical elements arranged crosswise. You can independently complete such a blank and give it movement, show artistic abilities, expressing your thoughts.
Before trying to do this, you need to find ready-made animations and videos for viewing holograms. Then make a prism and acquire the first skill of creating 3D images. Remembering the principle of operation, it will be easier to embody your own ideas.
How to make a large laptop hologram?
Features of 3D images obtained by the above method are realized in the form of a large hologram. The template is a trapezoid with a base of 240 mm, an upper horizontal of 40 mm and a height of 140 mm. A 45 ° chamfer is made relative to the side edges. Glaziers have glasses of this size. You need to cut them exactly, which determines the quality of the 3D picture. So it's easier to do this with plastic.
Glue the ribs carefully with silicone. Cut strips of 1 cm from double-sided tape and glue the upper cut of the glass. Next, we turn on the picture for 3D images in full screen. We put a pyramid on it in a smaller square. The tape will help prevent scratches. Align the edges with the white diagonals and start the video in a dark room.
A bit of history
The illusion of a hologram appeared long ago. This technique has been used since the 19th century in theaters, parks, museums and concerts. The effect is dubbed Pepper's Ghost after the scientist D.H. Pepper, who spread the phenomenon through demonstration. This was in 1862, and today the art of the hologram has reached perfection. The world began to get acquainted with the phenomenon as early as the 16th century, when the Neapolitan scientist Giambattista della Porta developed the illusion chamber. He also wrote the work “Natural Magic”, which is the first mention of the reproduction of illusions. The scientist considered the question of how objects can be seen in the chamber that are not actually there.
The Polytechnic Institute in London is a scientific institution where D.G. Pepper worked in 1862. At the same time, the inventor G. Dirks practiced the technique of the appearance of a ghost on stage in a performance. He tried unsuccessfully to sell his idea to theaters. This required a complete rebuilding of the stage, and the effect was deemed too costly. Then Dirks set up a stand at the Polytechnic Institute, where Pepper observed him. The scientist had an intention to modify the method, after which the phenomenon began to be used in cinemas. So the phenomenon gained significant success, and the world learned about it in detail. The improvement of the phenomenon by D. Pepper led to the fact that it received his name, and Dirks transferred all financial rights to him in a joint patent. People, attending various shows, allowed themselves to be deceived, since it was believed that the phenomenon was created by geniuses.
Step 1: Materials
- All you need is a sheet of clear plastic;
- Scissors;
- Marker;
- Duct tape.
Step 2: create the pyramid
Let's circle the template (4 sides of the pyramid) on transparent plastic.
Cut out 4 sides, and use small pieces of adhesive tape to fix them, giving the homemade product the shape of a pyramid.
The area of the tip of the pyramid will be 1 sq. cm.
Another quick way is to print the template (with the “Actual size” settings in the printers).
Adding the four sides together to form a pyramid and fix side diy lime ribbon.
Step 3: Design 3D Video
Now go to YouTube and search for holographic videos.
Place the pyramid upside down in the center of the smartphone.
All is ready. Thanks for your attention and good luck!
Part 1 of 4: Stock up on what you need
-
![DIY hologram. We paint with light. Holographic Displays]()
one
Order the necessary materials and tools online or purchase from a photography store. Before you start creating a hologram, stock up on everything you need. Find your home and purchase the following items online or at a photography store:
- holographic plates;
- red laser pointer (better adjustable);
- set for processing holograms;
- protective glasses;
- thick rubber gloves;
- a large hardcover book;
- metal tongs.
-
![DIY hologram. We paint with light. Holographic Displays]()
2
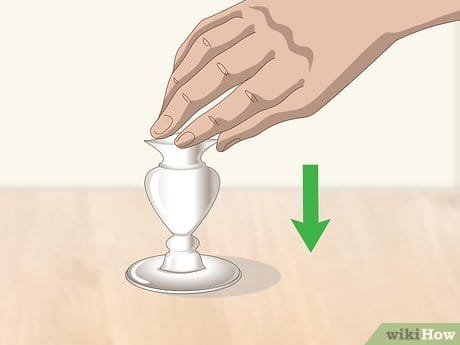
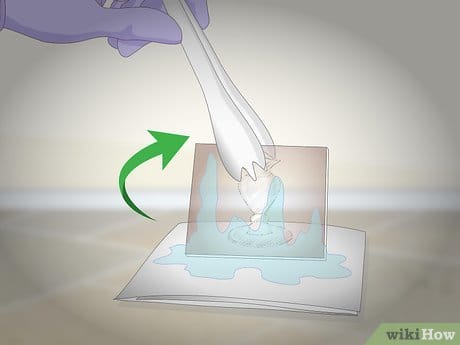
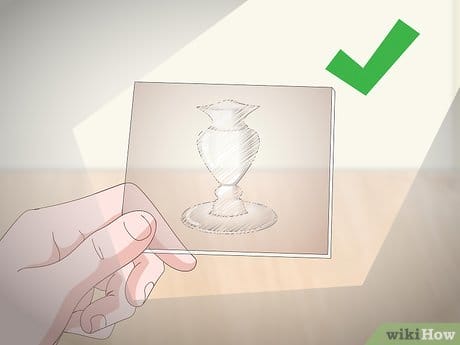
Choose a solid, shiny object for the hologram. Transparent and translucent things made of plastic, fur or fabric distort holographic images. To get a clear image, use a hard metal or porcelain object that reflects light and does not exceed the size of a holographic plate. [1]
- For example, a coin is perfect for a hologram. At the same time, you are unlikely to get a good image of a plush toy.
-
![DIY hologram. We paint with light. Holographic Displays]()
3
Select a darkened room to receive the hologram. Holograms work best in the dark because they create a good contrast between the illuminated subject and the surrounding space. Turn off all lamps in the room and, if possible, close windows and other sources of natural light. [2]
- Do not choose a room with a creaky floor, drafts or extraneous noise, as even slight vibrations can negatively affect the quality of the holographic image. A room with a tile, concrete or carpeted floor is perfect.
- There is no need to turn off the lights until you are ready to illuminate the selected object with a laser pointer.
-
![DIY hologram. We paint with light. Holographic Displays]()
four
Place the object on a stable table. Choose a table that doesn't wobble or squeak. If there is no such table, you can place the item on a flat concrete or tiled floor. [3]
- Glue the item to a wooden or metal stand on the tabletop if you're worried about it wiggling.
-
![DIY hologram. We paint with light. Holographic Displays]()
five
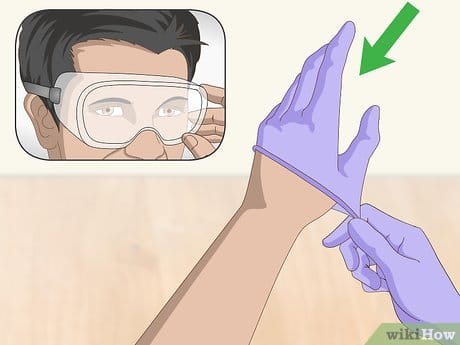
Wear safety goggles and rubber gloves. The chemicals included in the hologram processing kit can be toxic when dry and undiluted. Use safety goggles and thick rubber gloves when handling the kit to protect your eyes and skin.
- Never touch the reagents from the kit with your bare hands and do not work with them without glasses, otherwise you are likely to injure yourself.
- If you are sensitive to reagent odors, wear a medical mask or respirator before work.

Part 2 of 4: Position the Laser Pointer
-
![DIY hologram. We paint with light. Holographic Displays]()
one
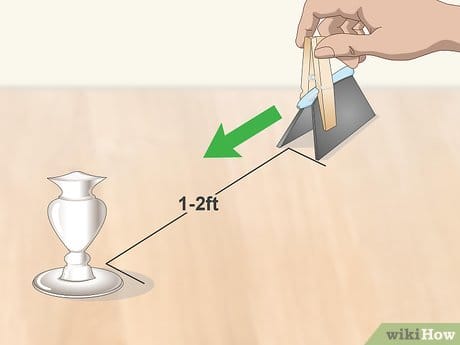
Install a red laser pointer. Attach the pointer to the plastic stand with a clothespin. Place the stand with the pointer on a stable surface about 30-60 centimeters from the subject. [4]
- To avoid damaging your eyes, never shine a laser pointer in the eyes of yourself or anyone else. [5]
-
![DIY hologram. We paint with light. Holographic Displays]()
2
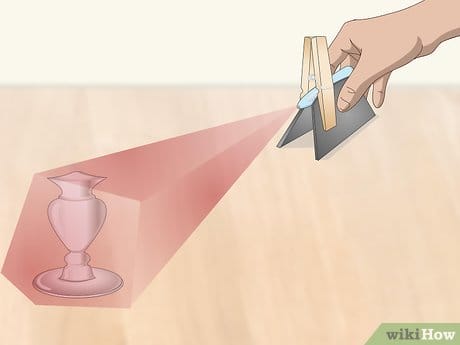
Adjust the pointer so that it illuminates the entire subject. Wiggle the laser pointer and aim its beam at the object to be photographed. Adjust the beam so that it hits the subject unhindered and illuminates it as best as possible. [6]
-
![DIY hologram. We paint with light. Holographic Displays]()
3
Turn off all light sources in the room. Turn off the lamps and curtain the windows to prevent outside light from entering. To get a normal hologram, the room must be dark enough so that you cannot read. [7]
- If your eyes are having a hard time getting used to the darkness, turn on a small nightlight under the table.
Part 3 of 4: Registering a Holographic Image
-
![DIY hologram. We paint with light. Holographic Displays]()
one
Temporarily block the laser beam with a book or other object. Place a hardcover book or other large, flat object between the laser and the subject to block the beam. This subject will serve as a kind of “shutter” when shooting the subject. [8]
- If you are using something else instead of a book, choose a completely opaque item. If it will at least partially transmit light, then it will not be able to properly block the pointer beam.
-
![DIY hologram. We paint with light. Holographic Displays]()
2
Lean the holographic plate against your subject. Remove the holographic record from the box and carefully place it on the item to be removed. If the plate is not thick enough to hold upright, support it with plastic supports on both sides. [9]
- Let the holographic plate stand for 10–20 seconds before starting the shooting process.
- Keep holographic plates in light-proof packaging until you are ready to shoot properly.
-
![DIY hologram. We paint with light. Holographic Displays]()
3
Raise the blocking beam about 2.5–5 centimeters above table level. At this point, the book should still cover the laser beam so that it does not hit the plate. Hold the book in this position for 10-20 seconds and wait for the table to stop vibrating before continuing further. [10]
- Move slowly to avoid table vibrations and extraneous noise that can adversely affect the quality of the hologram.
-
![DIY hologram. We paint with light. Holographic Displays]()
four
Move the blocking object out of the beam path for about 10 seconds. Raise the book completely for 10 seconds so that the laser beam hits the holographic plate. After 10 seconds, lower the book again and block the laser beam. [11]
Part 4 of 4: Processing the holographic plate
-
![DIY hologram. We paint with light. Holographic Displays]()
one
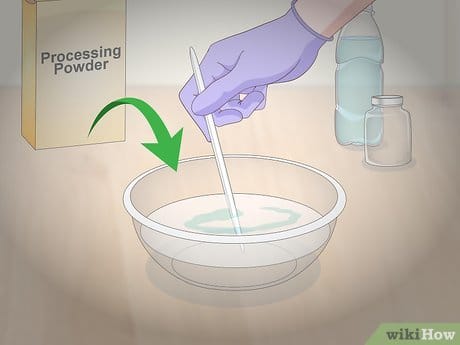
Mix chemicals according to the directions supplied with the kit. Dilute the powders from the kit in bowls. In accordance with the directions for use, dilute the required amount of powders with water in separate bowls and mix thoroughly with a thin metal object. [12]
- Do not mix individual solutions together unless indicated on the package. Please follow the attached instructions carefully so that no incidents occur.
- Remember to wear safety goggles and thick rubber gloves when handling reagents.
- Most hologram processing kits contain a developer and a bleaching solution. They should be bred separately from each other.
-
![DIY hologram. We paint with light. Holographic Displays]()
2
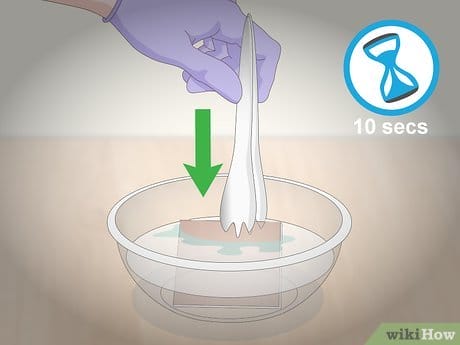
Immerse the holographic plate in the developer solution for 30 seconds, then rinse it in water. Grasp the plate with metal tongs and wiggle it from side to side in the solution (be careful not to get any liquid on your hands). After 30 seconds, remove the plate from the fixer and rinse it in a bowl of lukewarm water for about 30 seconds. [13]
-
![DIY hologram. We paint with light. Holographic Displays]()
3
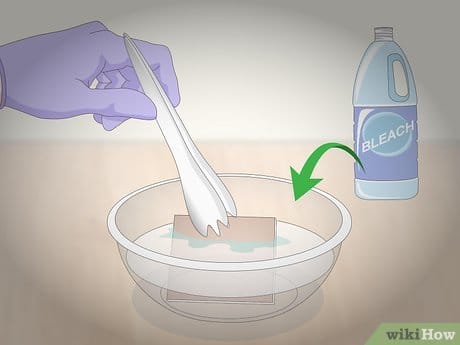
Do the same with the bleach solution. Grasp the plate with metal tongs, dip it in the bleach solution, and slowly move it back and forth. After 20 seconds, remove the plate and rinse it in lukewarm water for about 30 seconds. [14]
- Unless the instructions say otherwise, after the developer and bleach, the plate can be rinsed in the same bowl of water.
-
![DIY hologram. We paint with light. Holographic Displays]()
four
Dry the holographic strip. Place the plate vertically against the wall and place a paper towel underneath to absorb the dripping water. Do not touch the record yet and wait for it to dry in the dark. [15]
- The plate should dry for 2-3 hours (the exact time depends on its size).
-
![DIY hologram. We paint with light. Holographic Displays]()
five
Check the holographic image for defects. After the plate is dry, examine it under normal lighting. If you are satisfied with the image quality, the hologram is ready.
- If you are not satisfied with the quality of the hologram, repeat the process with a new plate or ask for help from a specialist.
- Don't be discouraged if the holographic image doesn't turn out the way you expected it to. As with any hobby, getting quality holograms takes time and experience.
Holographic effect
Unfortunately, this illusion cannot be called a hologram, since it uses 2-D pictures and videos to create the desired effect.
A real hologram creates a 3-D image and uses a technology that separates the laser beams.
Progress does not stand still. And now, such an innovation is available as viewing a hologram on a regular phone. In just 5 minutes, you will be able to see a 3D image that will amaze not only children, but also adults.
Required items
To see a 3D image on a smartphone, you first need to make a 3D pyramid. What elements are needed for its manufacture:
- simple pencil;
- marker;
- ruler (optional long);
- paper (preferably in a cage, so as not to use a protractor);
- scissors (to cut the stencil);
- knife (clerical is ideal);
- scotch tape (transparent, not wide) or glue for plastic;
- plastic containers from CDs (transparent).
Draw a trapezoid
After all the necessary elements have been prepared, you should start drawing the trapezoid (stencil). To do this, take a sheet of paper and, using a ruler and a pencil, draw a trapezoid with the following sides:
- bottom – 6 centimeters;
- top – 1 centimeter;
- height – 3.5 centimeters.
After finishing, take scissors and cut out the resulting trapezoid. This will be a stencil with which the walls of the future pyramid will be made.
Cut trapezoids from CD boxes (4 pieces)
This is the most time-consuming stage of making a pyramid and requires increased attention. The reason for the laboriousness is that the plastic from which the CD box is made is very fragile and can begin to crack under strong pressure.
- Understandable container from the disk.
- We apply the resulting stencil.
- We outline the trapezoid with a marker.
- We take a ruler and a knife.
- Place a ruler along the marker line and carefully draw along it with a knife.
- After the grooves appear, the ruler can be removed.
- Cut out the trapezoid.
- Cut out 3 more pieces according to the model of the resulting trapezoid. There should be 4 in total.
Fasten 4 parts
After preparing the parts, you can start connecting them. To do this, take all 4 parts and assemble them into a pyramid, where the bottom will be a side of 1 centimeter. They can be held together with strips of duct tape or glued with plastic glue. And you can do both, for the reliability of the structure: fasten it with tape so that it does not fall apart and fix the seams with glue.
Download a special video to your phone
After the 3D pyramid is ready, it remains to prepare the smartphone. There are several options available:
- Download a special video from YouTube.
- Download the program for playing holograms. Such a program already has a video and you can download more with it.
Sources used and useful links on the topic: https://alexgyver.ru/pov_display/ https://ArduinoPlus.ru/3d-gologramma-dlya-smartfona/ https://indycraft.ru/gologramma-dlya-smartfona-diy/ https://moymk.ru/igrushki/gologramma-svoimi-rukami https://minecrafter.pro/plugins/holographic-displays/ https://www.syl.ru/article/313186/gologramma-kak-sdelat-v -domashnih-usloviyah http://illjuzija.ru/zritelnye-iskazheniya/opticheskie-illyuzii/kak-delaetsya-illyuziya-gologrammy.html http://mozgochiny.ru/photo-and-video/udivitelnaya-gologramma-svoimi-rukami / https://ru.wikihow.com/%D1%81%D0%B4%D0%B5%D0%BB%D0%B0%D1%82%D1%8C-%D0%B3%D0%BE%D0 % BB% D0% BE% D0% B3% D1% 80% D0% B0% D0% BC% D0% BC% D1% 83 https://droidd.ru/kak-sdelat-gologrammu-svoimi-rukami-na-telefon-gologramma-na-smartfone.html
Post source: lastici.ru