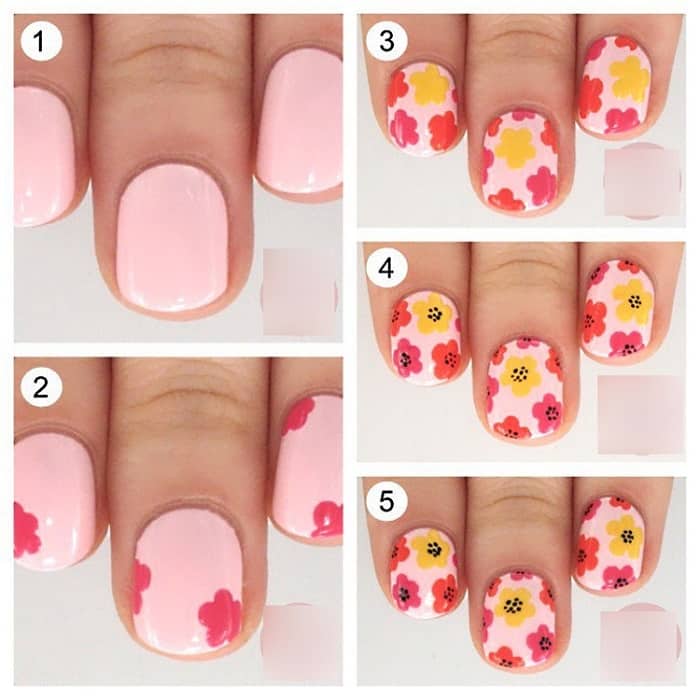
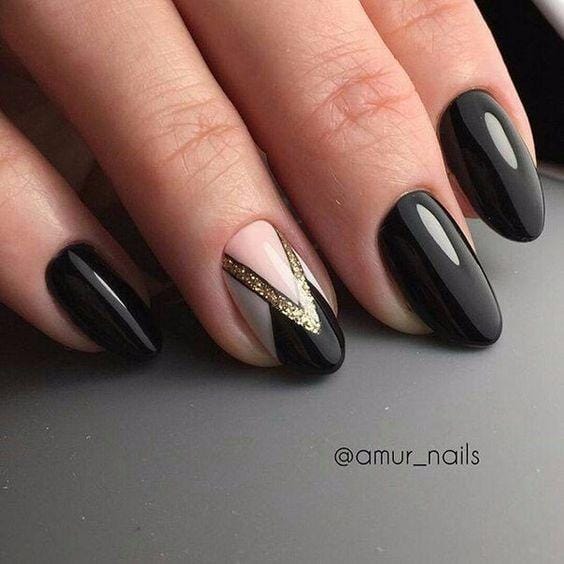
Trends in the design of a simple manicure 2020-2021. Nail design – novelties, ideas, techniques
Content
Hand care principles
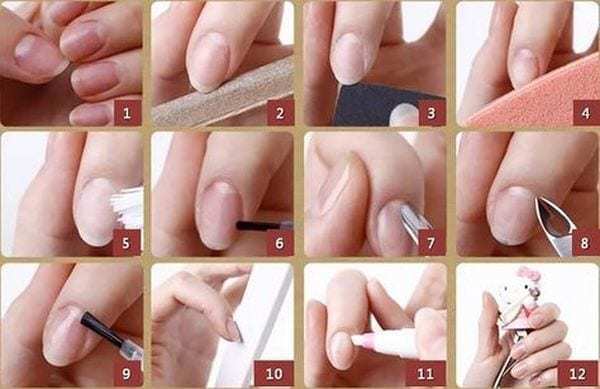
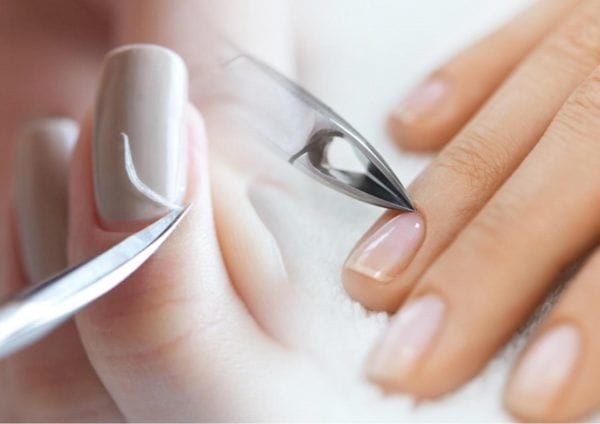
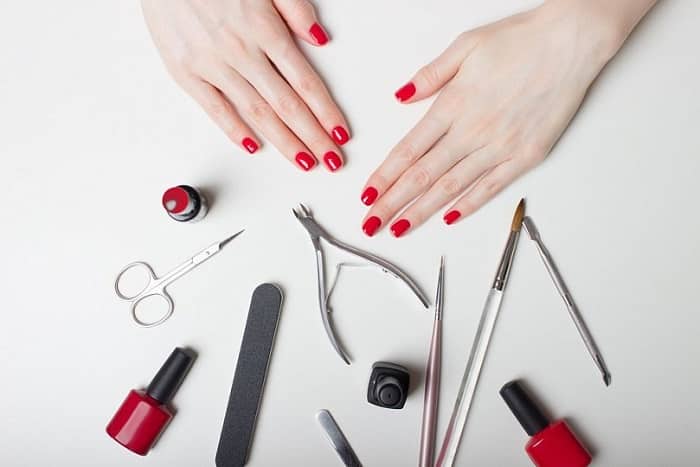
Always remember that nail decoration is the final stage of a manicure. First you need to get your hands in order. Namely – to remove the cuticle, process the periungual ridges and shape the nails. You can do this yourself. You just need to stock up on such tools:
- hand bath or any convenient container;
- sea salt or essential oil;
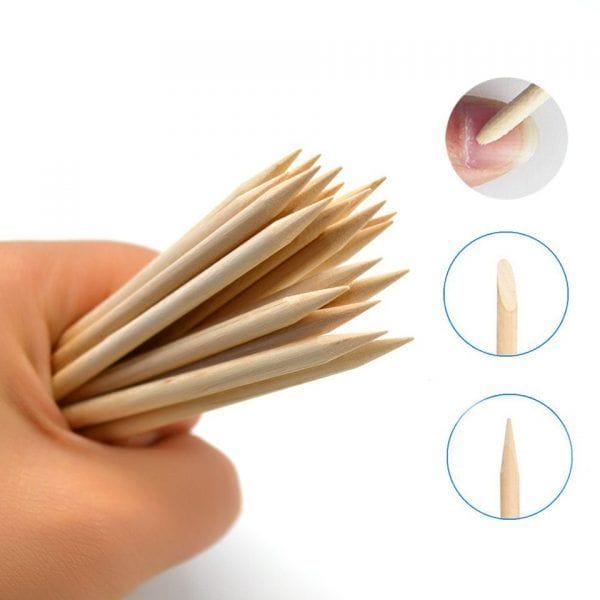
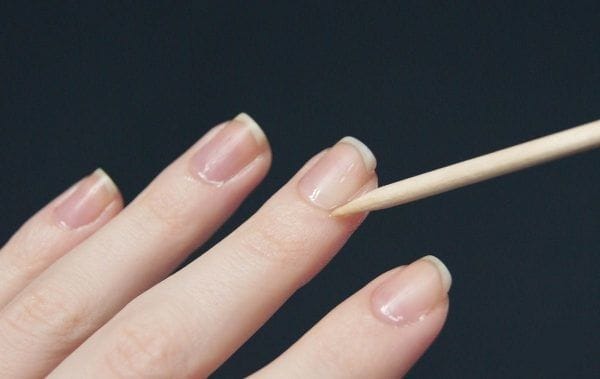
- orange stick to push back the cuticle;
- files for shaping nails;
- cuticle forceps;
- a piece of suede or a light fine-grained buff for polishing nails if necessary.
Manicure is performed in the following sequence:
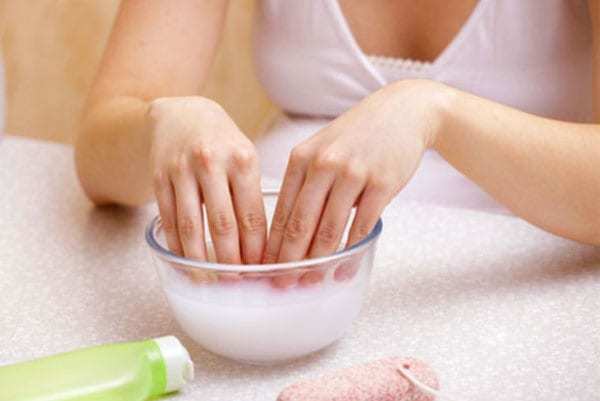
- steam your hands in warm water;
- move the cuticle with an orange stick;
- using forceps, carefully cut off its excess, remove excess skin from the periungual rollers;
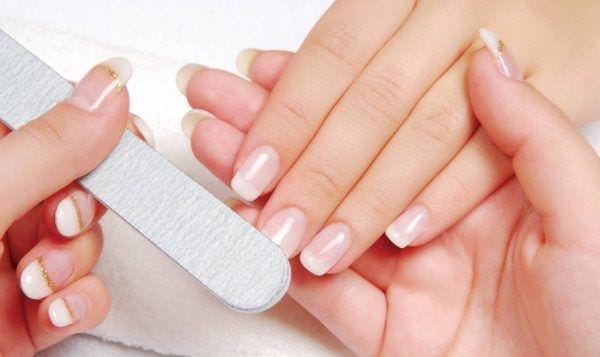
- Shape your nails with a file and polish them with suede. Do not forget to pamper your hands with a cream at the end of the procedure.
Getting started with decorating nails
First of all, we will study the ideas of manicure, which you can implement at home using ordinary varnish. And let's make it not boring. There are several options for staining nails with simple varnishes. Experts use the following:
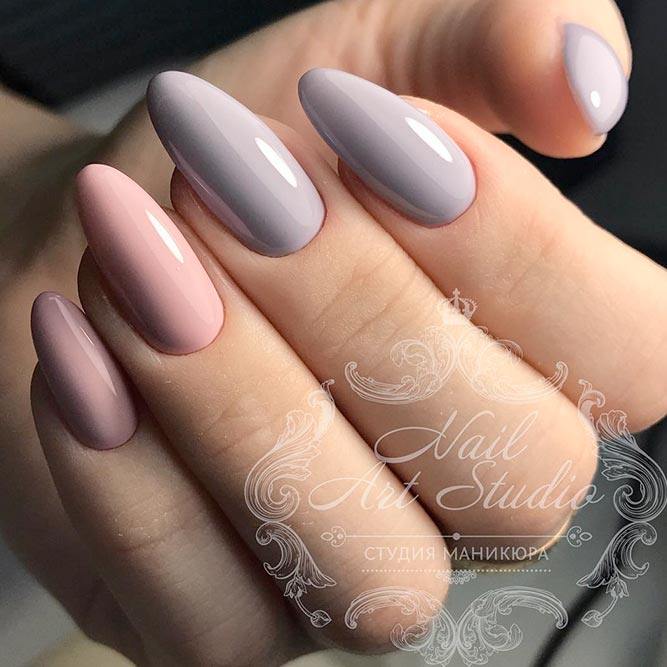
- Monochrome. In this case, shades of one selected color are applied to the nails. For example, it will be green. So we use 5 of his undertones from light green to rich emerald. We paint the nails with each shade, moving from the little finger to the thumb. We do the same on the nails of the second hand.
- Achrom. In this case, contrasting shades are used to stain the nails. For example, white and black, green and red, gold and silver, and so on. Varnishes can be applied alternating between nails. This is the simplest decor option. It turns out very interesting.
- Triad. For this nail design, you need three different shades of varnish. It can be done in bold and dynamic colors. Varnishes are applied to nails in random order. The main thing is that the composition lies flat, does not strip and does not give bald spots. Then the hands will look fun and neat.
When decorating nails with different shades of varnish, keep in mind an important point: the textures of decorative coatings must match. That is, either all varnishes are matte, or all varnishes are glossy.
Gradient is easy
It is very easy to create such a design on your nails. You will need one rich shade of varnish and one white varnish. We carry out the work in the following sequence:
- Take any convenient container or just an oilcloth file. On it we will dilute the shades of varnish.
- Place four large drops of nail polish well apart.
- Add white polish to each of the drops. In the first drop one part of white varnish, in the second drop – two parts, in the third drop – 3 parts of white varnish and in the fourth, respectively, four parts. Thus, we got four subtones of one varnish: from the darkest to the lightest. Mix them well with a brush.
- Now it remains to cover the nails. Apply the brightest saturated shade from the bottle to your thumb. Cover each next nail with a composition of drops formed on the file. Thus, a beautiful gradient is formed on the hand with a color transition from thumb to little finger. Fix the varnish on top with a transparent compound.
Moon manicure
It can be done obliquely or in the classic version. This manicure idea for beginners is planned in stages. Remember that a moon manicure is always a visual highlight of the nail hole. To cope with such a task, proceed as follows.
- Cover all nails with the main shade of varnish. Let it dry.
- Now stock up on a thin brush and a contrasting shade of varnish. Use a brush to outline a hole in the nail and paint over it completely. If this task seems difficult for you, then use special overhead stencils. After nail design, they can be easily removed.
- Cover the finished moon design with a colorless fixing varnish.

There is another version of the moon manicure. In this case, the nail hole is formed by a triangle. Making this design even easier. To do this, take a brush with varnish and paint the nail obliquely on one side and on the other. This will create a triangular hole. Cover the finished manicure with colorless varnish.
Polka dot design
It is very easy to do. Even with the seeming complexity. To complete the nail design, you will need a special tool called a dots. This is a manicure pen with a ball at one end. Instead, you can use a regular round-headed pin, a pen ampoule.
Play a playful polka dot design in the following order:
- We paint all the nails of both hands with one shade of varnish. We apply it in two layers.
- Now we dip the round-headed pin in the contrasting varnish and put the polka dots on the nails. You can use different sized head pins. As a result, the peas will be of different sizes. Once the decor is dry, cover your nails with clear polish.
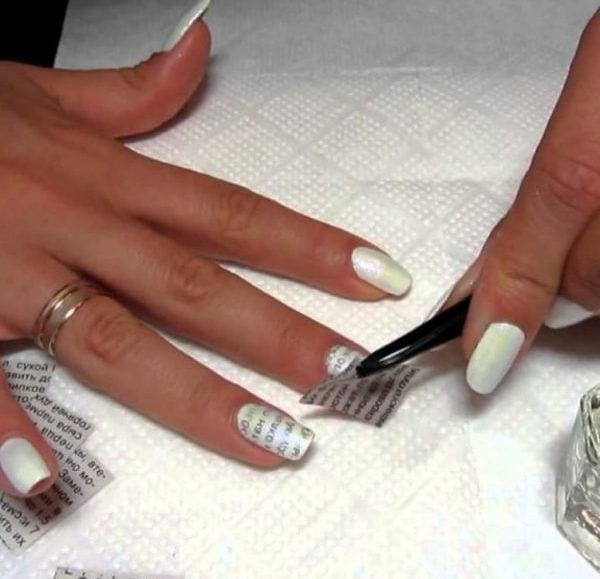
Newspaper design
You can appreciate the beauty of this design in the photo. To decorate your nails, prepare an old newspaper, a container, nail scissors, a base varnish, a little alcohol (this can be vodka) and a fixing top.
We carry out the work in the following sequence:
- First, cover all nails in two layers with the selected base varnish. Let the nails dry completely.
- Cut the newspaper into small pieces. If you wish, you can cut out the most interesting and important fragments for you. For example, with quotes, important statements, declarations of love.
- Now pour alcohol into a separate container. Dip a nail into it and hold it for about 3-4 minutes. During this time, alcohol will soften the varnish a little.
- The next stage of the design is the application of a newspaper piece to the nail. Press down on the paper and hold for 10 seconds. This is enough for the text to be printed. We remove the newspaper.
- The final step in nail design is to cover with a transparent top.
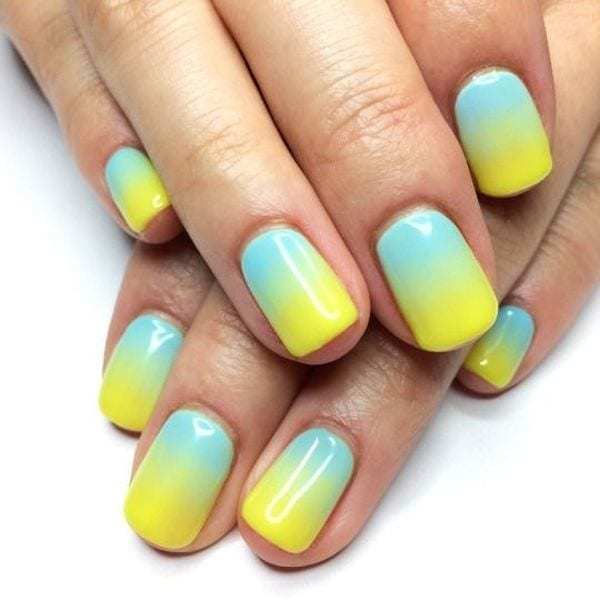
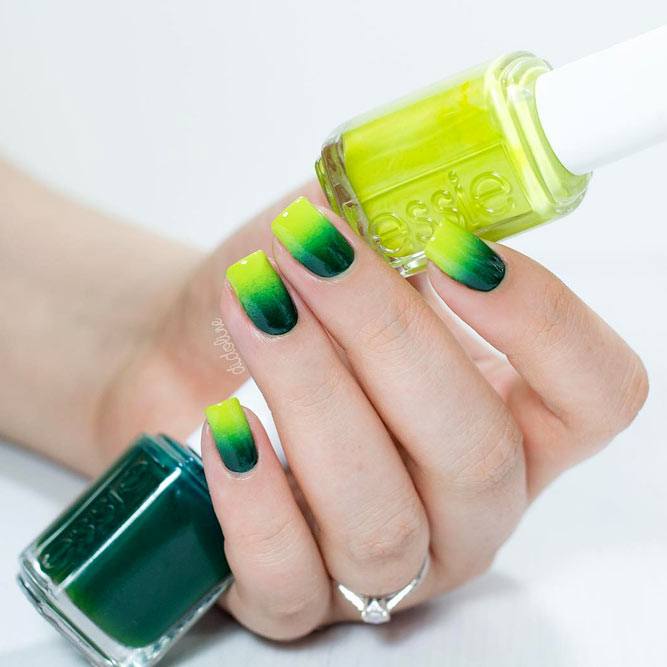
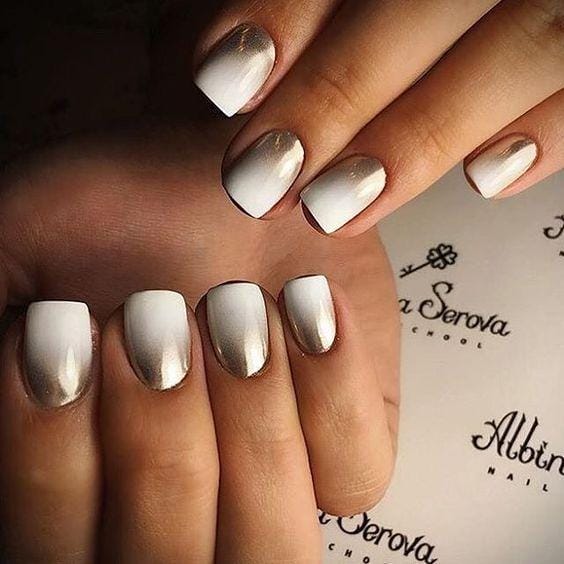
Ombre
To create an ombre nail design, you need two shades of varnish. Pick the ones you think are the cutest. If you wish, you can dilute them with white varnish so that the tip of the nail turns out to be as light as possible.
Ombre is performed using a foam sponge. We arrange the design in this way:
- First, cover all nails with the darkest shade of varnish. Let it dry.
- Now pour a different color of varnish on the oilcloth file. Dip a sponge in it and gently stretch the color to one half of the nail. Try to make the intensity of the top shade vary from the middle of the nail plate to its edge. You can add a third shade of varnish to the ombre design. It is applied in the same way, but with a new clean sponge.
Easy manicure to prepare nails for design: trim and acid options
When there is not a single extra minute, and you want to make a simple and beautiful nail design, then half the battle is preparation for coating. It can also be minimized and performed at home. The simplest manicure options are edged and acidic. Let's consider each of them step by step.
Edged or classic manicure:
- Give the nails the desired length and shape with a 180/220 grit file;
- Steam nails in warm water with the addition of liquid soap and soda, 1 tsp. for 1 liter. liquids;
- Push back the cuticle with a pusher or orange stick and gently remove the pterygium. A stick will handle a thin and dry cuticle better;
- Cut off the cuticle and coarse areas of the lateral ridges with manicure scissors. You can pre-cut the side rollers with a nail file on dry skin before soaking;
- Before coating with gel polish or shellac, you need to degrease the nail plate and remove excess moisture with a cleanser.
- The simplest manicure at the final stage is a monochromatic coating in a bright or neutral nude color. Red gel polish or shellac will create the right mood, and it will take a maximum of 20-30 minutes to apply a pink tone, even for a beginner. Complete the background with black dots at the base of the nails (photo), and you will have a simple original design in a minute.
Acid quick manicure
At home, I want to reduce the execution of manicure to a minimum and devote more time to creativity – drawing a design. The acid version of the procedure will help with this. At home, it will take 15 minutes.
- Give the nails the desired shape and file down the desired length;
- We apply an acid softener or keratolytic (professional name) along the cuticle line;
- We wait 5-10 minutes, and then with an orange stick or a pusher we push back the cuticle and clean the pterygium. Thanks to the product, they soften, and the dead cells turn into gruel.
- Wipe your nails with a damp cloth or cleanser;
- If the cuticles are rough and strongly overgrown, then at this stage they are well separated and you can cut them off with nail scissors;
- We dry the nail plates with a cleanser or dehydrator and, after drying, the coating can be applied.
A simple and quick option is gel polish or shellac with a “cat's eye” effect. It is applied in two layers, each of which is processed with a magnetic stick to create a strip or tape of shiny particles in the composition of the product (photo).
Variants of “cat's eye” application, what 3D gel varnishes and pigments are there and how to work with them
Unedged European manicure
Simple Nail Designs: Working With Textures, How To Apply Coats
Quick and easy nail designs are best for everyday, business, school manicure. It is recommended to perform them in neutral pastel shades, and the decoration, decor should be minimized. Often interesting textures come to the rescue, for example, pearl rub, acrylic powder, velvet sand, craquelure, matte finish, small glitters, foil, airbrushing.
How to apply each of the coatings correctly in order to get a quick effect and a beautiful design, even for a beginner? Consider with examples in the photo.
Black and gray polka dot everyday manicure
Suitable for school and for every day. Black gel polish or shellac is applied to the nails in two layers, then a mirror powder is rubbed into the top with a finger or a brush, and sealed with a top in one layer. After that, small dots are drawn with a brush, and everything is sealed with the second layer of the top with the study of the ends of the nails. Discreet and beautiful manicure will suit most everyday outfits.
Cracking effect gel polish, craquelure
A simple yet original effect is achieved thanks to the composition of the varnish. Craquelure is applied on a contrasting color substrate, in the photo it is a white background. The top layer spreads out in the form of “cracks”, creating a marbled effect. The contrasting shades of the substrate and varnish are well combined. The design does not require a lot of time, but it turns out to be very beautiful.
Foil and pearl rub on pink background
Rubbing is able to transform any shade of varnish, and at the same time it looks fresh and original. Performing such a manicure is easy even for a beginner. The secret is to rub in the varnish layer for half the recommended time, and then rub the powder into the still warm coating. So it lays down evenly and adheres well.
The foil is applied in the same way to the top layer of gel polish, and then sealed with a top. There is a variation of the rub called Yuki flakes – they also resemble foil.
Acrylic powder and velvet sand
A simple and quick manicure with an original powdery effect can be done even for a beginner, using the bulk material correctly. It is applied to an undried second layer of gel polish, and only then it is polymerized in a lamp. No topcoat required.
You can choose powder or velvet sand with some glitter for a subtle shine. There is a colored and transparent powder. It is better to apply a colored one on a light substrate, and a transparent one will “take” the color of any base.
One of my favorite topics, covered several times from various angles, for example, here is a detailed story about the use of velvet sand.
Classic manicure with gel polish for yourself
Not all girls love bright and catchy nail tones and designs. Some people prefer a solid, neutral finish. Such a manicure is very easy to do for yourself. To do this, you need to prepare the marigolds as follows: make the desired shape, cut the cuticle, cut the nail plate a little and grind it with a buff. Now you can start painting your nails. First of all, we apply the base and dry it in a lamp, then we cover it with varnish of the desired tone and dry it again. If one coat of varnish is enough, then you can apply top. If the color is not saturated enough, it is necessary to apply a second coat of varnish. The classic manicure is ready!
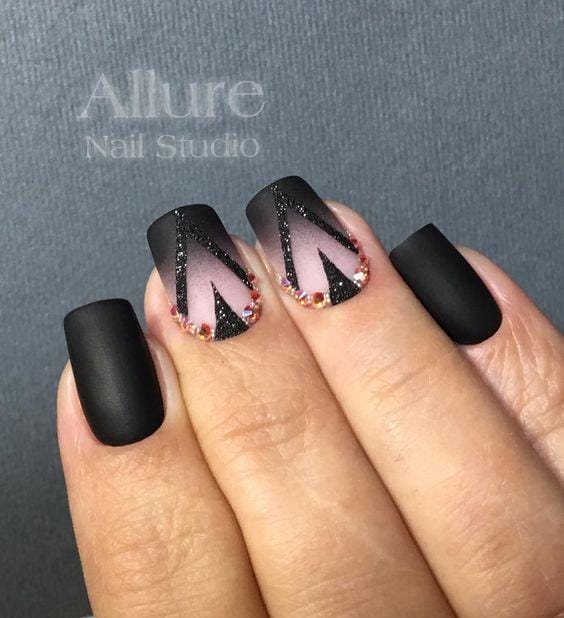
Matte manicure to myself
The matte finish looks very elegant, feminine and extravagant on nails of any length. This coating can be easily combined with glossy. To perform a wonderful manicure on your own, you must first prepare the nail. The technology for performing a matte manicure is no different from standard nail art. Only at the end we cover the nails with a special matte top. This manicure, if desired, can be decorated with stickers, rhinestones or patterns.
French manicure to herself
French manicure has the love of many fashionistas. Such nail art looks very neat, gentle and attractive. Performing a jacket on your own is not difficult. If it does not come out to draw even smiles on the edge of the marigolds, then you can use special strips that will greatly facilitate this task. For the classic execution of French manicure, the nails are covered with a pale pink tone or remain transparent. For a moderate to calm manicure, use white for the wells. If you want something unusual and extravagant, you can make holes in bright and catchy colors. It is also worth experimenting with the main color of the marigold. The red coating with black or white holes looks original. To diversify the design of French nail art, you can focus on one or two nails.
Ombre gel manicure to herself
Ombre looks very bright and attractive on nails. This type of nail art is most often performed in the summer. In order to make such a simple yet very elegant manicure, you will need two or more flowers and a piece of sponge. Apply the base to the prepared nails and dry in an ultraviolet lamp for 2 minutes. Now cover the toes with white. Next, we proceed to the execution of the gradient: apply the desired colors on the sponge so that there is a smooth transition between them, soak each nail with a sponge (do not press the sponge hard so that there are no clear boundaries). Finally, cover the manicure with a top and dry.
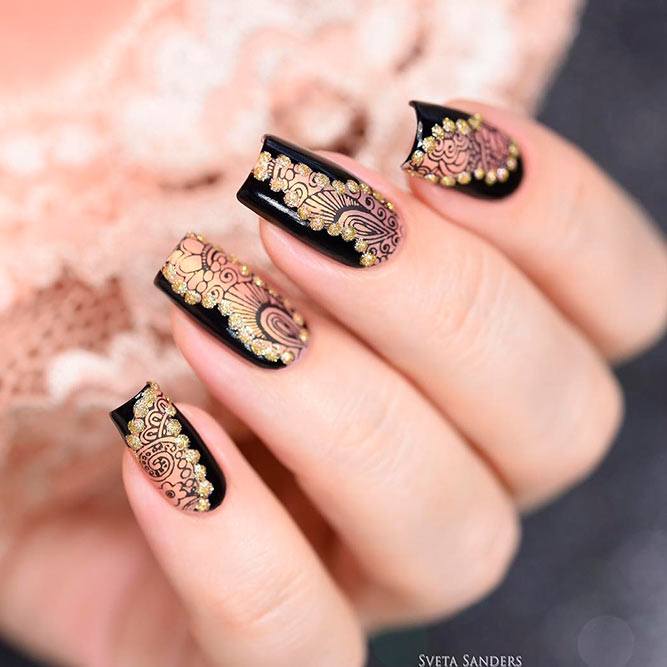
Doing lace manicure to yourself
Lace manicure looks very graceful, luxurious and beautiful on the nails. To complete it, we need a regular slider. Before starting a manicure, clean the nails and trim the cuticles. Now apply the base and cure under a UV lamp. To transfer a picture from the slider, use a special print. Put some polish on the slider and remove the residue, then print the design on the print and place it on the nail. To make the manicure look less defiant, you do not need to perform lace on all the nails, make one or two fingers monotonous. The base of the marigold can be made transparent, and in order to give the nail art originality, complete it in red or pink. If you want a brighter design, go for lace in orange, purple or white.
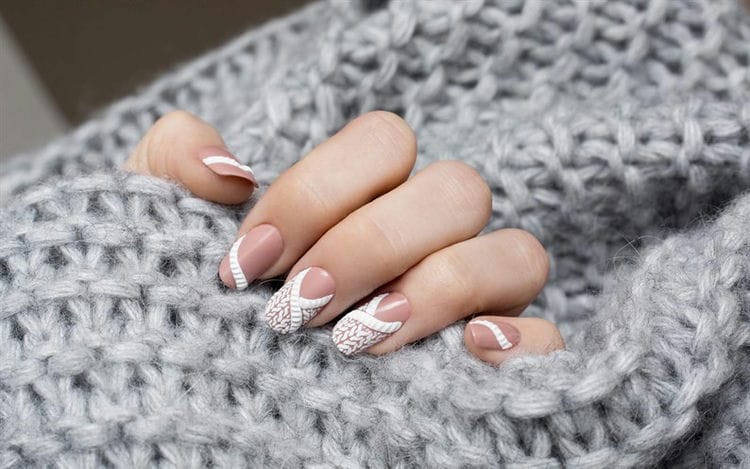
Knitted manicure
This type of manicure has been very popular lately. Volumetric patterns resembling knitted sweaters are most in demand in the cold season. In order to make the design of nail art unusual and interesting, you need to decorate with a viscous ring and middle finger. In this case, the fingers can be distinguished not only with the help of an openwork pattern, but also painted with a different shade. Before applying varnish, give the nails the desired shape and get rid of the cuticles. Now you can safely apply the base and dry it in an ultraviolet lamp. Next, cover the nails with varnish of the desired color. After the varnish has completely dried, you can start drawing. Carefully follow the pattern in the form of a braid or knitted sweater (for a more voluminous effect, it is better to apply the pattern several times). Optionally, you can cover the pattern with acrylic powder to achieve a rough effect.
Manicure at home – we disassemble step by step
There is a saying: my home is my fortress, and also my SPA, dressing room, sometimes a work office, and sometimes a real beauty salon. This is familiar to almost every young lady whose daily planner contains a to-do list of a billion items. Where can you find a free minute to visit your beloved neil-master, who is bored in the studio? Do not despair, do-it-yourself manicure is a completely feasible task not only for “experienced users”, but also for beginners who are eager to comprehend all the wisdom of neil art. The main thing is to choose simple, but at the same time original manicure options and immediately try to translate them into reality.
It doesn't take much to make your room look like a creative workshop. The first and most important thing is to develop patience, without it it will be difficult for you to master the subtleties of beautiful marigolds. Second – get a comfortable chair with a back, as well as a table on which the magic will take place (it is absolutely not recommended to do beauty manipulations on the floor or in the kitchen). Third, replenish your personal arsenal with the necessary tools. Which ones? See our info table for details.
| Tool | Its purpose |
|---|---|
| Nail file | Perhaps the most important tool for shaping the nails to the desired shape and removing excess length. They are divided by the number of grit, that is, by the degree of abrasiveness: 900-1200 g – for polishing natures. nails, 200-400 gr – for shaping natures. nails, less than 180 gr – only for extended nails |
| Pusher | A metal stick with a flat working edge. Suitable for pushing back the cuticle and freeing the nail bed from the overgrown epidermis |
| Polishing buffs | It is better to have several of them in view of their rapid wear and tear. They are made from both natural (suede) and synthetic materials. Contributes to the smoothing and smoothing of wavy nail plates |
| Scissors and / or tweezers | Basic manicure tools can be used not only to cut off excess length, but also to eliminate cuticles. It is advisable to purchase accessories made of surgical steel |
| Orange sticks | Sold immediately as a set. Especially relevant for those girls who prefer the unedged manicure method. Used to push back the cuticle and minor corrective work |
| Tweezers | Practical metal tweezers with exaggeratedly long and flat working edges are needed for laying out rhinestones, foil, Yucca flakes or kamifubuki |
| Bath | Of course, any other bowl can be used as a cosmetic bath, but for “salon entourage” it is worth spending once on a highly specialized accessory |
| Sterilizer | It is a mistake to assume that a home manicure is a safe manicure. Dirt, fungi and bacteria also accumulate on the tools during use. A stationary ball sterilizer will be enough to eliminate infections by quartzing |
| Lamp | For the polymerization of gel polishes. A more budgetary option – an ultraviolet lamp, a more “long-lasting” and practical – an LED lamp |
| Dots | A metal or plastic stick with round ends, used for placing points in basic drawings |
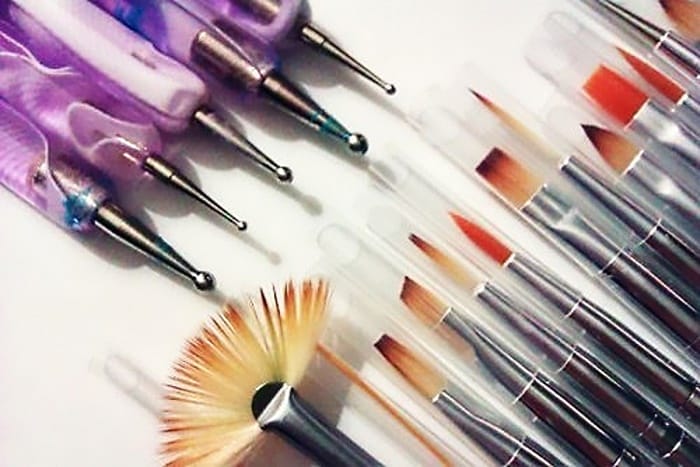
Surprised that there are no brushes in the list? We decided to take them out in a separate block, because the quality of your manicure directly depends on the quality of such an important tool. Experts recommend taking a closer look at such basic assistants:
- a flat brush shaped like a scapula. Ideal for ombre manicure and for even distribution of textured coatings;
- a “hair” brush, an ultra-thin synthetic or natural brush that allows you to draw lines, draw miniature details and place light or color accents in drawings;
- fan-shaped brush, suitable for working with glitter and other loose decorative elements;
- a “petal” brush, necessary for making drawings of varying complexity;
- thin brush up to 1 mm, optional but desirable attribute, guaranteeing beautiful neil art.

Well, have you already got a naughty mood and a desire to quickly try your hand at nail service? Then it remains to add only a couple of touches to the collection and boldly get down to business. Speaking of “a couple of strokes”, we mean the materials with which you will create at least a masterpiece of fine art on your nails. Feel free to keep yourself a list of must-haves:
- colored varnishes. The more, the better. Bright and monochromatic, pastel and nude, sparkling yellow and deeply dark – the main thing is not to get confused and not sweep everything off the store shelves;
- base and top. It is important to choose high-quality specimens with good reviews from practicing masters. From ourselves, we just add that the base should be self-leveling, it can even be rubber, and it is advisable to purchase the top in both glossy and matte versions;
- cuticle oil. The skin around the nails, like the skin of the face, needs to be regularly moisturized, this will visually make your manicure more neat;
- kamifubuki. Small and large multi-colored rounds will luxuriously complement the bright, cheerful design;
- rhinestones. Large and miniature sparkling stones will transform the basic French manicure and add charm to a solid color;
- sparkles, glitter or Yuki flakes. Girls love everything shiny, especially on their fragile and graceful fingers. This fact does not even require proof;
- fimo. These are plastic sticks inside which a certain picture is depicted;
- stripes. You have no idea how fashionable and chic designs can be created using standard French strips or foil ribbons;
- rubbing. In fact, this is a finely dispersed mirror or holographic powder, which got its name from the method of application;
- foil. With the help of miniature pieces of foil, you can create a trendy design “broken glass” or an interesting New Year's manicure.
So, there is little left to do. You just need to view the funny pictures from our gallery, save the ones you like and feel free to get to work.
DIY manicure ideas
ProstoNail is not used to being limited to the usual jacket and offers its loyal readers bright ideas for a manicure at home, which do not require much time to translate them into reality:
- moon manicure using dots. The algorithm for such a design is extremely simple: choose a neutral or completely transparent varnish and snow-white acrylic paint. You dip the dots in paint and put points along the lunula line, adhering to the rules of harmony, symmetry and proportion, and then connect these points with a toothpick. Voila, the trendy anti-jacket in the negative space technique is ready;
- polka-dot manicure looks cute and unusually romantic. The sequence of actions is the same, however, for working with dots we use a contrasting gel polish of medium fluidity. You can put specks equidistant from each other, or place them in a chaotic manner;
- Why come up with new ideas when you can modernize old ones? Fans of classics and laconicism will appreciate the monograms and matte top covering the manicure – a luxurious option for the most sophisticated women;
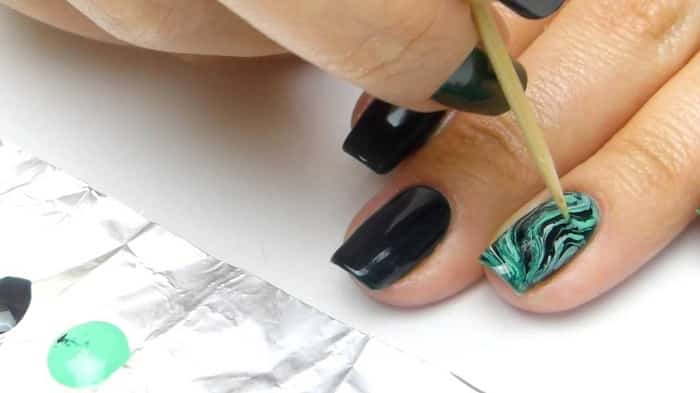
- marble manicure is another trendy technique that is relevant for modern nail decor. We have already written about the intricacies of its implementation;
- combine different textures. You can use the iridescent, mystical cat-eye varnish in combination with decorative sand to create a striking manicure at home.
Home nail decor
If you have one bright idea, a couple of tools and determination in your arsenal, then there will definitely be a beautiful manicure. Do not believe me, then we will give quite logical arguments in favor of our innocence, providing several variations of unusual neil art for your choice at once.
Marigold “Ariel”:
- perform a routine hygienic edged or unedged manicure;
- apply a base to your nails and cure it in a lamp;
- now choose several colored gel polishes in a marine theme: let it be azure, emerald, blue and blue pigments;
- put on your finger a fairly fine mesh used for storing food;
- with chaotic strokes, apply the selected shades to the nail plate through the mesh;
- carefully remove the mesh, dry your nails and secure the result with a top;
- the nails of the little mermaid “Ariel” are ready.
Water manicure:
- after completing the first two points from the instructions, feel free to proceed to the next step – generously apply a generous layer of cream to the cuticle around the nail bed or attach scotch tape;
- drip colored gel into a container with water, wait until it spreads over the surface, and then drip varnish of a different shade. Repeat this manipulation several times;
- create an intricate pattern on the water surface with a toothpick or orange stick;
- dip each finger there in turn;
- remove the remaining gel and fix the result of the efforts with a firming top.
Manicure ideas with stickers
Nail stickers are a cheat for those who doubt their artistic abilities. Performing a home manicure using these self-adhesive stickers is a matter of a couple of minutes, but the pleasure of the result will accompany you for a long time. First, you can take stencil strips for a jacket and use them to create a catchy geometric manicure. Secondly, foil ribbons are great as an independent decor in the minimalist style. And thirdly, with the help of stickers, you can make a romantic, delicate design in a botanical theme.
DIY nail art
Ideas for manicure at home sometimes appear spontaneously, and sometimes require “brainstorming”. But they always end with a painstaking creative drawing process. We have collected the most interesting, vibrant and juicy designs from all over the instagram space, worthy of the soonest implementation in reality.

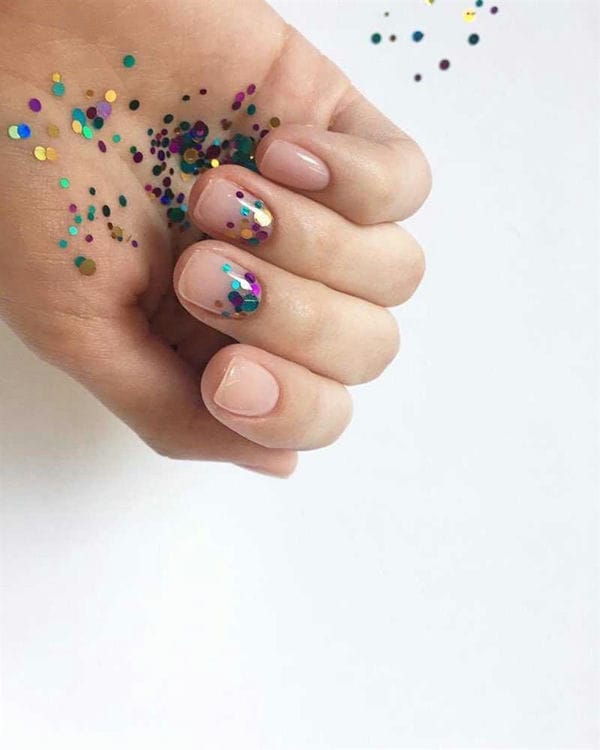
Simple glitter manicure
Ideas for manicure at home from ProstoNail are very simple to implement, but always original and extraordinary. Using a brush, your imagination, our little beauty cheat sheets and a lot of sparkling sparkles, you can create a truly unforgettable neil art that changes not only the mood, but also transforms the image as a whole.
As you can see, DIY nail design is a fascinating activity that requires not high professionalism, but a good mood and no less luxuriously developed imagination.
What you need for nail design at home
In order to do nail design at home, you must definitely purchase some tools and materials that you will need to decorate the decor. Finding everything you need is not difficult. The product can be ordered in the online store, or you can buy it yourself by going to a regular store for masters of beauty salons.
So what you need:
- Various colors of nail polishes;
- A set of art brushes;
- Acrylic lacquer-based paints or a set of art lacquers (both can be purchased);
- Stickers, stencils;
- Nylon sponge;
- Broths, rhinestones, dry glitter and other decorations;
- Tweezers;
- Orange sticks;
- Fast drying topcoat
How to prepare your nails for design
Before you start doing nail design at home, you should prepare your fingers so that the decor looks neat and beautiful. You can also do a manicure with your own hands. In this case, it is better to choose a European non-edged manicure. It is safe and easy to make.
For European manicure you will need:
- Hand bath and sea salt;
- Cuticle remover;
- Orange stick or pusher;
- Nail file;
- Cuticle oil;
- Cloth napkin.
How to do a manicure in European style, step by step instructions:
- File your nails neatly to the desired shape and length;
- Put warm water in a hand bath and dilute a teaspoon of sea salt in it;
- Apply cuticle remover to all fingers;
- Dip your hands into the water and hold the min. 7-10;
- Take out your hands, wipe them lightly with a napkin and begin to gently move the cuticles on all nails with a pusher or orange stick. If necessary, you can hold your hands in the water for a little more;
- Remove the exfoliated cuticle with a napkin;
- Lubricate nails and periungual rollers with oil, rubbing it thoroughly, wait until everything is absorbed and the manicure is ready.
Now that the pens are ready, you can think about how to design your nails at home. Of course, here you should take into account your taste preferences, fashion trends, and your style. Let's consider a variety of design options, ranging from simple to more complex. You will definitely find something optimal for yourself.
Water-based nail design at home
A water-based manicure looks very impressive, but it takes a little practice to get it done neatly. To complete it, you need a small glass filled with water, several pieces of varnish of various shades and a toothpick. In order not to stain your skin, you can use adhesive tape at least 1 cm wide or greasy hand cream.
Stages:
- The nails are put in order: they wash the old coating, if any, remove the cuticle, file it.
- Next comes the varnishes. For this, a drop of varnish is added to the water. When it spreads over the surface of the water, a different shade is added to the middle of the glass (the procedure is repeated for all colors). A drawing is created with a toothpick. Then the finger is lowered into the water. The remaining varnish can be removed with a toothpick.
- Remove the tape from the finger or wipe the varnish with a napkin if cream was used.
- After the coating is dry, the nails are covered with a color enhancer or regular colorless varnish.
Home nail design with rhinestones
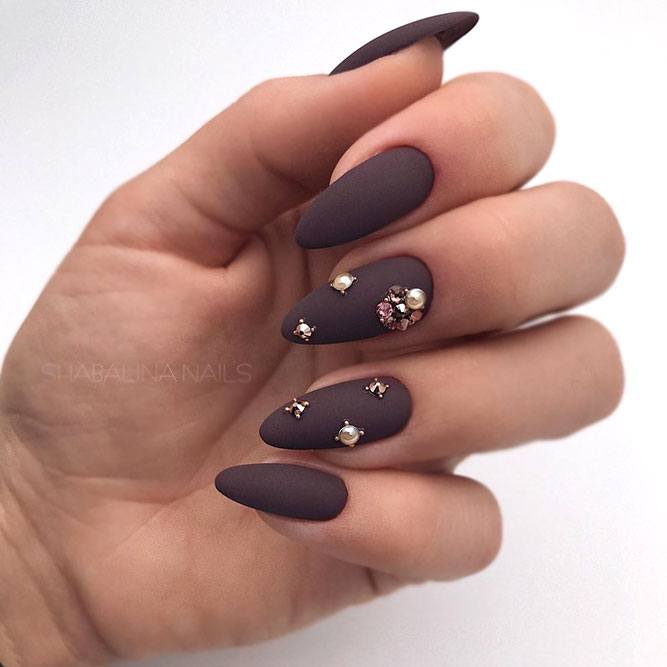
Nail design at home with rhinestones can be done in various techniques, it can be painting, lace manicure, service jacket, moon manicure, where the hole is framed with rhinestones.
For beginners in manicure, there is the easiest option for decorating nails with rhinestones. To do this, one strass is laid out on the still not dried main varnish (if you wish, you can put several pieces) and everything is covered with a fixative varnish. In addition to rhinestones, you can use colored beads, beads, small pearls, metal figures and logos.
Nail design at home with ordinary varnish
Home nail design is most often done with regular varnish. For a creative design, you need several colors. A varnish is selected for the general background, then a drawing of a different color is applied to it with the help of manicure devices. Brokat, broths, stickers, dried flowers can also be used in the design.
Beautiful manicure with a pattern: ideas
Women have decorated their nails since time immemorial. Nail art is mentioned in ancient Egypt. Modern manicure is about more than nail polish and nail polish.
A bright manicure should not be associated with flashy flowers, an abundance of stones, long and impractical nails. Modern manicure is originality, a way of self-expression and creating a unique look.
To keep your hands in order, it is enough to be able to take care of them, regularly and correctly do a manicure, and learn how to reproduce interesting ideas of nail art on your nails.
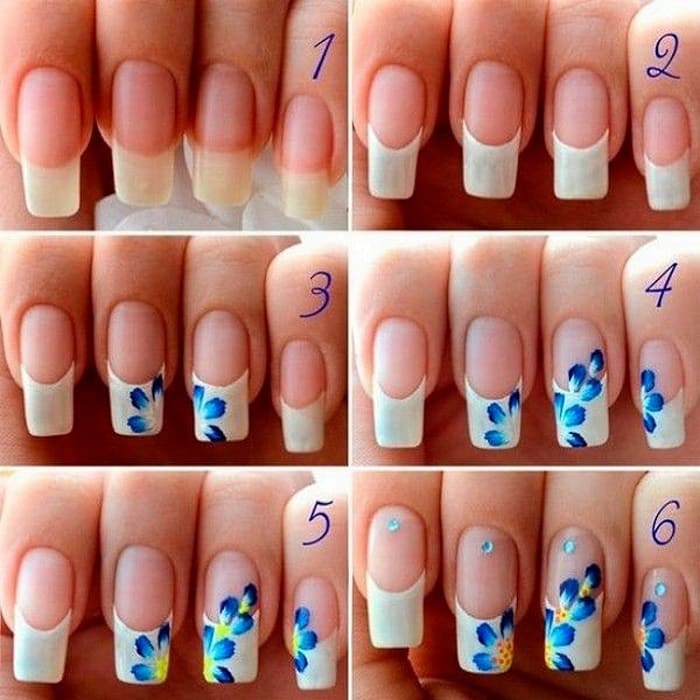
For many years in a row, drawings have remained in trend. Each season presents new ideas for manicure, where they use:
- floral ornament;
- oriental painting;
- animation elements;
- contrasting jacket with a pattern on individual nails;
- geometric patterns.
When choosing ideas for nail art, pay attention to the following methods of nail design:
- Natural naturalness.
Natural manicure is at its peak. Pictures can be bright and contrasting, but the basic colors are in pastel colors. Choose from peach, beige, vanilla, sand, lavender, mint, or ivory.
The use of contrasting varnishes is encouraged. With a natural base background, use raspberry, burgundy, marsal, plum, black.
If the manicure is thematic, then there are practically no restrictions on the use of colors, shades and decor elements. The main thing is not to overdo it.
- The lightness of openwork lace.
Openwork lace manicure deserves special attention. Such nail art is appropriate for a casual and festive look.
The main background can be of any color, feel free to use matte or glossy varnish. Perform an openwork pattern in a darker shade of the base background or choose a contrasting varnish. Apply the pattern to all of your nails or to your ring finger.
Feel free to decorate a discreet manicure with a pattern with stones, broths. Experiment with the abundance of flowers, making each nail unique in its own way.
- Play of colors and lines.
Manicure with a geometric pattern does not lose ground. The pattern can be monochrome or multi-colored. Try a harmonious combination of shades or a combination of absolutely bright contrasting colors.
Ombre looks original on nails. Such a manicure is complemented with drawings of flowers, butterflies, decorated with sparkles, broths and volumetric polymer elements.
Ombre is not necessarily present on all marigolds. Gradient stripes on the ring finger and little finger look interesting.
The combination of matte varnish and transparent allows you to create the effect of droplets that have frozen on the nails.
3D-images and drawings in combination with openwork patterns are actively gaining popularity.
How to get a manicure: tips and tricks
To do a manicure at home, it is not enough to navigate the trends of nail art. Pay attention to these life hacks for applying coating on nails:
- Don't start with your thumb.
Leave it for a snack. It is convenient to use your thumb to remove any residual nail polish on your skin.
- Apply the coating with your working hand.
If you hold the brush in your non-working hand (for right-handers – left, for left-handers – vice versa), fix it in one position and move the finger of your working hand.
- Do not try to immediately remove or wipe off any nail polish that has come in contact with your skin.
Apply the manicure in the evening, and in the morning the dried coating residues can be easily washed off the skin with a washcloth and water.
In order for the nails to look neat and harmonious, it is important to know how to do a manicure correctly, taking into account the shape and length of the nail plate. So:
- Feel free to use hand and nail creams as often as possible.
- Choose the correct nail shape. The ideal option is to repeat the curve of the cuticle. The trendy shape is a soft square.
- Monitor the condition of the cuticle. It is better to move it as it grows or remove it with a special gel. Cutting the cuticle can cause damage to the structure of the nail plate.
- File your nails correctly – from the edge to the center. If you use a nail file, like sandpaper or a file, your nails will start to flake.
- Before applying the coating, the nail must be degreased and walked over it with a hard towel. The towel will lift the micro-particles of the nail to which the polish will attach.
To get your hands in order, perform a series of simple-minded operations:
- Correct the shape of your nails.
- Remove the cuticle from the nail plate. Soak your hand in warm soapy water for 10-15 minutes. Treat the cuticle with a special stick and cut it off with nail tongs.
- Repeat the procedure for the other hand. Use biomanicure gel to save time on steaming your cuticles. The product contains fruit acids, which quickly soften the hardened epithelium.
- Polish the nail plate with a special file. This procedure can be carried out no more than once a month.
- Liberally lubricate the skin of the hands and nails with a nourishing cream.
- Degrease the nail plate before applying the coating.
- After applying the base colorless varnish, which will serve as the basis for the manicure with a pattern, wait for 20-30 minutes. The varnish should dry well.
Do not forget that nails and hands are reflections of a woman's health status, take care of them! Protect handles from cold, use gloves during household chores. In the autumn-winter period, apply vitaminizing and strengthening varnishes to the nail plate.
Making a manicure with a drawing with your own hand is an easy task. You don't have to be a professional artist and manicure artist to do this. It is enough to practice several times, try to translate the idea on paper or an artificial nail.
Choose quality varnishes. Take care of your hands and nail plate, adhere to tips on how to properly do a manicure.
Simple manicure 2020-2021: do a light manicure yourself
 Fashion trends in manicure do not stand still, so every year we can see new interpretations of nail design in traditional and innovative techniques.
If you decide to make a light manicure at home with a simple varnish, we advise you to pick up several varnishes in order to try their combinations and play with shades in contrasting options.
Buy brushes that you can use to do simple patterned manicure, nail file sets, and other hygienic manicure accessories.
To make a simple manicure, but sophisticated and interesting, we recommend adding to your home nail art kit not only matte, glossy and shiny varnish, but also beads, rhinestones, glitter, candy of different sizes, colors and shapes.
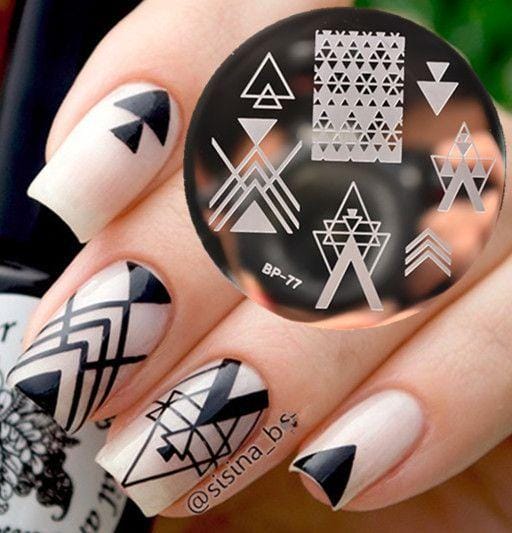
When creating a light manicure for short nails and a simple manicure for long nails, stencils and stamps will not be superfluous, allowing you to make patterns and drawings on nails in different styles.
Simple manicure with polka dots 2019-2020
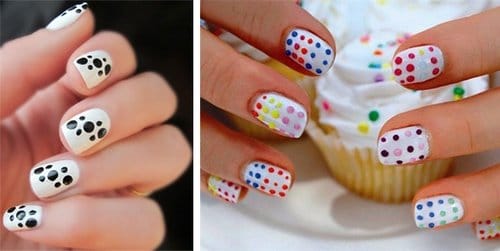
When you plan to create a gentle and airy look for spring and summer, a simple polka dot manicure will be a super solution. What is not an easy manicure! Everything is simple, understandable, accessible even to beginners.
We choose a glossy, matte or shiny base of the shade you like, with the help of brushes we apply polka dots contrasting in color (of the same or different sizes) and your light manicure at home is ready.
Black polka dots are inimitable. This nail design attracts attention, makes your look stylish and unique. A simple polka dot manicure is presented in our gallery below.
Simple water manicure 2020-2021
Water-based manicure is easy. Pour water into the glass, adding varnish of the shades that are relevant for you.
With an orange stick, lightly stir the varnish on the water to form a certain pattern.
Apply lacquer of light shades to the nail, dry it, so the manicure will turn out clearer. Then treat your finger around the nail plate with a special tool or PVA glue, which will allow you not to stain your finger with varnish after applying the pattern.
Dip the marigold in a water solution. Taking out your finger, an amazing pattern will remain on your marigold.
By removing the film around the nail, you will also remove excess varnish. Secure the result with clear varnish. Everything! Your lightweight, fashionable water-based manicure is ready.
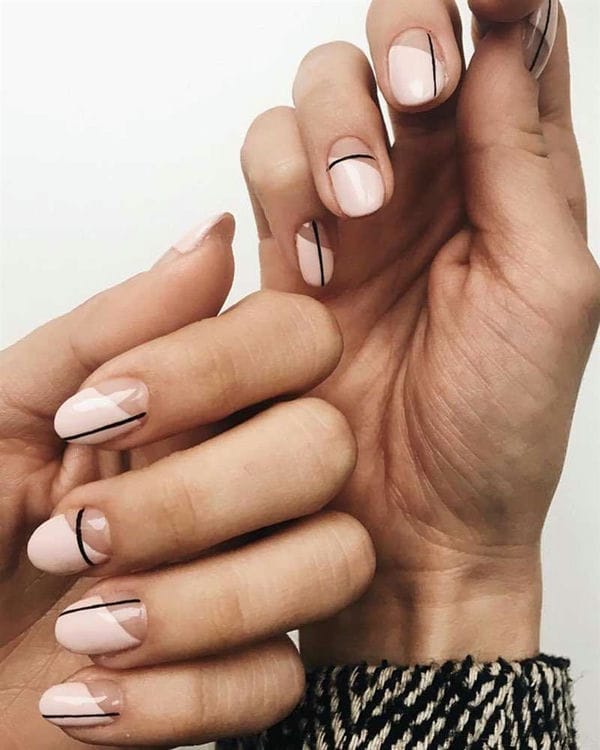
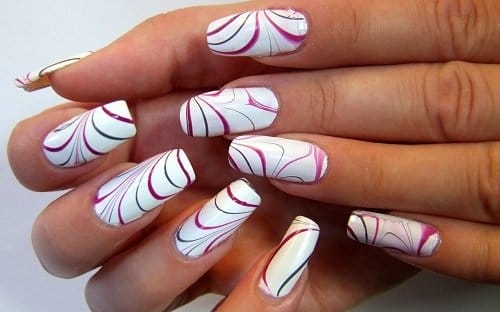
Simple striped manicure 2019-2020 for nails of different lengths
 The second way to make a simple manicure is to draw stripes. The stripe belongs to the geometric trend, so it is very beautiful when the stripes are even and neat.
They can lie on the nail plate in parallel or intersect at different angles.
A simple striped manicure can have as little as two stripes, or it can be created with a lot of stripes. It all depends on your patience and creativity.
For a light manicure at home, you can stick on strips of metallic and any other shades you like, or paint them by hand. There are also plenty of nail art ideas with stripes.
A simple manicure in this version will not be superfluous, both for a business woman and for a young girl.
Where to start – the necessary materials and manicure tools
Any quality manicure starts with good nail preparation. How to do this is a woman's business. If desired, a trim manicure is done, and if there is a possibility, a special tool (milling cutter) – hardware.
In order for the nail plate to acquire a base color, you need a coating – varnish, gel polish, gel. But further – this is already a creative matter. But it is still difficult to do without such tools and materials:
-
colored varnish or acrylic paint (suitable both for painting on nails with a high pigment content, and simple art). Colored varnish should differ from the base coat by at least a couple of tones.
-
stencils, stickers, scotch tape or other necessary adhesive supplies for a specific design;
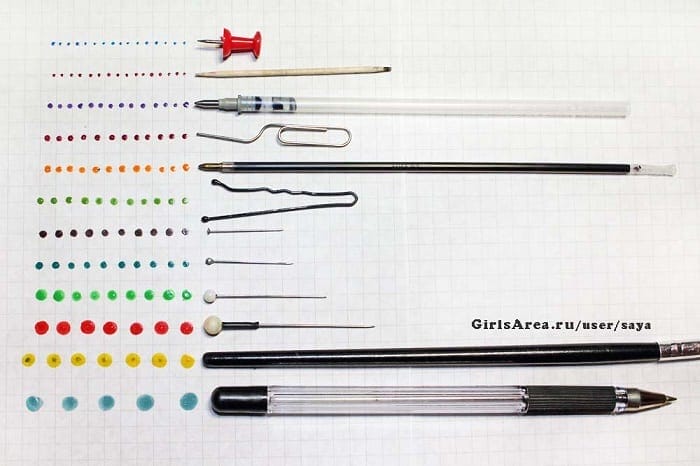
-
thin and flat brushes, sewing needles (as an option – a sewing pin), toothpicks, dots with tips of different diameters;
![Trends in the design of a simple manicure 2020-2021. Nail design - novelties, ideas, techniques]()
Professional Nail Art Tools
-
additional decorative elements (glitter, sparkles in colorless varnish, rhinestones, foil, rubbing, broths, etc.).
At home, you can find many handy tools that are worth using to create a pattern on your nails. For example, replacing dotsu – an invisible hairpin or a sewing pin with a different diameter of the ball-tip.
How to draw patterns on the nails?
The nail art industry is developing so quickly that it is very difficult to keep track of the technique of creating patterns on nails. Who would have thought that water would be a popular method of drawing on the nail. But you shouldn't underestimate the more familiar methods either.
You can create patterns on both natural and artificial nails. It is not difficult to learn how to draw complex patterns and ornaments with simple tools, you just have to acquire patience.
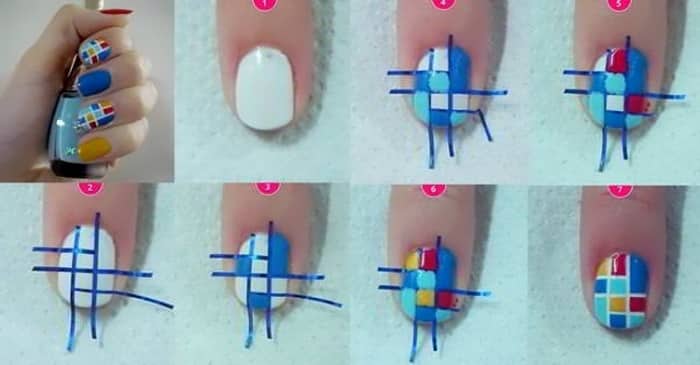
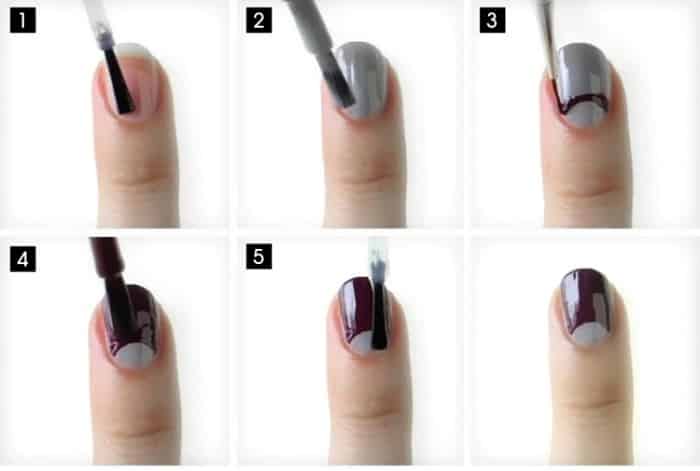
Using regular tape or foil
The essence of this method is to create an even geometric pattern or shape on the nails. But first, they cover the surface of the nail with a base varnish (any color is chosen that is needed). But you should understand that the main layer will eventually become the color of the picture itself.
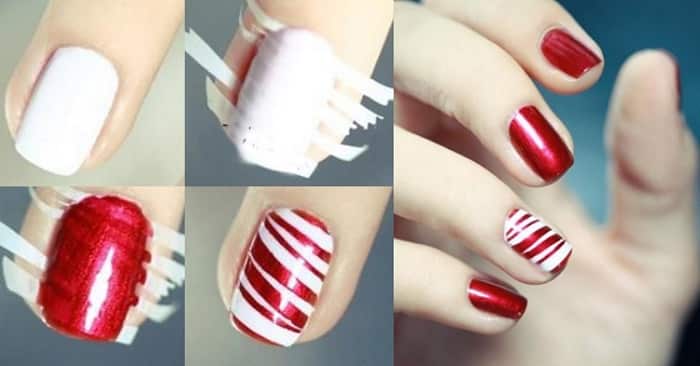
The pattern itself depends on how the tape was glued: in thin stripes or wide, straight, zigzags, diagonally, or it covers part of the nail, forming geometric shapes.
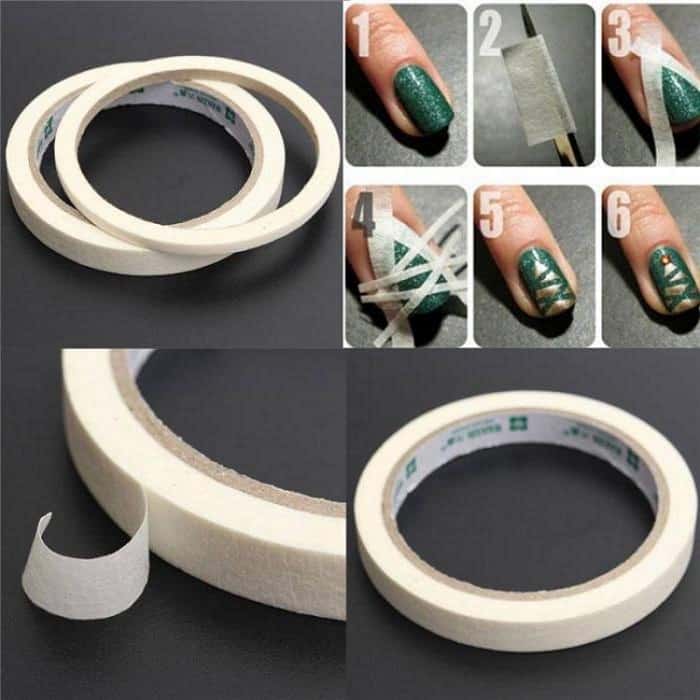
For a manicure, it is better to take masking tape. It has less adhesion to the surface of the nail and will not damage the varnish when removed. At the same time, its stickiness will be enough to make a beautiful drawing.
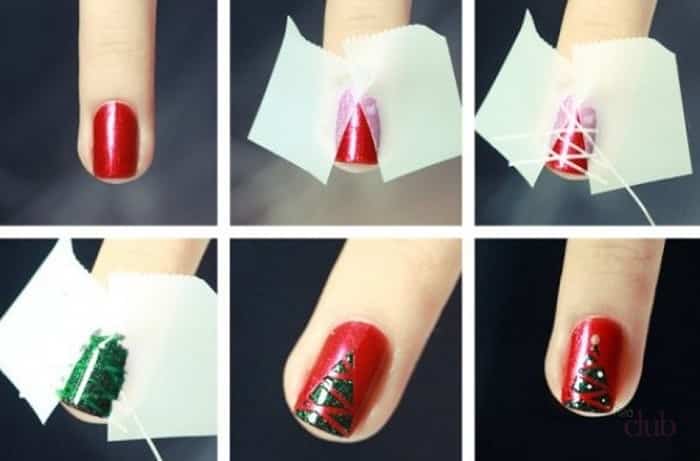
In addition to scotch tape, they also use a special foil tape for design. It is easier to use, since you do not need to monitor the width of the strip. Finished tapes can vary in thickness and do not need to be removed. It can become part of the design.
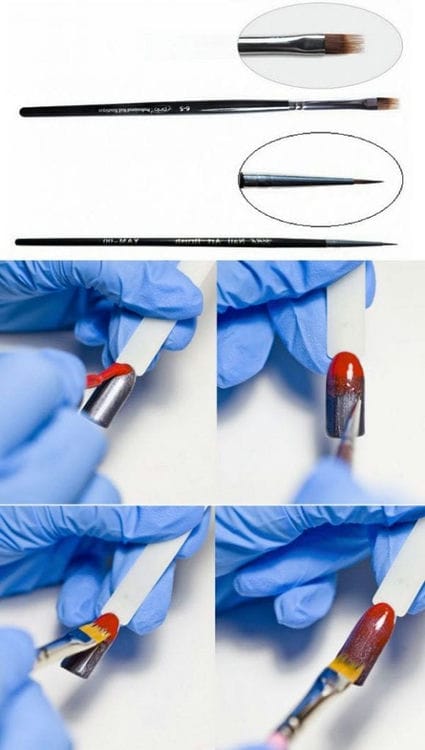
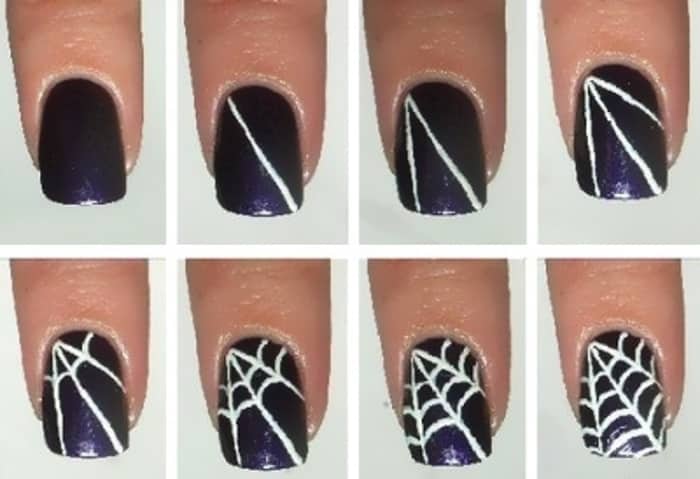
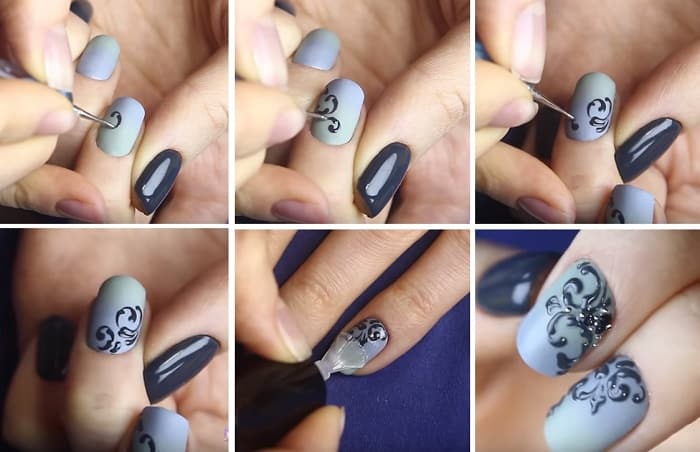
Ordinary needles
To make a drawing with a needle, you need at least two colors of varnish (more can be, depending on which drawing is conceived). One – for the base (complete drying of this layer is necessary before starting the drawing), the second and further – for painting. There are many options for creating simple but effective drawings. Nail designs made with a needle do not require a lot of time and additional costs.
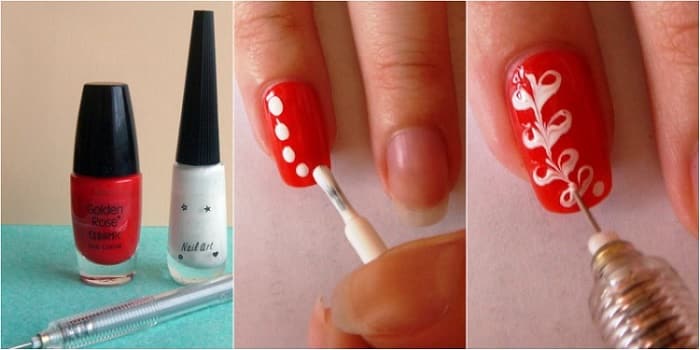
The next effect on the nails can be done with a thin dots tip, but the easiest way to do this is with the sharp end of the needle.
An option for decorating nails with a needle and two colors of varnish
The technique of drawing with a needle is available even to those who have never done nail design before. The main feature is to have time to apply a beautiful pattern while the varnish on the needle is not dry. And if the drawing is done pointwise, then until the drops of varnish dry on the nail.
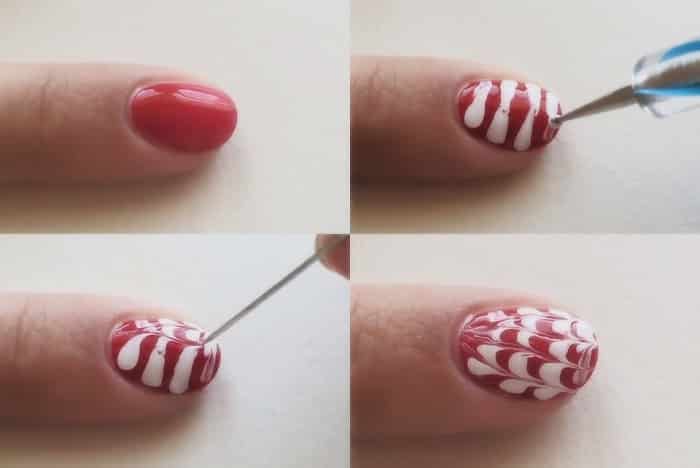
If you paint with a needle, then the applied line will be thin. You can also outline the contours of the pattern with a needle.
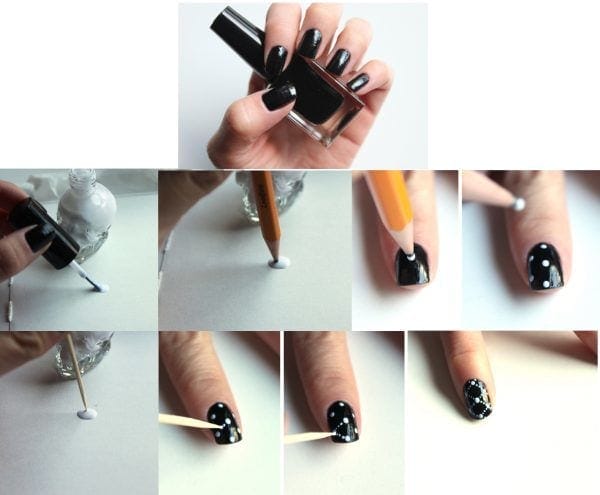
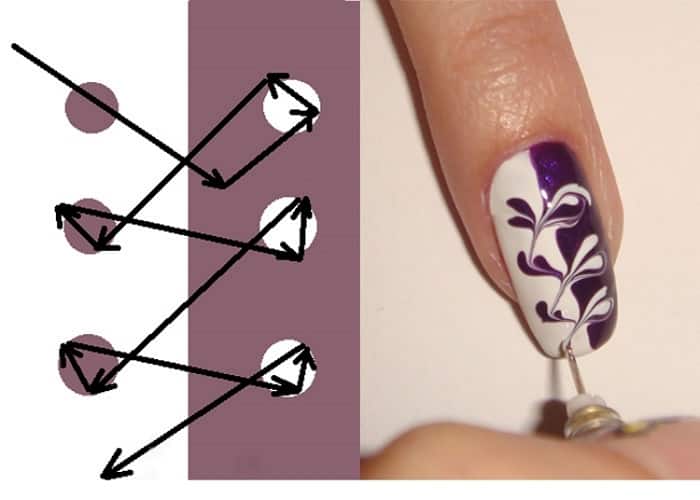
Using dots
The result on the nails, if painted with dots, will be similar to what is done with a needle. Only the use of dots for painting is more convenient – so much varnish is wrapped around the ball of the tip that it does not interfere with the work (it does not roll in large portions and it is more convenient to apply straight lines without “blunders”).
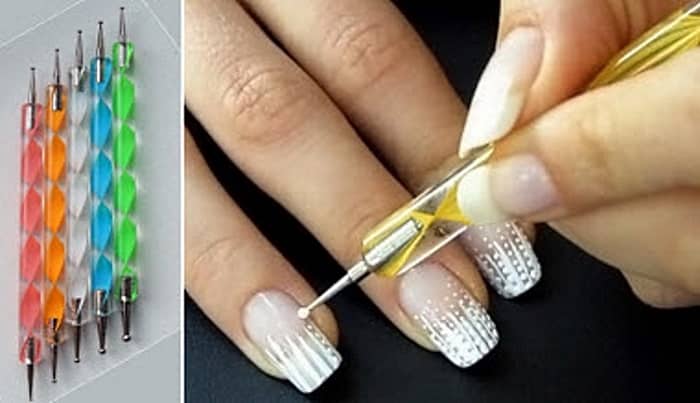
The color for the base is selected. The drawing is applied with a “ball” that is dipped into the varnish of the desired color. If you need to change the color, you can simply wipe the tip of the tool with cotton or a cloth dampened with nail polish remover.
How to draw a simple drawing on the nails?
You can draw different patterns with different materials. The simplest and most affordable is colored varnishes. But for those who are seriously interested in decorating nails, it is worth trying other material options.
Gel polish
You can make a variety of patterns and effects with gel polish that will last until you have to repeat the procedure for covering your nails with this material. The technique of drawing with gel polish can be different: on an undried coating and already on a polymerized one.
Gel polish coating technology is as follows:
- Apply a primer prepared by a buff (base coat). Dry in a lamp if necessary.
- Apply color gel polish. At this stage, differences in further actions begin. This layer can be dried and then complemented with a pattern. But you can do this before the nail goes to dry. This technique is called wet. Drying in the lamp takes place only after the nail is formed.
- Apply fixer, dry, remove stickiness.
Drawing with gel polish step by step
Acrylic paint
Acrylic is a very convenient material for decorating nails. It dries quickly, has no odor, and retains the pigment well. Acrylic paint is applied to the dried surface (varnish, gkl varnish, shellac, even on a natural nail). To carry out a nail painting, you will need a brush, preferably with a nap of non-natural origin.
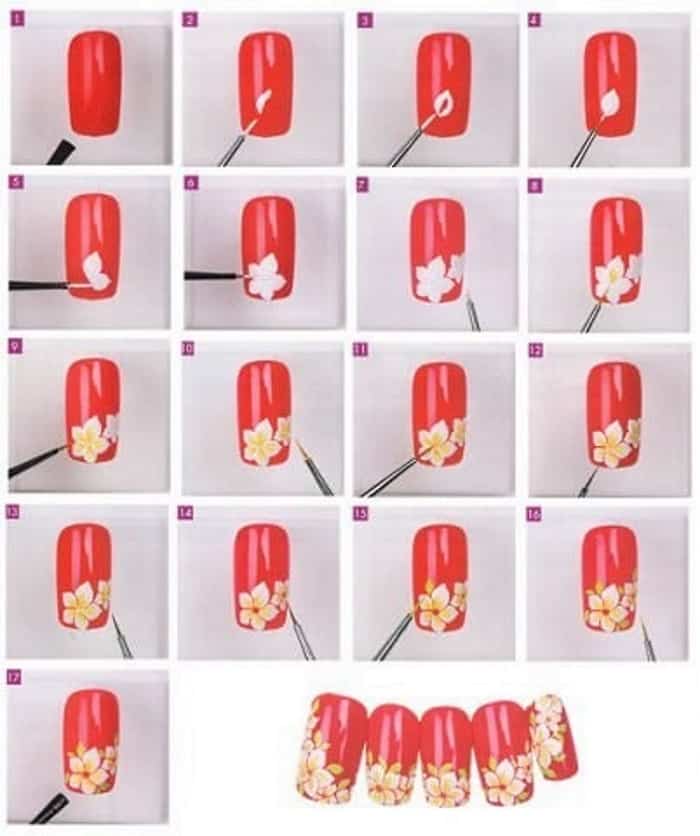
Step by step drawing of a flower with acrylic paint
You can also make a jacket with acrylic and decorate it with an original floristic pattern. The technique of painting with acrylics is convenient because if the pattern does not work out, then you can simply wash it off with water until it dries up and start painting over again.
In order for the nail painting to last on the nail for a long time, a transparent fixative must be applied over the drawing.
With shellac
Just as in the case of gel polish, you can decorate nails with shellac using the wet and dry technique. You can take a jacket as a basis, which is not a problem to make on short or long nails. If the nails are still short, then you should not make too wide a “smile” of the jacket. If it comes to a drawing, then it should not be too large, so as not to visually enlarge the nail plate.
Manicure for beginners at home
An increasing number of masters prefer to use the so-called non-edged manicure. They cite the fact that cutting the cuticle threatens infection, burrs and subsequent rapid regrowth. And as an alternative, they suggest using a special cuticle remover gel.
It is applied along the contour, left on for a while, then scraped off with a spatula along with the cuticle. Most modern doctors call this the best way.
Nail shape – adjust
Next, you need to give the nails the desired length and shape. Nail files, scissors or nippers will help with this. Glass or ceramic instruments should be chosen for natural nails. It is important to remember that you only need to file your nails in one direction – from the edges to the middle:
Otherwise, their structure can be damaged, because of which they will begin to exfoliate and break.
Important! If you prefer to use a “wet” manicure (traditional cuticle removal), then you need to correct the shape of the nails before starting it.
After a bath with soapy water, the nails will become soft, it will not be possible to file them properly until they are completely dry.
Apply a base coat.
Manicure with varnish. The base should be applied to the prepared marigolds. The most common clear varnish will do. However, you can also use a strengthening one. This will help not only preserve the design for a long time, but also improve the quality of the nail plate.
Thanks to this, the colored varnish lays down in an even layer, the manicure turns out to be beautiful, without flaws.
To proceed to the next step, it is advisable to wait for the base layer to dry completely – about 15-20 minutes.
Manicure gel polish for beginners
Manicure gel polish. Before applying it, the nails are covered with a primer. This is a special agent that degreases the surface, providing better adhesion of the nail plate to the gel polish. The primer is not cured in a UV lamp. You can immediately proceed to the next step: Which lamp is better to choose UV or LED
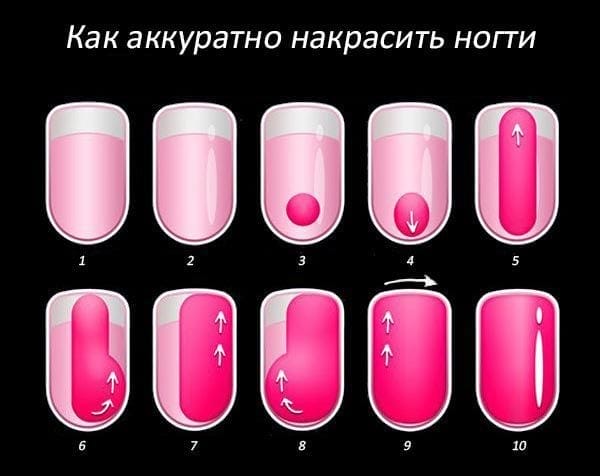
Apply varnish (gel) coating
Masters recommend applying several layers. Usually 1-2, less often 3 – in the event that the varnish is very liquid and gaps are formed. There is a diagram of how to paint your nails correctly: How to correct gel nails:
- We drip the varnish on top at the base of the nail in the middle.
- Stretch it with a brush to the bottom edge. Then similarly on the sides from top to bottom. There should be three strokes in total.
- We fix the tip with another small portion of varnish.
These three easy steps will help you create a smooth, beautiful manicure. It is not recommended to make unnecessary side-to-side or bottom-up movements.
Apply a fixing layer
Do not forget about the last layer: it can be a regular clear varnish or a finishing agent for drying in a UV lamp. It will keep your nails from damage, chips and scratches. A fashionable manicure will delight you for several weeks if everything is done carefully and correctly!
How to choose the shape of the nails of a beautiful manicure
The most beautiful nail design photo novelties 2019-2020 dictate the shape! This year, the almond shape and soft square remain fashionable. However, it is worth focusing not only on stylish trends, but also on the structure of the hand. For example, square nails look perfect on thin and long fingers, oval nails on short and full ones.
Color for a beautiful manicure design
When the hands look well-groomed and neat, the manicure is done and the shape of the nails is chosen, it's time to decide on the color.
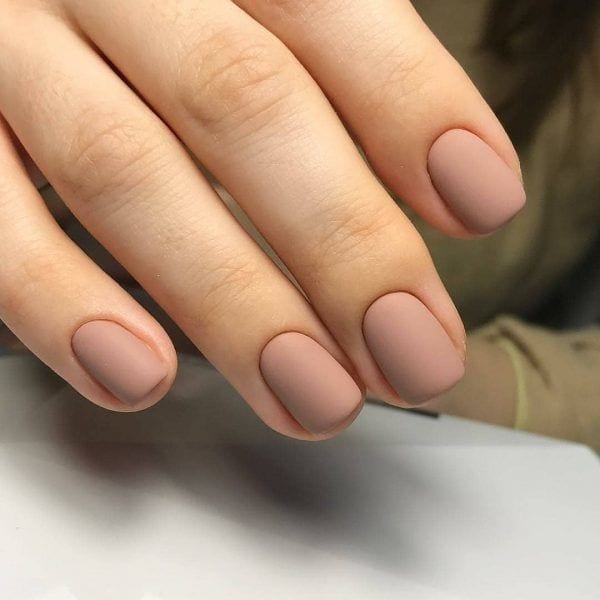
Masters distinguish a number of so-called “duty” colors. They suit absolutely everyone, look stylish and effective on nails of any shape and length. So if there is no time or desire to deal with the choice of beautiful nail designs for a long time, then you should take this basic list into service:
- Light pink, almost transparent
- Natural beige
- Powdery
- Bardovy
- Dark blue
- Red
These shades suit everyone, look great on nails of any shape and length, and are appropriate both on holidays and on weekdays. Against their background, the skin of the hands looks lighter, more graceful and noble.
At most of the latest fashion shows, a beautiful 2019-2020 manicure is presented precisely by a monochromatic cover of bed colors or richly bright, but not flashy and not pretentious.
Sources used and useful links on the topic: https://moddam.ru/idei-manikyura-v-domashnih-usloviyah https://nails-mag.ru/manikur/prostoy-legkiy/ https://pix-feed.com / manikjur-samoj-sebe / https://prostonail.com/home-manicure/ https://vashi-nogti.ru/dizajn/kak-delat-dizajn-nogtej-v-domashnih-usloviyah/ https: // womenshealth .su / kosmetologiya / dizajn-nogtej-v-domashnih-usloviyah-foto / https://www.nur.kz/1753076-kak-sdelat-manikur-doma-s-risunkom.html https://1001sovety.ru/ prostoy-manikyur / https://www.LadyWow.ru/prostye-risunki-na-nogtyah.html https://my-nogti.ru/manikjur-dlja-nachinajushhih/ https://my-nogti.ru/shikarnyj -manikjur-foto-samyj-shikarnyj /
Post source: lastici.ru