How to tie a tie in the classic way: step by step photos. All Ways to Tie a Tie: Learning to Tie Together

Content
General rules for tying a men's tie
Both stylists and designers around the world share tips on how to tie a tie correctly. In everyday life, the average man has only 3-5 types of knots, although the world of men's fashion and historical experience offer more than 20 types of knots. Some of them have become unshakable classics, others are solemn and elegant, and still others are novelties and still little-known techniques.
Before moving on to training, it is important to remember a few general rules for weaving a knot:
- you need to practice all types of knots directly on the neck;
- the classic requires that a wide strip a couple of centimeters be located below the belt on the trousers;
- the wide strip of the tie should go down half as much as the narrow end of the accessory;
- most often a wide edge is involved in weaving, therefore it is initially located below the narrow one;
- it is necessary to select the shape of the knot, starting from the type of collar on the shirt and the variety of the tie itself.
When choosing a tie, you should pay attention to its width and length, as well as the variety, that is, what event it is supposed to be for. The color of the accessory plays an important role in the choice, the shade and patterns should overlap with the shirt and trousers.
Ascot in a business wardrobe
It is perfectly acceptable to wear such a tie in a respectable office. This expressive accessory subtly hints that its owner is a bold, self-confident person with a developed sense of style who is not afraid to stand out from the crowd.
An ascot tie can be combined with a solid three-piece suit or worn with a shirt with or without a jacket. The rules for choosing an ascot color are similar to those by which you are used to choosing a regular tie for a business suit. Particular attention should be paid to the fabric – it must be of the highest quality. As for the colors, paisley or geometric prints are relevant today. But if you do not want your tie to attract too many looks, it is quite possible to choose a solid gray, dark blue, brown. Accessories in a small strip or a cage look good.

But an ascot tie that matches the color of a shirt or suit is a bad idea. He must definitely stand out.
What is an ascot tie?
Some call this decoration a neckerchief. It is better not to do this, because in its essence it is not a scarf at all. Moreover, such a tie has its own name – “ascot”. It has several varieties, but they are similar in structure. To visualize what it is, the following illustration will help us.

By the way, in the photo we see that anyone who has basic sewing skills can sew an ascot tie with his own hands. To do this, you need to sew two strips of elegant fabric about 15 cm wide and at least 70 cm long. For convenience, you can lay several folds in the middle (when tying, this place will be on the back of the neck).
Color gamut
The material for the ascot tie is chosen expensive (silk or fine wool) so that it looks presentable, but at the same time the color palette of the base should not be too variegated to avoid pretentiousness.
Ascot is distinguished by its conservatism in color, because the British are restrained people, who do not allow themselves to provoke nuances in their clothes. Most often, this tie is made of a plain fabric of pastel or muted colors with a subtle fine pattern that becomes almost invisible from a distance.
For reference! It is advisable to know that the most famous designers in their recent works used Ascot in combination with suits, where the tie perfectly matches the color of the vest, because it is sewn from the same fabric.
For the most effective result, it is important not only to choose the right color, but also to learn how to tie Ascot with different knots. Also, when using such a stylish tie, you must leave the top button of the shirt unbuttoned.
Role in contemporary street fashion
An ascot tie can also look completely casual. No wonder this accessory is so respected and loved in the hipster environment. For a casual look, you can choose a tie in any color that matches the rest of the details.
Maintain your style with comfortable suede shoes, a stylish shoulder bag, and matching accessories.
By the way, to create a casual look, it is permissible to combine ascot not only with shirts and shirts, but also with a blazer, polo shirt, and an informal shirt with short sleeves.
Dark jeans are the best for this accessory. Blond ones can look strange in the company of an unusual tie.
Shoes should be chosen especially carefully. Shoes and tie should not match in color, but should be in harmony. In addition, they should not have mutually exclusive prints and patterns.
Traditionally, the ascot is considered a man's accessory. But in a casual style, ladies can also afford something similar. But if it is permissible for a female image to tie this accessory asymmetrically, then a male ascot should have a knot strictly in the middle.
How to tie a kid's tie?
All children are known to want to grow up faster. And any boy dreams of at least sometimes appearing in front of those around him in the form of a mature, intelligent man. Appropriate clothing style can help with this.
A tie greatly contributes to the creation of a representative image. Most modern children's models of the accessory, of course, are somewhat simplified, do not require daily tying, but are attached with hooks and elastic bands hidden when worn under the shirt collar.

It is convenient as this part can be put on easily and without any problems. But what if you accidentally untied a tie with an elastic band, how to tie it?
- First of all, you should conveniently position the accessory on the table, putting an elastic band on its thin end. Next, bend it in this place, creating a corner with a slope to the right.
- Pull the thin end of the accessories under the thick one with an outlet on the left side. Tighten the resulting loop a little and, hooking the elastic band, thread the thin end under it from top to bottom.
- Tighten the knot so that it takes a neat conical shape from the outside, straighten the tie.
- At the back, you should get a knot in the form of an infinity sign. Taking threads with a needle, they should be fastened to the rest of the fabric with several large stitches.

The photo shows a diagram of how to tie a tie with an elastic band
This kind of instruction on how to tie a tie will help you solve unexpected problems with an important piece of your wardrobe.
- The bow tie.
For special occasions, bow ties are very suitable for children. In the old days, the fashion for this gentleman's jewelry was enduring. “Butterflies” were worn with pleasure by noble gentlemen and lackeys.
And nowadays, respectable adults wear an accessory as an element that necessarily complements a tuxedo. At the beginning of the last century, the premiere of one of the most famous operas, which took place at the Teatro alla Scala, brought worldwide fame to “butterflies”.
On that unforgettable evening, it was this accessory that adorned the appearance of all the musicians, which the public liked indescribably.
In the modern version, “butterflies”, fixed, as a rule, with elastic bands, prefer to sew from bright fabrics, combined with any kind of suit. They are decorated in the most original way, being made not only of fabric, but of leather and even wood.

Best of all, such a wardrobe item is combined with a simple shirt without pockets, and there is an inherent rule that the “butterfly” must always be a little narrower in size than the collar edges of the shirt on which it is worn.
Many models look just wonderful and original, as evidenced by the photo. How to tie a tie yourself, if the need arises?
- Initially, the material from which it is supposed to create a “butterfly” (as can be seen from the picture) should have a not quite usual, but necessarily symmetrical, shape.
- When placing a tie around your neck, it should be remembered that one of the two parts of the accessory, more precisely the one in the left hand, should be slightly longer than the right. First of all, it is thrown into the neck loop from the bottom up, making a simple tying.
- The left wing of the “butterfly” is formed from the side of the accessory, which remained at the bottom.
- The remaining part is threaded through the loop formed from the inside, thus a second wing is obtained.
- The decoration is straightened and the desired appearance is given to it and the volume of the “butterfly” is formed. In this case, it turns out that one end of the string remains outside, and the other is inside.

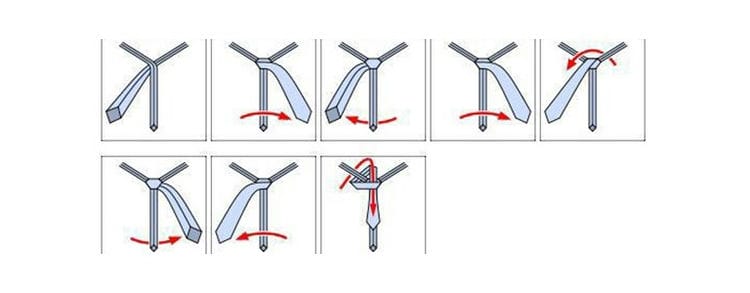
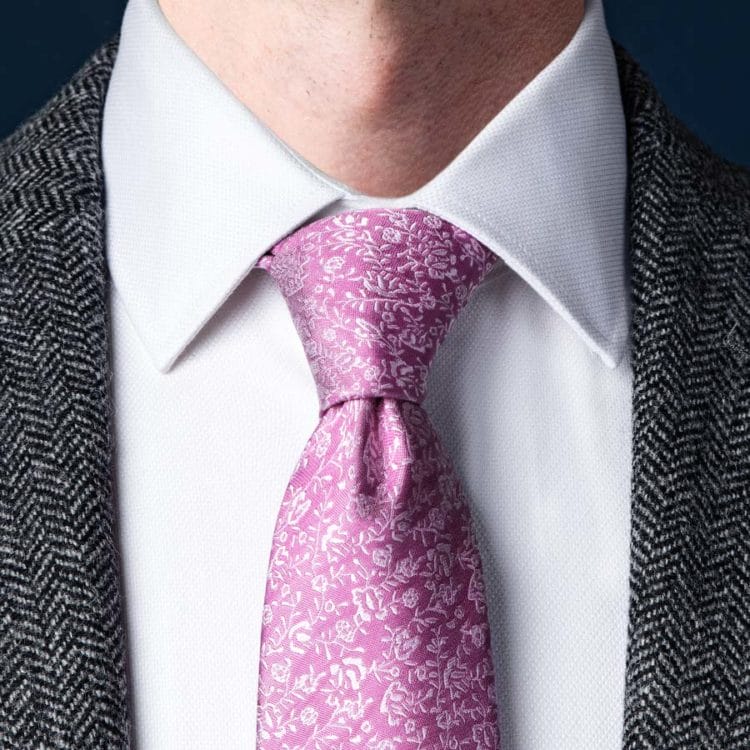
The classic way

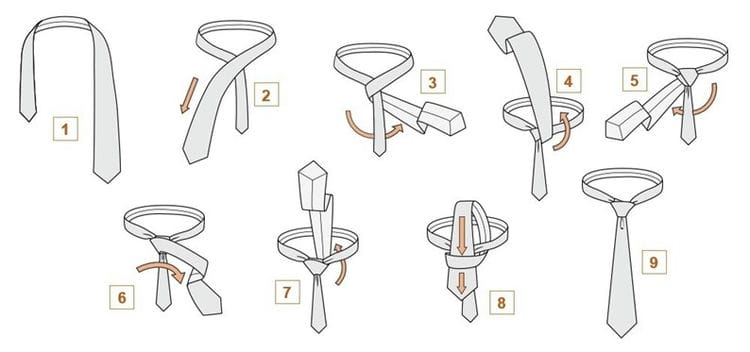
Every man at least once in his life planned to attend an event with a strict dress code. But the plans of many of the stronger sex did not come true, because they could not “defeat” the tie and tie it beautifully. But this is done quite simply:
- the tie is put on the neck in such a way that its wide part is on the left (from the side of the owner of the neck product);
- the narrow part of the neck accessory is located higher than the wide one (approximately 2 times);
- the wide and narrow sides intersect (the wide side remains on top);
- the wide side once “wraps” the narrow part;
- the wide part of the tie from the inside is inserted above the intersection of the two parts of the product and brought out into the “ring” that appears as a result of throwing one side over the other.
The photo shows a diagram of the technique of tying a tie in the classical way:
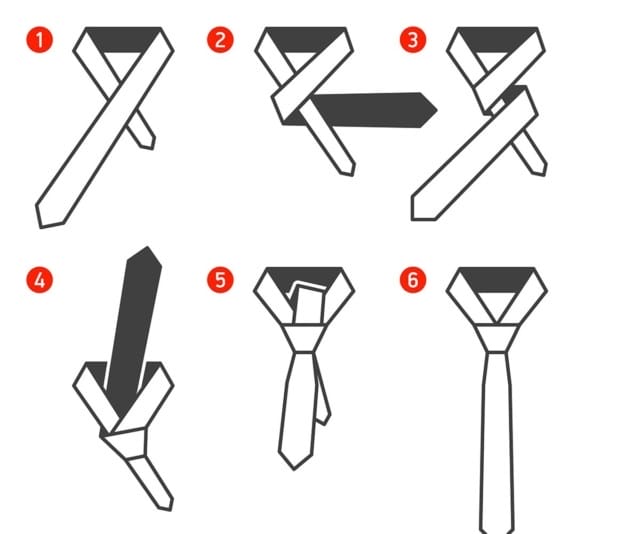
After that, it remains only to shape the resulting tie knot and adjust the force of its pressure on the neck. By the way, to make “dimples” appear on the bottom of the knot, it is enough to squeeze it on both sides with your fingers.
For information: this method of tying a tie is often called a quadruple. Because a man is only 4 easy steps away from a perfectly looking neck jewelry.
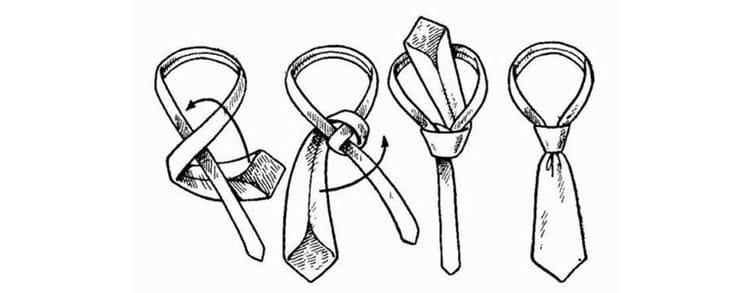
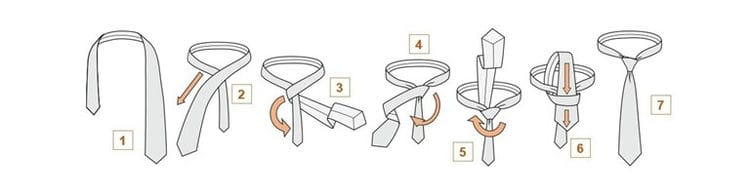
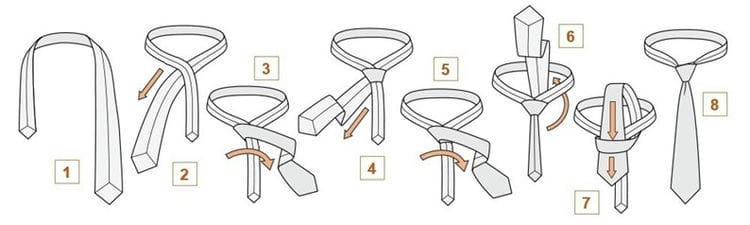
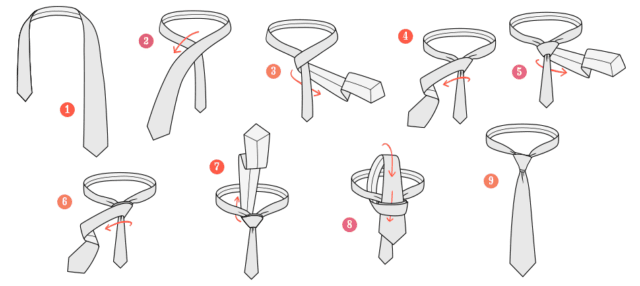
How to tie a tie in the simplest “classic” way: diagrams, photos, videos
On the left is the thin end of the tie, on the right is the thick end. It is necessary to overlay the thick part on the narrow surface.
Then thread the large end of the tie inside the resulting neck loop.
The thin end extends downward and is held under the thin end towards the right hand.
We again draw the thick end over the narrow one, but already in the direction of the left hand.
Through the neck loop, the thick end is pulled upward. From top to bottom, a thin end is threaded into the eyelet. Make a neat bundle tie
Windsor

The tie knot, so floridly named after the Duke of Windsor, is considered to be quite comfortable. Indeed, thanks to the unusual way of creating it, such a tie can be easily loosened and removed without unraveling.
How to make such a knot?
- The tie is worn around the neck so that the longer and wider side is on the left.
- The left side is superimposed on top of the right, and its end is passed from the inside to the area of intersection of the tie sides and is brought out.
- The wider and longer edge is drawn under the short side and once again passed through the resulting “eyelet”.
- The wide side is laid on top of the short part, and its end from the inside is passed through the neck loop.
- Outside, the tip of the tie is passed into the newly formed ring, the knot is tightened.
The photo shows a diagram of the method of tying a tie with a Windsor knot:

By the way, to tighten a tie with such a knot, you need to gently pull on its short end with one hand, and hold the knot with the other.
Important: in order for a tie with a Windsor knot to look as effective as possible, you need to choose elongated models of neck accessories (about 4 cm more than ordinary products).
It is worth noting that it is not always possible to tie a tie in the Windsor method the first time.
We tie a tie on ourselves: lifekahs
The fashionable word “life hack” has become popular with the society because it has simplified various complex tasks and actions at times. The same can be said about the methods of weaving ties, experts offer life hacks how to quickly and beautifully design a design without skills.
An illustration of how to braid a tie in 10 seconds.
Video, how to braid a knot in less than half a minute:
Thanks to such little tricks, men who do not have free time for complex and sophisticated knot options will quickly cope with the task of weaving a tie.
Oriental, aka Eastern
The simplest of the knots, it will ideally “sing” with a thick (say, thick wool) tie. Not suitable for those with a round face.
There are kinds of knots designed to be tied in three seconds – however, they also crumble quickly. This method is just like that. The instruction for its “mating” is short, but, however, you will have to fill your hand – not everyone can do it without training.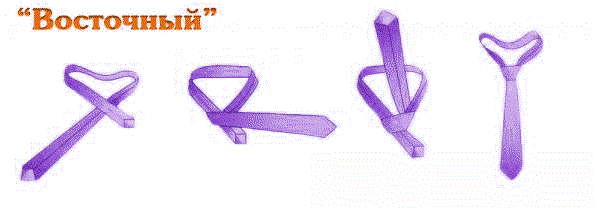
- We sketch out a thin “tail” on a wide one, directing its “arrow” to the right.
- We embrace the narrow one with a wide half, directing it to the left.
- Now we pull this wide end at the back of the knot through the neck loop, pull it through the knot from top to bottom. The node is ready!
Windsor node: step by step, photos, diagrams, video
When you need to decorate a tie knot using the classic method, then you should use Windsor. At the same time, a triangular knot is formed, which has an elegant, symmetrical shape. Obtaining such a knot is achieved by making a double fastening on the neck loop. When there is no satisfaction in a large bun, then you need to try ties made of lightweight fabric. It should be borne in mind that Windsor is advised to design for collars with a wide neckline.
How to beautifully tie a tie with a quarter knot?
The quarter knot is one of the most famous ways to tie a tie. It has become popular for its simplicity and versatility. Conical, slightly asymmetrical knot will fit any collar.
How to tie a tie with a quarter knot
- Place the tie so that the wide end is on the right and the narrow end is on the left. Pull out the tip of the narrow half, and put the wide part of the tie over the narrow one.
- Wrap the narrow end with the wider end from left to right. Form the front of the knot by sliding the wide end from left to right.
- Pull the wide end towards the neck and pass it under the collar of the tie.
- Pass the wide end through the loop on the front of the knot.
- Pull the wide end by tightening the knot. Done!
Hanover
Another triangle knot, and it turns out to be even larger than Windsor. The collar should be as wide as possible. Perfect for miniature representatives of the stronger sex. How to tie a tie if it's wide enough? This instruction will do.

“Cross” method
There is another easy way to tie a tie. This kind of knot goes well with long ties. Now it is called “double”, “Italian”, “square” tie. In the territories of European countries, it is called “Christenses” or “Cross”.
Such ties are tied to high collars, which have a minimum height of four centimeters. Cashmere and woolen items are combined with a cross tie. Accordingly, these types of knots are made in winter. The Hanover knot is quite difficult. However, it looks pretty nice. In the photos and videos, you can see what is obtained with a symmetrical knot, similar to a triangle. It is slightly larger than Windsor, which means it requires the widest possible collar. If the collar is narrow, it will overlap part of the tie, and an ugly distortion of the shape will occur.
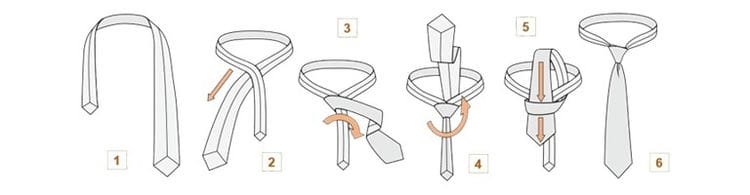
Half-windsor knot

It would seem why it was necessary to create a tie knot, which is extremely similar to the already existing method of tying a tie. But in fact it is necessary, and here's why:
- this version of the beautiful design of the product takes less time;
- this method is easier for “beginners”;
- the half-Windsor knot looks much narrower and more elegant than its “big brother”.
And in order to tie a neck product in this way, you need:
- place it on the neck (the longer and wider end is located on the left);
- put the left side on top of the right;
- skip the wider part under the narrower one;
- pass the tip of the wide part of the tie from the outside into the tie knot and bring it out from the inside to the right;
- circle the narrow, short part of the product with the wider side;
- insert the tip of the wider part from the inside under the knot to insert the “ring” made in the previous step from the outside.
The diagram shows how to tie a Half-Windsor knot on a tie:
Granchester knot
Granchester is a technique of tying a tie of sufficient length, resulting in a knot close to the Cavendish version. We are talking about a large and colorful knot, and in order to get enough volume, you need to take a tie longer than the standard model. So, we tie a tie beautifully in Granchester as follows:
- a wide strip is crossed with a narrow one on the inside, after which two turns are made in the direction to the left, forming a double pocket;
- a wide strip is lifted up through the loop from the inside;
- they are lowered over the pocket in the direction to the right, after which, from the inside, under a narrow strip, they are carried out to the left;
- now again a wide strip is wrapped around a narrow one, forming a third pocket;
- on the right side, a wide strip is lifted up to the loop from the inside;
- at the end, a wide strip is threaded down through three pockets.
As a result, you should get a voluminous and wide knot, which is located in the center of the shirt collar. Stylists advise combining this knot with a Shark collar.
Trinity
The Trinity knot is very original and unusual that will immediately make you stand out. But tying it is not so difficult, all instructions and diagrams are below.
Diagonal

The diagonal knot seems rather complicated only at first glance. In fact, to create it, it is enough to combine knowledge of the classical and Windsor methods of tying a tie and follow the following steps in sequence:
- the tie is put on the neck in the old, familiar way (the wider and longer side is located on the left);
- the left half of the product is superimposed on top of the right one and passes around it twice;
- the tip of the wide part of the tie is first launched from the outside into the formed knot, and then brought out to the back side;
- the tip is passed through the loop, which appeared as a result of double “winding” and pulled down.
The photo shows how to tie a diagonal knot on a tie:

Voila, the light and original knot is ready. It remains only to pull a little on the ends of the tie, and align the beautiful weave with your hands.
We knit a knitted tie beautifully
Knitted tie is a new trend in men's fashion, which belongs to the casual style, that is, urban style. Today, men prefer to wear such tie models with strict classic and retro looks in suits and shirts. They are preferred in the cold season in winter and autumn, and fashion designers combine them with tweed suits and unpaired jackets.
Knitted tie
In principle, most tie designs are suitable for this model. But the following techniques are considered the most ideal options for weaving a knot:
Quarter knot:
Kent node:

Prince Albert:

For reference! Knitted tie models are an unofficial accessory for men called knitted ties.
“Bow tie” or elastic
Begin tying the knot by throwing the tie around the neck so that the location of the seam is on the outside. It is advised to study the photo well, which explains step by step how to tie a product in the form of a “bow tie” or an elastic tie.
Short tie
This type of tie is not considered a classic and is a risky choice for a man. Most often, this model of accessory is practiced in the dress code of civil servants. You can put on a tie only strictly under the jacket, its width is different from the norm, and simple and compact designs are selected as knots. Of the above techniques, the Kent, Half Windsor, Small and Double Knot are ideal.
Also, experts advise you to try the Wismar node, which is performed in just a few steps:
- a tie is hung around the neck, a wide strip is thrown over a narrow one, winding to the left;
- after that, on the left side, it is wound from the inside under the loop on the neck;
- a turn is made around the loop on the left, after which, under a narrow strip, a wide edge is introduced to the right;
- now the wide strip is lifted up to the loop, make a turn around it on the right;
- at the end, a wide strip is lowered parallel to a narrow one.
The result is an elegant and very informal knot that is perfect for both men and women. Wismara looks best on formal-looking silk and satin ties, emphasizing the dignity of cropped models.
How to wear a tie correctly
Choosing and wearing a tie is not as easy as it might seem. The wrong length or width of an accessory, unnecessary jewelry or an inappropriate print can completely change the impression of you as a business partner – for example, you are unlikely to wear a tie with frivolous pictures to a gala dinner. We have put together a few basic rules for you, following which you will not make a mistake.
Prince Albert Knot
Prince Albert is an English classic tie-tying technique that accepts slim and thin accessory options. You can assemble the structure as follows:
- the long wide edge is laid in a criss-cross manner over the narrow edge in the direction to the right;
- make two turns from the inside of a narrow strip, bringing out a wide strip on the right side;
- now a wide edge is brought out from below to the loop on the neck and lowered into the pockets with which a narrow strip was wrapped.
It remains only to straighten the structure on itself, straightening the knot. Ideally, this English version will look on men of short stature, as well as on thin and elongated models of accessories. But it is better to choose a shirt with an extended collar.
Kelvin Knot
The Kelvin Knot or Kelvin is named after the physicist and inventor William Thomson, 1st Baron Kelvin – the very one who invented the Kelvin scale. Very similar to the Quarter Knot, suitable for short and classic collars.
Triangle
The standard instruction for tying a tie in a triangular shape, the Kent knot technique is suitable for beginners in this business, since it is quite simple in itself. For weaving, you need to do the following:
- a wide strip should be 30 cm lower than a narrow one;
- a wide strip is crossed with a narrow one on the inside;
- now make a turn around the narrow part, forming a pocket;
- after that, a wide strip is wound under the loop from the inside;
- at the end, a wide strip is passed through the pocket, straightening down to the very belt of the trousers.
The end result is a standard triangular knot that's perfect for winter season and woolen ties. Although it will look elegant and stylish on silk models.
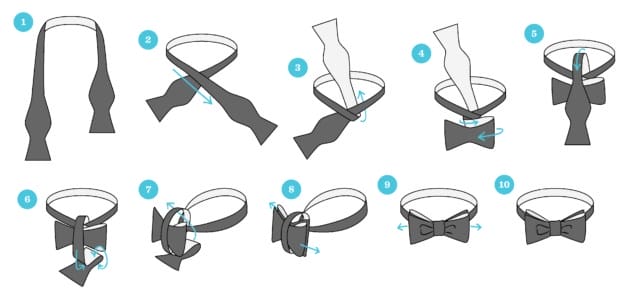
Butterfly

“Butterfly” is a shorter, more original and austere version of such a familiar man's product as a tie. It is usually combined with tailcoats and tuxedos. However, in everyday life there is a place for such an accessory, however, if it is beautifully and correctly tied. How to do it?
- The bow tie is worn around the neck in such a way that its right side is longer than the left side (from the side of the owner of the tie).
- The longer edge is placed on top of the short one and passed through the center.
- The short side is made even shorter by folding one side of the butterfly like an accordion.
- The long edge of the tie wraps around the short side, moving from top to bottom, and winds back.
- The more elongated half of the “butterfly”, just like the other half, is folded like an accordion and passed through the resulting loop.
- The ends of the butterfly are pulled gently in different directions to secure the knot.
For your information: if you tie a bow tie correctly, then the finished product will have two “wings” on both sides. In this case, the length of the outer sides should be equal to the length of the inner sides. Otherwise, the accessory will not make the desired impression.
Agree, it is very difficult to tie a bow tie beautifully and symmetrically. It is for this reason that the first acquaintance with such a neck accessory is recommended to start with a simpler “butterfly” on an elastic band.
In the photo, a diagram of tying a bow tie:
But if you really wanted to learn how to tie an original classic product, then carefully study not only the description and photo of the process, but also the video on the topic.
We suggest watching a video on how to tie a bow tie:
Pratt or American knot

The Pratt Knot, or Pratt, was invented by Jerry Pratt of the United States Chamber of Commerce. The knot is versatile and fits a classic collar with rounded ends.
Half Windsor Node

The Half Windsor knot is a versatile knot that is great for wide and tight ties. The knot is fairly symmetrical and fits wide and padded collars.
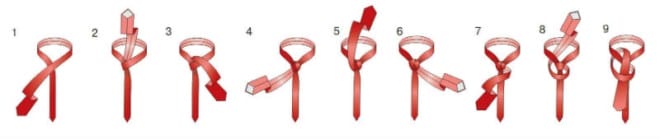
Double
The second name for such a tie knot is “Prince Albert”. This is an expensive-looking way of tying a tight, lined tie, and absolutely not suitable for thin accessories. To do it, you need:
- hang a tie around your neck so that the narrow and short side of the product is located on the right side;
- put a wide half on a narrow one and wrap around it twice;
- pass the tip into the cervical knot from the inside;
- draw the tie from the outside into the double “winding” and gently pull to the bottom.
The diagram shows how to tie a double knot on a tie :
All the beauty of a double tie knot lies precisely in the pair “eyelet”. Therefore, this moment must be emphasized.
It is not entirely clear how and where to pass the sides of the product? Do not despair, because there is a video tip.
We suggest watching a video on how to tie a double Prince Albert knot on a tie:
How to choose this smart accessory accurately?
- Picture. Put on a striped suit – get a solid tie. The pattern of the tie should not repeat the patterns of other things from the image (and first of all, the shirt).
- Color. Choose a color not at random, but trying on both a shirt and a suit. And remember: a tie should be an elegant brushstroke, not a dominant spot of color. Choose a bright red model – of course, you will be remembered … But perhaps only by the look of the tie. But the male style is to stand out with the mind, but with discreet clothes.
- Length and width. There are different models – they are all created for our different figures, that is, tall and short, fat and thin men. A thin petite guy will be fine with thin lapels and the same tie – well, a large man is better off buying a wider model.
Output
Today, the Ascot-type tie is widely used in many European countries, as an invariable accessory when creating the groom's image. Its demand is increasing in other countries, because the fashion for wide ties is gaining momentum. Aristocratic style at special events is in demand, as it was many years ago, so a stylish wide tie will be on the crest of popularity for a long time.
Sources used and useful links on the topic: https://afmen.online/vse-sposobyi-zavyazyivaniya-galstuka.html https://FB.ru/article/313020/galstuk-askot-i-ego-osobennosti https: // afmen.online/galstuk-askot.html https://zen.yandex.ua/media/id/5c0624573a3d7204141b6392/kak-zaviazat-galstuk-foto-shemy-i-sposoby-zaviazyvaniia-galstuka-5c0fae45eb86bc00a938c293 https: // moipravila. com / muzhskoj-stil / kak-zavyazat-galstuk.html https://family-journal.ru/kak-zavyazat-galstuk/ https://style4man.com/accessories/kak-zavyazat-galstuk-poshagovo.html https: //www.cosmo.ru/lifestyle/lifehacks/kak-zavyazat-galstuk-poshagovaya-instrukciya/ https://bowandtie.ru/kak-zavyazat-galstuk/
Post source: lastici.ru