15 ideas for decorating your sunglasses. Decorating sunglasses

Use a hair dryer to fit plastic frames
Let's face it, if your glasses sit too low on your nose, it can cause some discomfort, to put it mildly. However, there is a way to make your plastic frames more comfortable, and this requires a regular hair dryer. To do this, you can heat the temples of your frame with hot air for 20 seconds, and then bend them in such a way as to eliminate discomfort.
If you are wearing a frame frame, you also have nothing to worry about. Just use your thumbs to adjust the distance between the anchor pads so that they fit snugly against the bridge of your nose.
Adjust the nose pads on your metal glasses if they are too tight
It is well known that there is nothing good in a pinched nose, unless it is your beloved grandmother gently squeezing it with her fingers, while saying that you are her most beloved grandson in the world. If your metal rim squeezes your nose too much, you can move the nose pads slightly apart, of course, with the utmost care.
Eliminate slippage
If you constantly adjust your glasses with your middle finger, sooner or later someone around you will suspect a bad sign in this gesture. Yes, this happened to me, and I do not like to think about it.
To fix the problem, you will need a small screwdriver to tighten the screws on each side of the bezel. The all-in-one eyeglass repair tool is sold with liquid and lens cleaning tissue at any pharmacy, and will work with almost all frames.
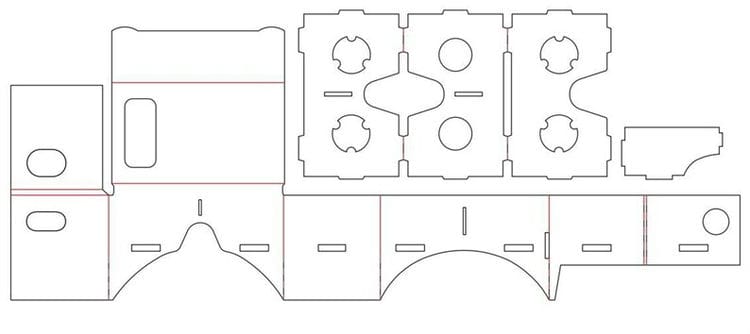
Drawing of virtual reality glasses made of cardboard
As you already understand, materials and tools alone will not be enough for the manufacture, and even more so for the assembly of the whole structure. Of course, this requires a drawing or simply a template scheme for creating virtual reality glasses.
You can find a template for cutting glasses below. It can be easily printed and then pasted onto a piece of cardboard. Since the expanded version of the glasses goes beyond the usual landscape format (and is 3 A4 sheets ), you will have to carefully and accurately combine all the fragments at the joints.
To download a template to your computer, you need to right-click on the picture, and then click on “Save Image As”.
3 pieces of template
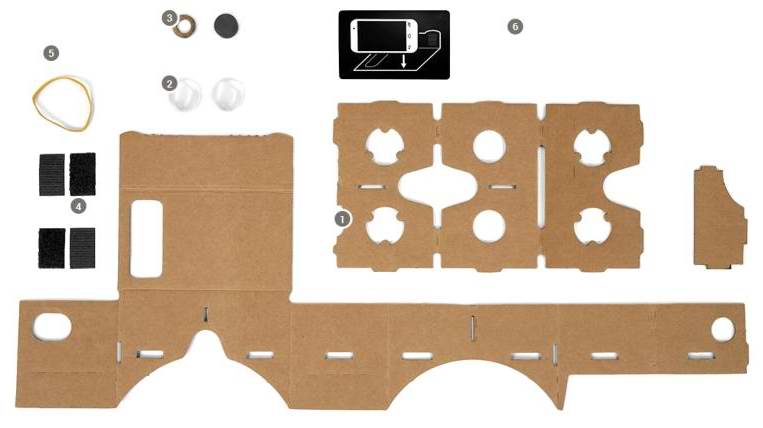
The finished result on cardboard
This is the final result that you should get by connecting 3 parts of A4 sheet on cardboard.
Cut out cardboard construction
This is what we got after we completely cut out the cardboard according to the drawing. Follow the numbers carefully, and connect all the parts correctly.
Where to get lenses for glasses
In this issue, it is the lenses that are the most difficult to access component. If you cannot find them at the nearest stores and retail outlets, then you can search the Internet.
Among the available and most likely places that can offer a similar product for sale, the following can be noted:
- Shops of the category “Optics”. Here the product is measured in dimensions – diopters, and glasses require lenses of at least +22 diopters.
- Stationery stores. Magnifiers (i.e. magnifying glasses) are sold here, tenfold lenses should work as an alternative.
- Search on domestic sites and trading platforms, or on foreign online auctions.
- Make from a plastic bottle (more in the video instructions)
In the event that the lenses obtained by the user differ to a certain extent from the specified standard, it will be necessary to either grind the lenses themselves, or make appropriate adjustments to the design of the glasses. Often the problem can be solved by providing in its design a device for adjusting the distance from the smartphone to the lens.
How to make glasses without lenses
Those who assume the option of creating VR glasses without lenses can immediately forget about it. Without special lenses, the resulting design will be no different from ordinary glasses or glass. This design will not bring any practical benefit, except that it can be used to create a cinema effect.
How frames are made
The frames are adorned with glasses. Plastic ones with their color will make any look bright and noticeable. But metal or wooden frames are sophistication and sophistication.
Any process of making frames begins with design. The artist is identified with a sketch and the layout is launched into production.
Metal-framed sunglasses look stylish and modern. However, few people think about how they are produced. The technological process is multilevel and complex.
First of all, metal wire is loaded into a separate machine with large trays. After that, a lens is inserted into the holder, the frame will be bent in its shape. The wheel is spinning – the wire bends and after 3-5 seconds a part of the future frame is ready. At this stage, a hinge is added and the frame looks like a monocle. Next, two parts are combined: the bridge is welded in the middle.
The next step is the temples. They are also squeezed out of metal wire. After the press, grind and attach to the rest of the frame. Particular attention is paid to the cogs, as they are often lost.
An important stage is testing. To do this, individual copies from the batch are checked as follows: the temples are opened / closed up to 100,000 times. Create maximum stress on the frame.
In order for the frame to be stronger, several additional layers are applied to it:
- metal that protects against corrosion and scratches, and
- varnish for a characteristic shine.
To fix the layers, the frame is placed in the oven for 14 minutes. The frames are then shiny and sturdy. The final touch is the rubber temple tips.
Applications
Paper crafts are used not only in creativity lessons in kindergartens, where you can make glasses out of paper with your own hands. They also often carry real functional value:
- Virtual reality glasses made of cardboard are not inferior in functionality to purchased models. To make them, you need a simple template and thick corrugated cardboard.
- For performances at theatrical performances or themed parties, you can make fashionable glasses out of paper in the style of minecraft or a model on a stick.
- Paper glasses can be used as an accessory for children's games: they can be put on a toy, or you can decorate a snowman. You can surprise a child by making origami glasses that look very natural in just 5 minutes.

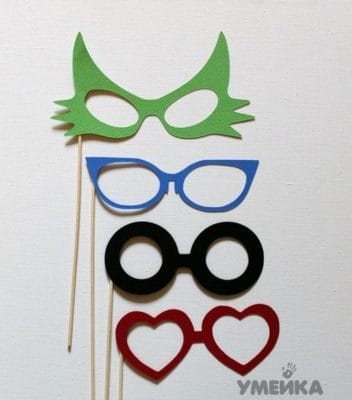
Examples of finished crafts
The presented photos of finished paper crafts can be taken as a basis and made your own accessories using the technique you like.

The simplest glasses, made of colored paper or cardboard, can complement a carnival costume. To make them, it is enough to print the finished template, transfer it to cardboard and cut it out.

The openwork model, made in the quilling style, looks very elegant and attractive. With the help of such crafts, you can decorate a holiday postcard or place them in a photo frame, decorated in the form of a panel.
You can also make 3D cardboard glasses yourself. To do this, you need to cut lenses from a plastic bottle, paint them and insert them into a cardboard base. The blank template must be printed on a printer.
The following video provides detailed instructions for making 3D glasses:


A neat and elegant craft, a bookmark in the form of glasses can be a pleasant gift for a book lover.
Almost real sunglasses may be required to play with dolls. The delicate workmanship and natural appearance will delight the child.

This elegant carnival mask is created using the quilling technique and attached to a stick. To create it, you will need paper ribbons of 2 shades, a base for creating a mask, a long bamboo stick and double-sided tape.

Cardboard glasses for a Halloween themed party are enough to cut out and decorate with plastic themed figurines.

Such paper pairs are ideal for a fun photoset at a party, where it has become fashionable to arrange photo zones with various accessories for photographing.
How to make glasses out of paper and cardboard
Before you start making crafts, you need to prepare a desktop and collect all the necessary accessories and tools. The work area should have good lighting, a comfortable chair and free space to get the job done.
Phased assembly of virtual reality glasses
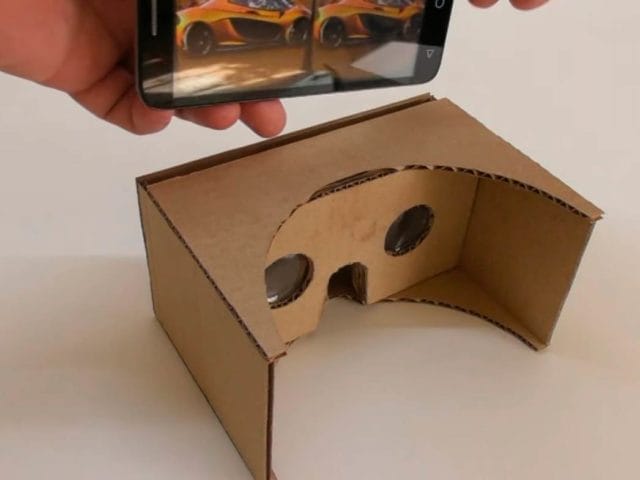
VR glasses are the dream of many children. You can make them yourself from ordinary cardboard. At the same time, home-made models are not inferior in functionality to purchased counterparts. They can also watch 3D movies and play games.
For work you will need:
- durable corrugated board;
- sharp stationery knife;
- ruler;
- a gun with a silicone rod;
- plastic transparent bottle;
- syringe with a needle.
Master class on making VR glasses:
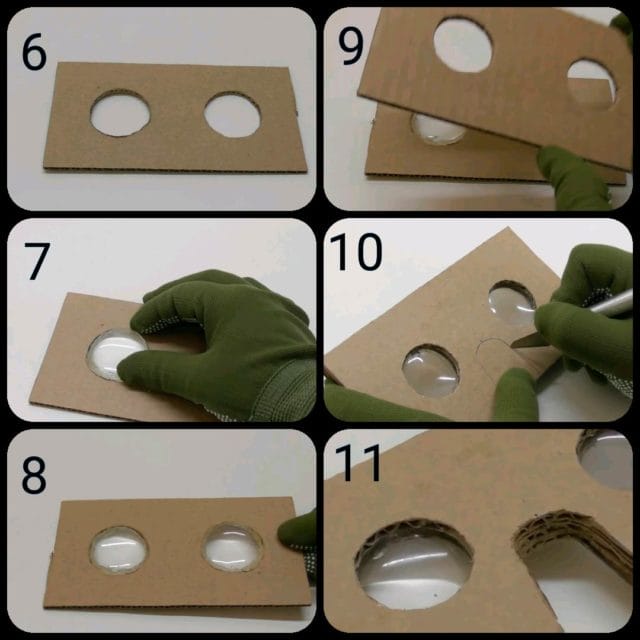
- Cut 4 identical circles with a diameter of 25 mm from a plastic bottle and glue them in pairs, filling them with silicone glue around the circumference.
- Fill the resulting lenses with water using a syringe. Seal the hole with silicone glue.

- Draw and cut 2 cardboard rectangles 15cm by 8cm with lens slots.
- Place lenses between 2 parts and fix the structure with glue.
- Make a slit for the nose at the bottom. Inaccuracies in cardboard parts can be corrected by filling the resulting gaps with silicone glue.
![15 ideas for decorating your sunglasses. Decorating sunglasses]()
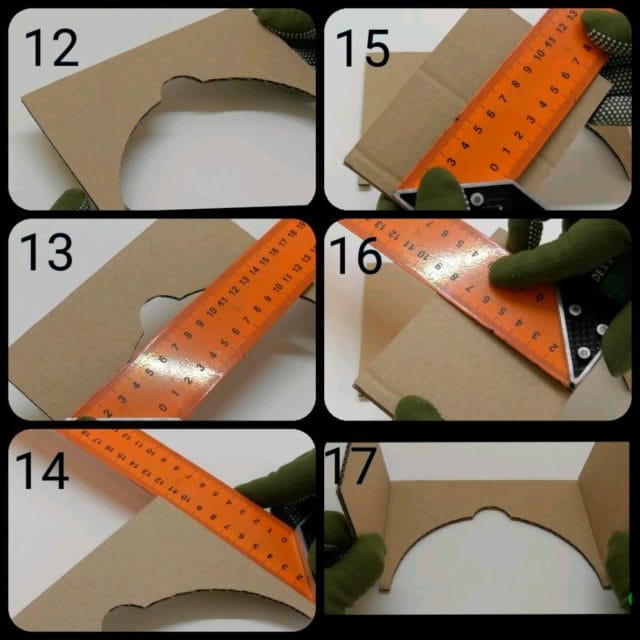
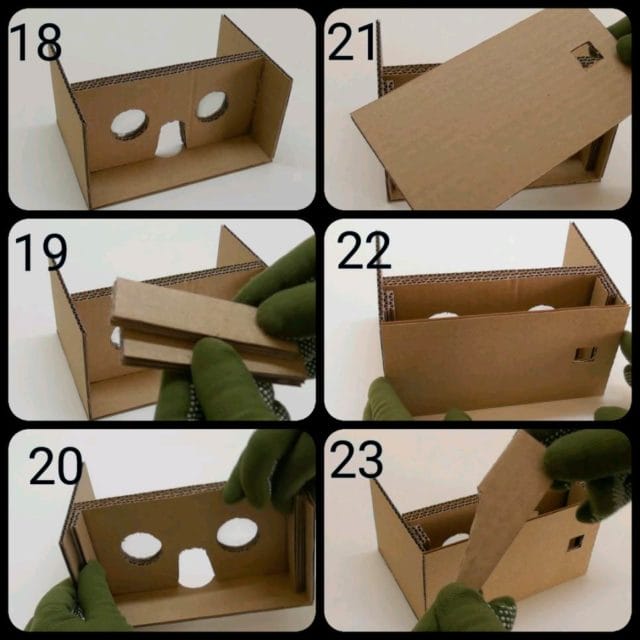
- Cut out the bottom base for glasses from cardboard with a semicircular cutout for the face. The part is 16 cm long and 11 cm wide.
- Cut 2 rectangular pieces measuring 11 cm by 8 cm and glue them on the sides of the base with the short side down.
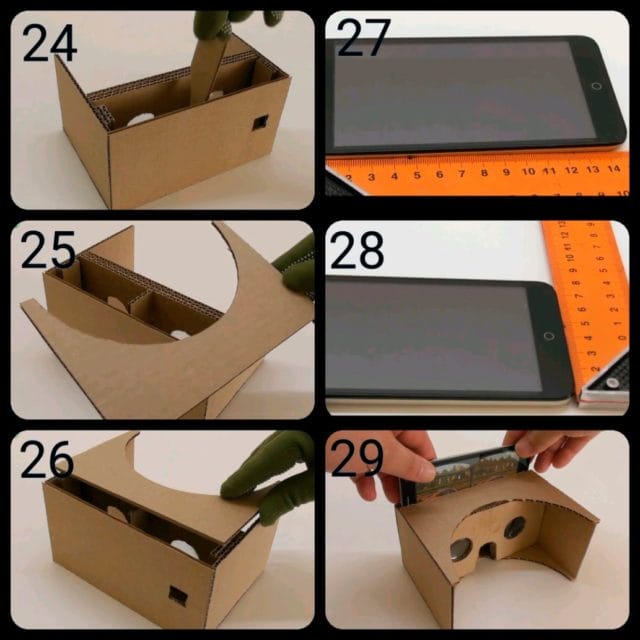
- Glue the part with lenses to the front edge of the base of the glasses, aligning the cutouts for the nose on both parts.
- On the back of the base of the glasses, use silicone glue to secure the back wall with a slot for the camera.
- Glue 2 narrow cardboard parts between the glasses with lenses and the back wall on the sides.
- Place the part with the cut corner in the middle.
![15 ideas for decorating your sunglasses. Decorating sunglasses]()
- Close the structure from above with a rectangular piece with a semicircular cut that follows the contours of the lower base.
- To use virtual reality glasses, you need to turn on a video or game in a special format on your smartphone and install the phone in the slot in the back.
When making VR glasses, lenses from a plastic bottle can be replaced with real lenses with a diameter of 25 mm and a magnification of 5-7 times.
Origami of simple glasses
A “like a boss” model in origami style can be made in 5 minutes from a regular A4 sheet. Such glasses cannot be worn on the face, since they do not have a slit for the eyes. But with the help of them you can create images for dolls and toys.
Sequencing:
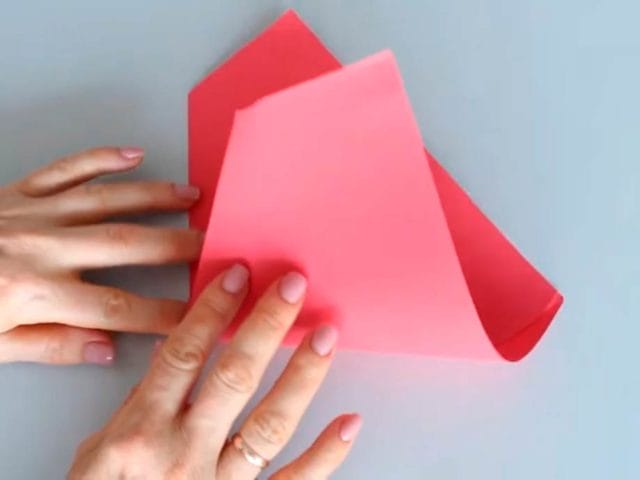
- Place a sheet of colored paper in front of you and fold the lower left corner to the upper right corner. Iron the fold carefully.

- Fold the part in half and mark the fold line again by ironing it with your hand.
![15 ideas for decorating your sunglasses. Decorating sunglasses]() ] (https://e-ipar.ru/wp-content/uploads/2020/03/image18-30.jpg[
] (https://e-ipar.ru/wp-content/uploads/2020/03/image18-30.jpg[ ) [ ! /03/image19-30-640Ч481.jpg[
![15 ideas for decorating your sunglasses. Decorating sunglasses]() )
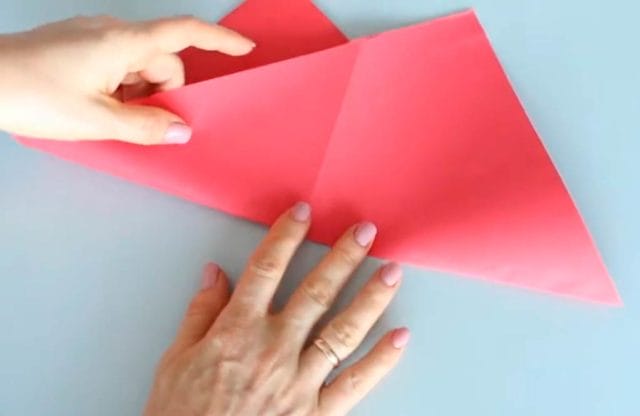
) - Unfold the sheet completely.
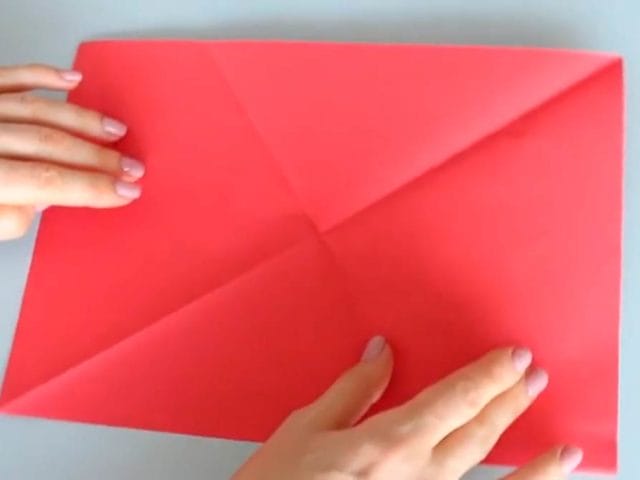
- Make a new diagonal fold.
![15 ideas for decorating your sunglasses. Decorating sunglasses]()
- Place the part in front of you so that the resulting corners are pointing up.

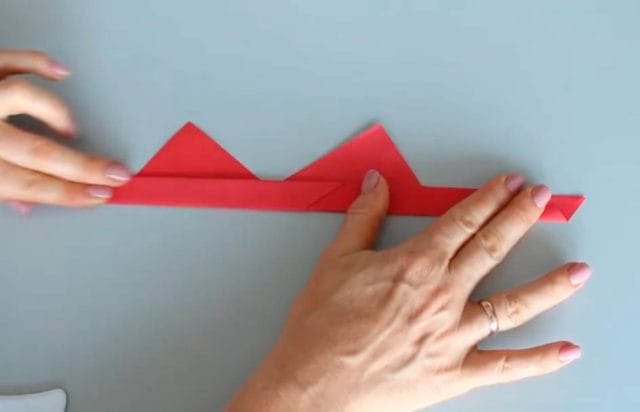
- Bend the bottom of the sheet upward until it intersects with the point of contact of the corners of the upper triangles.
- Bend the resulting lower part in half.
![15 ideas for decorating your sunglasses. Decorating sunglasses]()
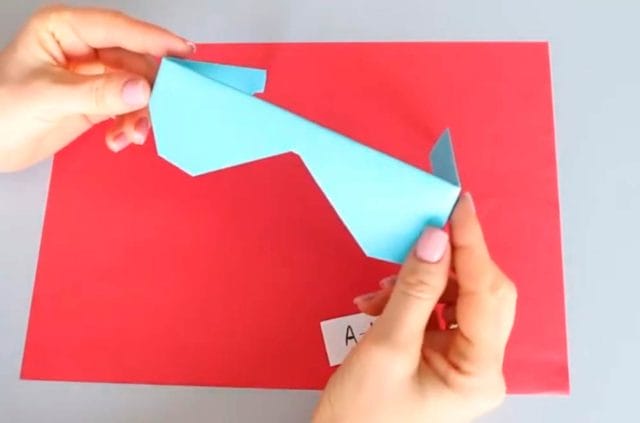
- Bend the bottom part again, forming the frame and temples.
- Make bows by bending the strips at the side corners of the triangles.
![15 ideas for decorating your sunglasses. Decorating sunglasses]()
- Turn the craft over, bend the lower corners of the resulting lenses slightly inward.

 ] (
] (


Variations of children's glasses
Everything is done so quickly that you want to tinker a little more. In this case, cardboard glasses can be decorated with a pattern or patterns made of multi-colored paper. Or you can connect your imagination and make something incredible.
Carnival glasses
For New Year's or other carnival, pince-nez glasses are suitable. Instead of bows, you need a stick with non-sharp edges, which can be glued to the cardboard blank with pistol glue.
Since we are preparing for the carnival, the glasses can be made in the form of a mask of any animal or cartoon character. The decoration will also have to work to make the glasses look bright, colorful and attractive.
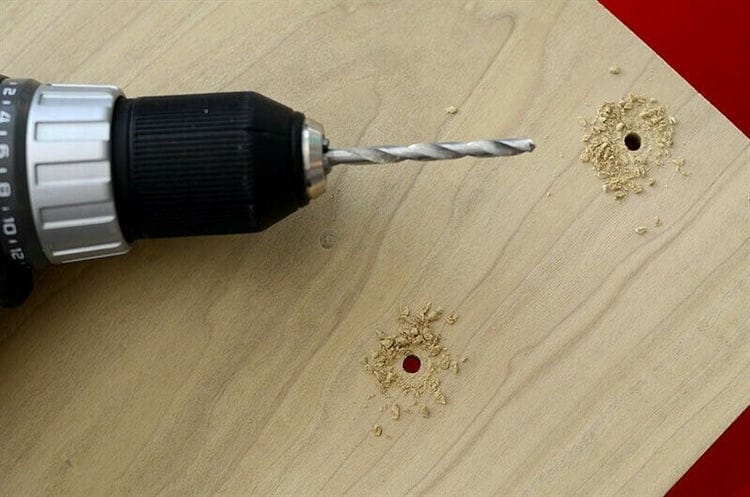
Eyeglass organizer with eyelets

To make such an organizer, you need to drill holes in the board and stretch the loops from the rope or cord through them. Glasses cling to the eyelets with arches.

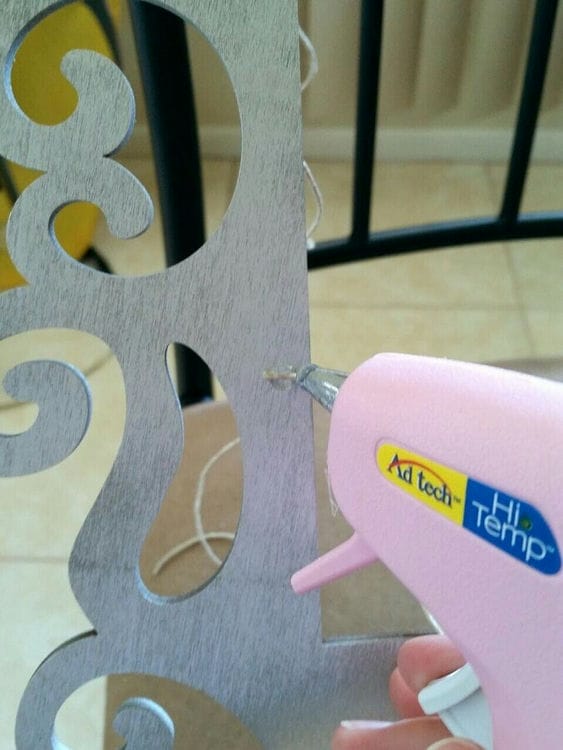
Organizer for glasses from a photo frame

The simplest frame will do: the ropes are glued to it with strong glue.
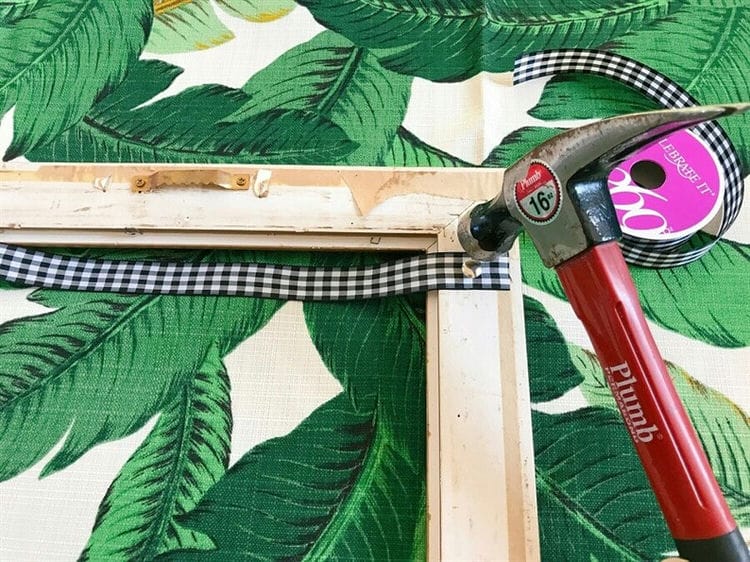
Organizer for glasses from a picture frame
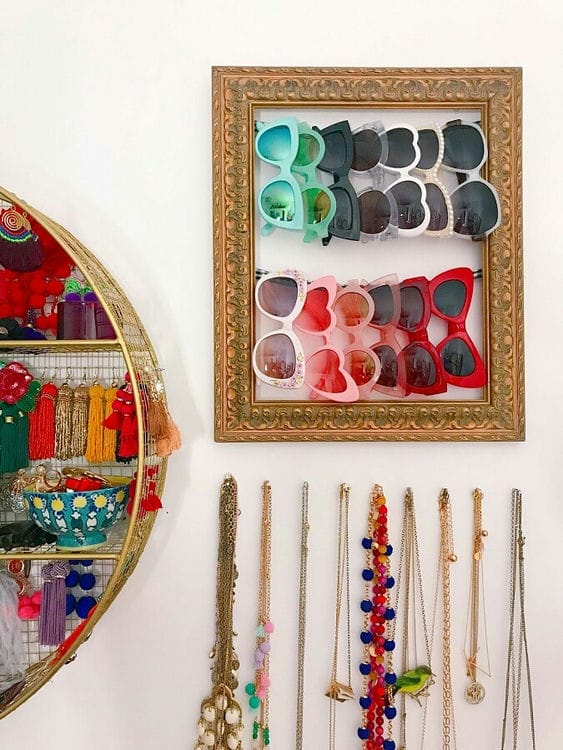
In this case, a large picture frame is used – this is suitable if you need to place a lot of glasses in the organizer. The role of the crossbars on which the glasses will hang is performed by pieces of braid attached from the inside with flat pushpins.
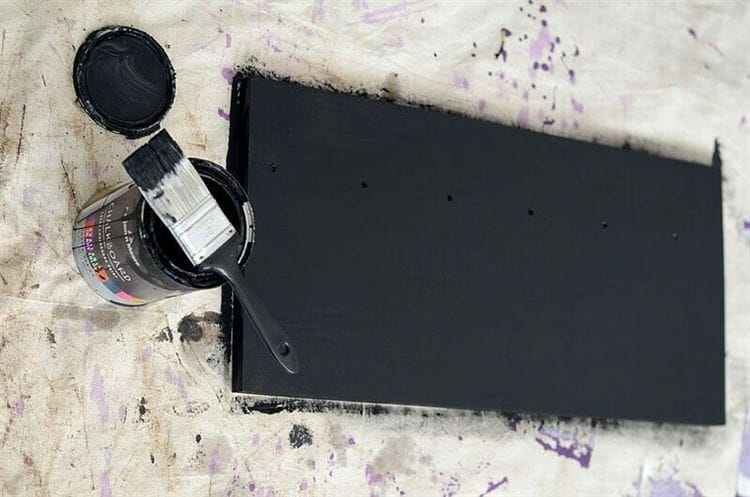
Organizer for glasses from a tablet and ribbons
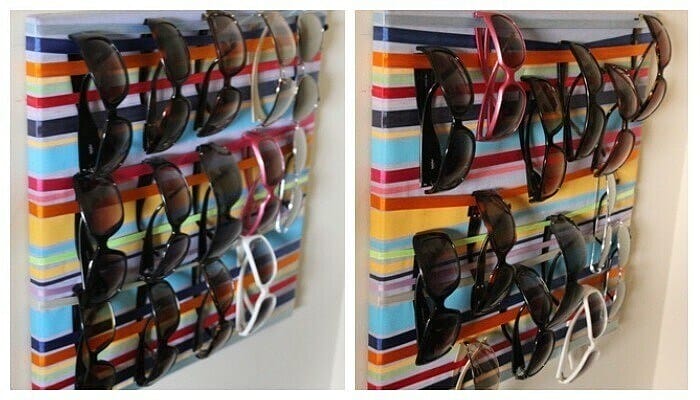
The tablet can be organized from a wooden board, covering it with a cloth. Colored ribbons or braid are pulled parallel from above. Glasses can be hung in a row or at random.
Master classes taking into account the material
Currently, many eyeglass cases are produced, but even with such a variety, you want something special. Moreover, a self-made cover can be an excellent gift. Beginners should try starting with simpler leather, felt, or knitwear.
From felt
This master class will answer the question of how to make a case for glasses out of felt with your own hands. This is the easiest option available even for children. To make an eyeglass case you will need:
- a sheet of hard felt;
- threads;
- needle;
- scissors.
You should stick to the plan:
- It is necessary to measure the glasses when folded.
- Cut off twice as much felt.
- Sew along the edge with an overcast seam, threading the end of the thread inward.
If you wish, you can make a finish from the same felt, then you will need to sew the product after composing the composition. If there is no time, decorative elements will be easier to stick to the surface. Felt is easy to cut, does not crumble, so small parts and a cover are made without problems.
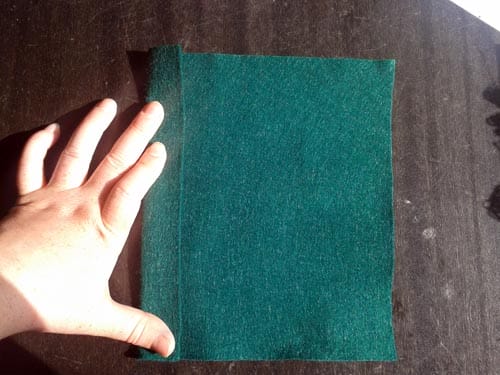
Prepare material of the right size
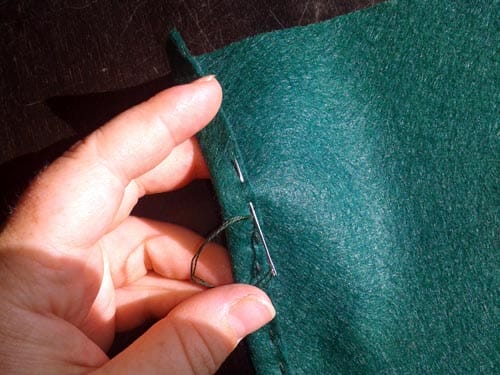
Fold in half and stitch
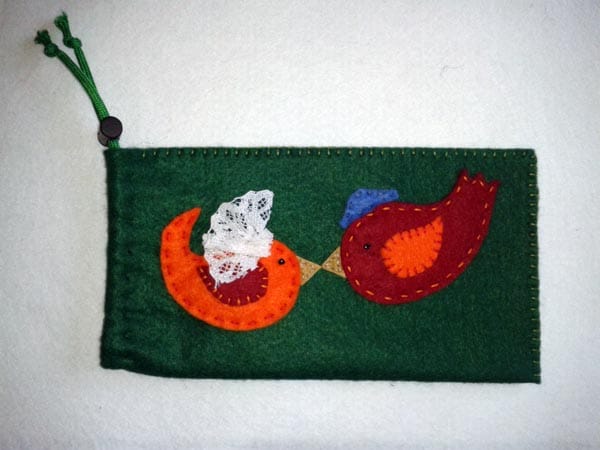
Ready-made glasses case
Leather
DIY leather glasses case can be made based on this master class. For manufacturing you will need:
- the cloth;
- glue;
- a piece of skin, preferably on a thin foam rubber;
- needle;
- thread.
You need to adhere to the following steps:
- First you need a pattern of eyeglass cases made of leather. With our own hands we cut out a rectangle to the size of the product. You can focus on the standard parameters – 18 x 15 cm.
- Fold in height with the front part inward and sew two sides (long).
- We cut foam rubber, we glue allowances.
- Gather it in half and sew in the middle with a longitudinal seam.
- We cut off the foam rubber, turn off the allowances on the front side and glue them.
- Cut out a strip of fabric measuring 8 x 30 cm.
- Fold in half with the right side inward and sew the two sides.
- We put it on the leather base of the case.
- We turn out the entire product. If desired, you can trim the top with a strip of leather of a different color.

Measure the desired piece of leather
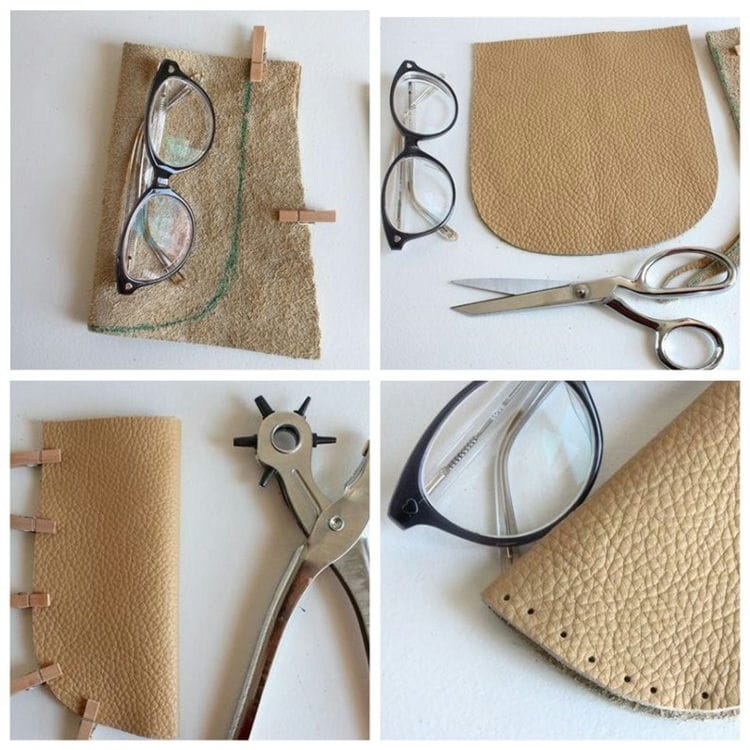
Outline the shape of the cover, cut and punch holes

Sew the case with thick threads

Finished leather case
Crochet from knitted yarn
This master class will help to tie the original eyeglass cases with your own hands. For this you will need:
- about 100 g of yarn;
- zipper closure;
- hook number 3.
To tie the case, you need to adhere to the following procedure:
- Crochet # 3 in two strands. Cast on a chain of 10 stitches.
- Continue knitting in a circle with single crochets.
- Not reaching about 2 cm to the top, dial 22 air loops, continue to work in a circle, skipping 22 columns.
- After 2 cm, start decreasing from the sides of the loop (from the first row – 4, from the second – 3).
After the base is ready, sew on the zipper. The main thing in this case is to adhere to the scheme in order to avoid skipping loops. Those interested can crochet a border for the product.

Knit a row of air loops
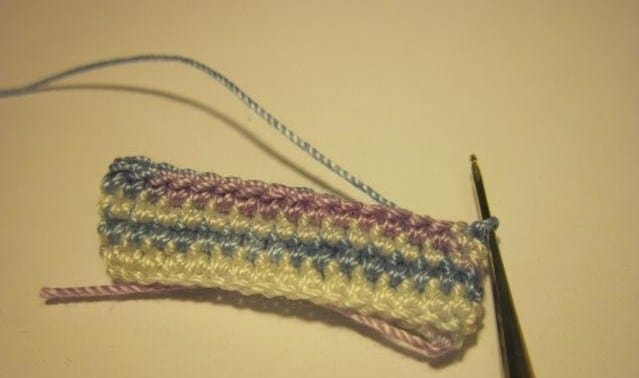
Beginning of single crochet
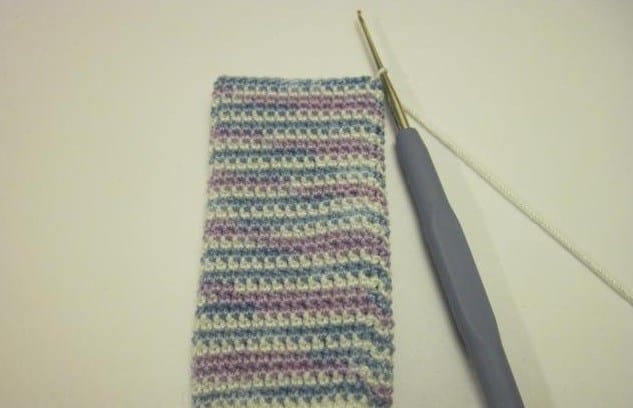
Knit the required number of rows
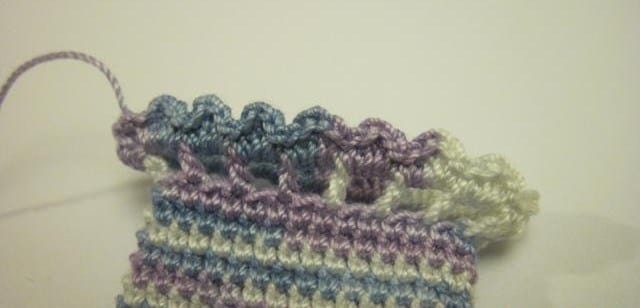
Make eyelets for tying

Thread a string

Finished cover
Hard cardboard and fabric
How to make a case with your own hands, a master class on the topic “We sew a case for glasses from fabric and cardboard” will tell you. The following materials and tools will be required:
- cardboard 2 mm thick;
- Whatman sheet;
- cotton;
- glue;
- Scotch;
- magnet.
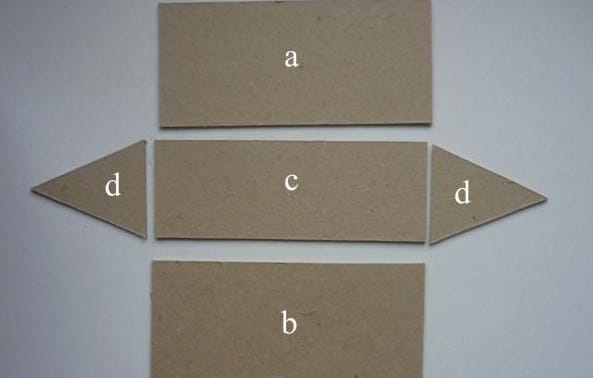
First you need to cut out parts of the eyeglass case from cardboard: rectangles measuring 16.6 x 7.6 cm, 17 x 8 cm and 16.6 x 6 cm, 2 triangles 6 x 7 cm, 8 x 7.8 cm. Whatman is needed for each of sides, and the lengths 1 and 3 of the above parts should be increased by 4 mm. The edges of the first rectangle must be beveled. Then you need:
- Assemble the case by fixing the corners with masking tape and gluing the Whatman sheets to the base.
- Cut the fabric to cover the entire perimeter of the garment. Stick it on the outside of the case.
- Make a slot for the magnet on the inside, fasten it neatly.
- Sew on the spine, glue the lock. Insert the other part of the magnet from the outside.
Such a case can be made not only practical, but also fully consistent with the style of the owner. Suitable for adults and children. All that remains is to choose the materials and get to work.
Blanks for a cardboard case
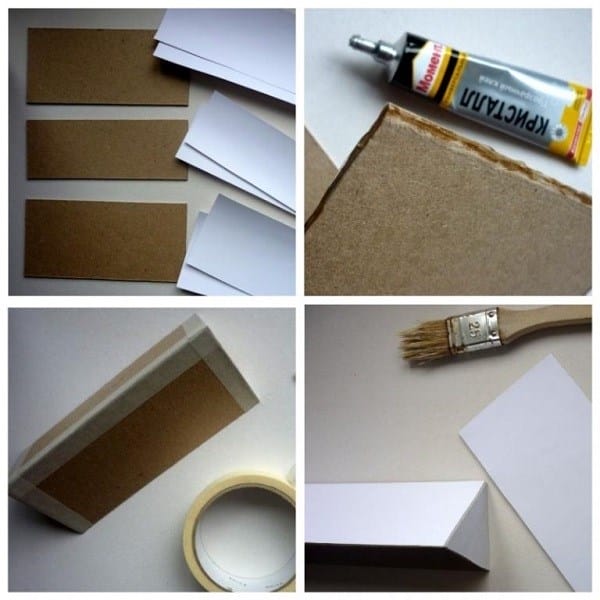
Glue the parts

Additionally reinforce from the inside and mark the place for the button

Insert Button
Ready made cardboard and fabric cover
Lens window arc split
This phenomenon is often observed in plastic frames. A cracked bow lends itself well to gluing. To glue it, you need a degreaser and a good all-purpose adhesive.
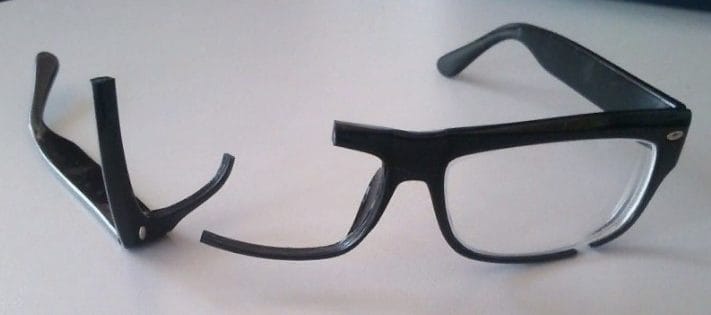
The surface is degreased before gluing. The glue is applied in a thin layer to the bonding site. Since there is a very large load in the area of the fracture, not all adhesives are able to withstand it. Experts advise the following types of glue :
- Bison Plastic;
- Moment Plastic;
- UHU Plast Special.
The advantages of these adhesives include safety, resistance to moisture, and the absence of toluene in the composition.
Also, to reduce the load, it is recommended to glue the lens over the entire area of the window before gluing the fracture site. For the reliability of gluing, it is necessary to firmly tighten the repair site with a nylon thread for a while.
Before applying the glue, the lens must be sealed with tape, since the chemical compound of the glue contains substances that can damage it. The fracture site is cleaned and sanded after the glue has dried.
Glue is applied to the ends of the bow, and the bonding area is pulled together with a thread. If there are scratches, they are painted over with transparent nail polish.
Cracked metal frame is hot welded. For this, brass and metal beads are used. The repair process itself requires increased accuracy. However, the joint will look sloppy. Giving them a respectable look will be quite problematic.
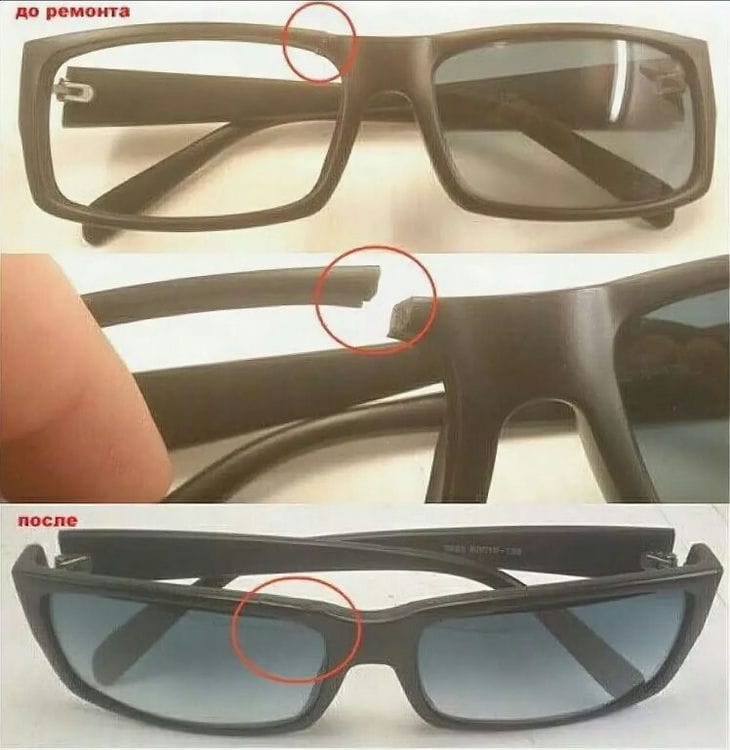
The frame (bridge) on the bridge of the nose split
 No less common breakage of glasses is the bridge on the bridge of the nose. After preparing the necessary equipment and glue, you can start gluing the glasses.
First, you need to erase the break points with an emery cloth, followed by degreasing the gluing surfaces. For gluing, you need a piece of a ruler or a strip with a length equal to the distance between the side parts of the glasses. Thanks to this, it will be possible to fix the glasses, which will make the repairs of higher quality and more convenient.
Cover the lenses with paper to protect them from scratches. A wooden rail is attached to both halves of the glasses with an elastic band. The elastic should ensure a snug fit of the 2 broken parts of the frame.
The glue is applied in the fracture until the joint is completely filled. Before the glue dries, its excess must be removed with a cotton swab. Then the glasses must be left for a couple of hours until the glue is completely dry.
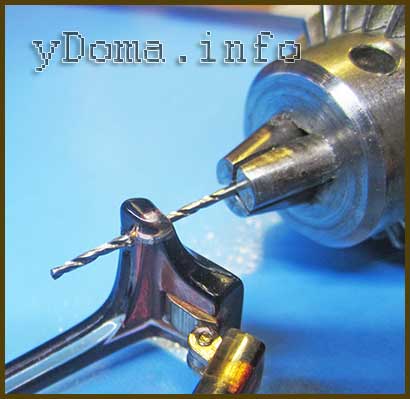
After the glue has dried, 2 holes must be made with a small drill on 2 sides of the break. A thread of color matching the color of the frame is passed through these holes. It is threaded through the holes until it fills them as much as possible. Next, the holes are filled with glue, and the whole thread is impregnated with it. Excess glue is removed with a cotton swab, and excess thread is trimmed.
To completely dry the glue, do not use glasses during the day. The glasses will be ready for further use in a day.
Broken hinge
Repairing a broken hinge mechanism begins with removing the broken part, for which you can use a file.
Important! The process of removing the broken part must be done carefully to avoid damaging the frame.
After leveling the surface with a file, it is necessary to make a replacement part; for this, a copper wire of a similar diameter is passed into the remaining loop of the mechanism and bent in the form of the letter of the Greek alphabet – “Omega”.
In the future, the parts are connected, and the wire is heated by means of a soldering iron. It is carefully pressed into the softened plastic until the maximum possible drowning. After cooling down, the connection is solid. After the wire hardens, the place of repair is leveled and sanded, it can also be painted over with nail polish to match the color of the frame. This repair only applies to plastic frames.
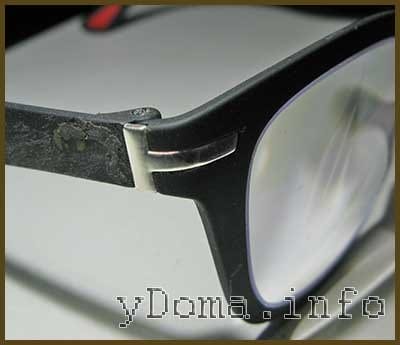
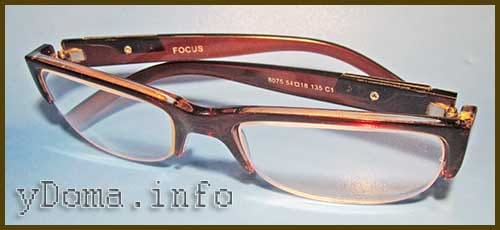
Repair of the eyeglass temple with a broken hinge
A neighbor turned to me with a request to try to repair his favorite glasses, since they refused to repair him in a specialized workshop – they advised me to buy new ones.
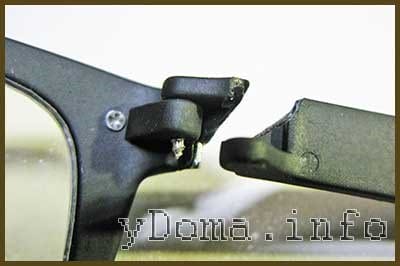
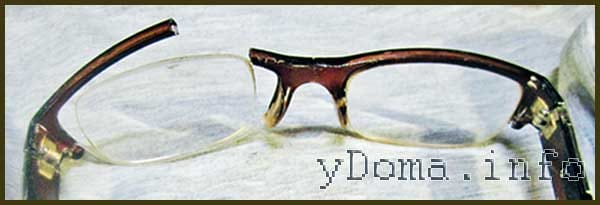
The bow of the glasses broke in the place of the hinge and at first glance it seemed that it was impossible to repair the glasses. But if you think about it, you can always find a way to repair.
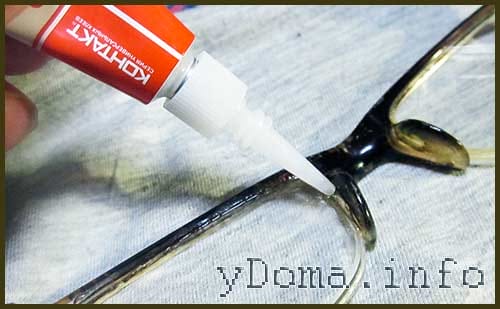
First you need to unscrew the self-tapping screw and glue the broken part of the hinge using Super-glue “Contact” to the temple. I often use this glue to glue any cracked or broken pieces together. But in this case, the fracture area is small and the glue will not hold reliably. Therefore, the parts were glued together mainly for the convenience of further repairs.
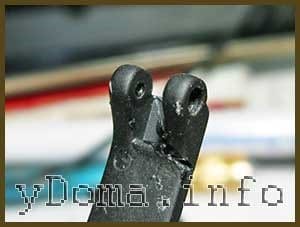
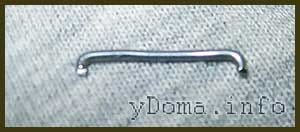
Next, a staple was bent from a paper clip, as shown in the photo, and by heating with an electric soldering iron, it was fused in the longitudinal direction of the temple. The middle of the staple should follow the crack line.
For the reliability of the connection, a second bracket was melted across the temple. In order not to burn your fingers and to melt the staple into the desired place of the temple, it is convenient to hold it with tweezers. It takes up to a minute to warm up the brackets, there is no need to rush. When the bracket heats up to the melting point of the plastic, it will easily enter it.

After the staples are melted into the temple, it remains only to smooth out the protruding plastic and cut off its excess after cooling with a knife or grind it off with fine-grained sandpaper. If the bracket appears on the surface, then it can be reheated and drowned deeper.
Now the brackets are not visible, the resistance to breakage after reinforcement with steel brackets of the temple has become higher than it was. The glasses will no longer break at this point. If desired, the junction can be polished, making it completely invisible.
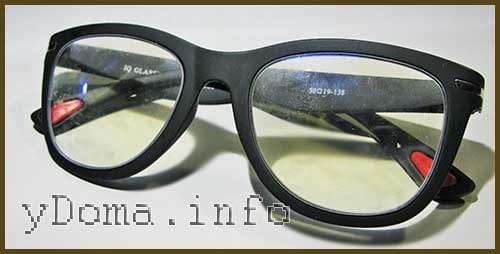
The repairs have been completed and now the glasses began to look like new and, if treated with care, will last a long time. When I returned the glasses to my neighbor, he was very surprised that they managed to be repaired, but he doubted if the temple would break off in this place again. After a month of socks, he began to ask me what kind of glue I glued the glasses. After all, he did not know that the bow at the place of the breakage was reinforced with metal brackets.
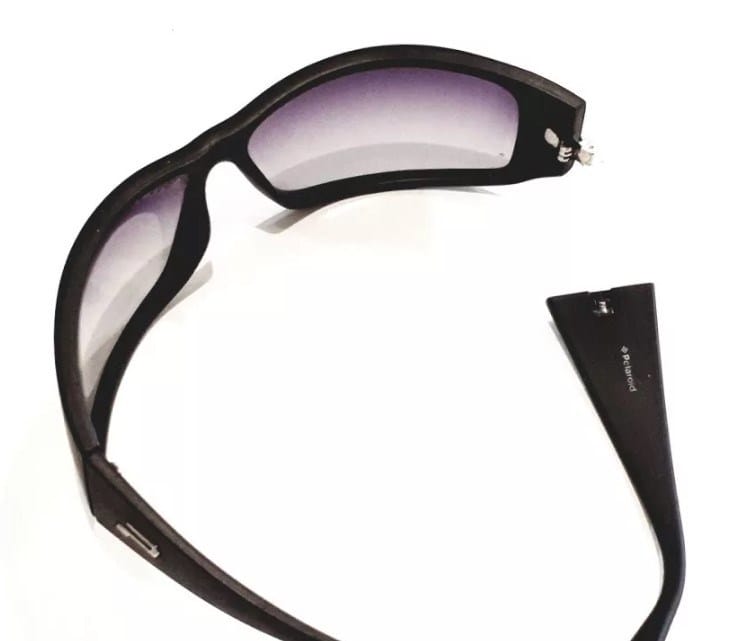
Repair of the place of attachment of the temple ear to the rim
Another glasses with a broken-off bow got into the repair. But in this case, the temple was intact, and the place of its attachment to the rim collapsed.

The temple loop was made of brass, so it didn't break. This breakage is more likely due to a constructive flaw in the frame of the glasses, and not to handling them.
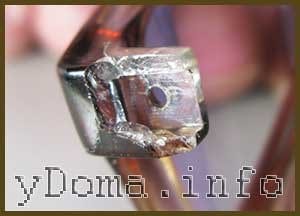
The loop of the temple was fastened in a rectangular hole made in the frame with one self-tapping screw screwed into the metal of the loop. When wearing glasses, the screw slowly unscrewed, and the load on the plastic increased, so it cracked. Ultimately, the screw completely unscrewed and lost, as a result, the bow fell out of the mount.

There was no screw of a suitable size, so I had to use the standard M1.5. For this, a thread was cut in the loop bar with a tap.

The plate on the rim for securing the temple loop had a crack. But it was impractical to install a metal bracket to strengthen it, since it was necessary not only to strengthen the plate, but also to increase the support area of the screw head
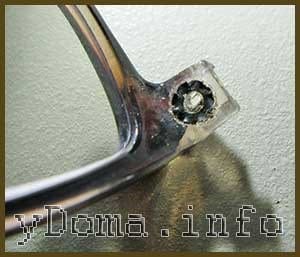
Therefore, a washer ribbed around the circumference was selected and melted into the plate by heating with a soldering iron. As a result, the area where the screw head rests on the plastic increased many times over, and the crack partially melted, which also increased its strength.
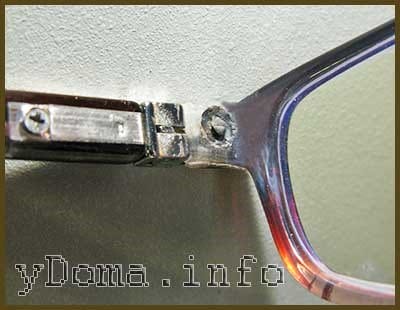
Next, the mating surfaces of the plates were greased with Super-moment glue, the hinge plate was inserted into the square hole in the base of the glasses and a screw was screwed in. A splinter from the frame was glued at the same time. It did not carry a load and therefore there was no need to strengthen its fastening with a bracket.
The next glasses were repaired with their own hands and their operation for several months confirmed the reliability of the repair performed.
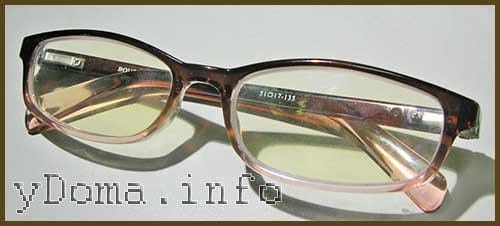
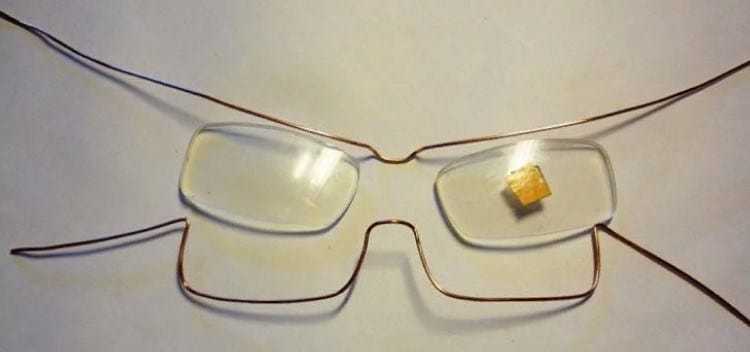
Repair of a semi-rim frame with a lens mount on a fishing line
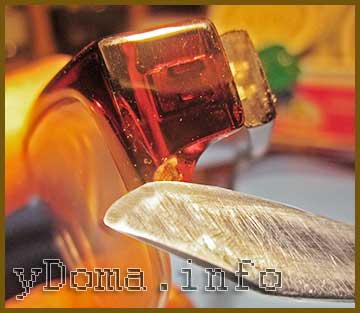
In a semi-rim frame, the lenses are half mounted in the frame, and the rest of them are held in the frame by a fishing line half recessed in the facet (a groove running along the entire length of the lens end). Thanks to this way of attaching the lenses, glasses have an elegant look and less weight compared to rim frames, especially if the lenses are plastic.

But elegance has to pay with a more careful attitude during operation, since such a frame, in comparison with a rim frame, is less reliable. If you forget to take off your glasses and start shooting a piece of clothing over your head, it may well happen that the glass falls out or pops out of the rim of the fishing line, as in the photo. If the lens falls out, but the line remains securely fixed in the half-rim, then due to the elasticity of the line, the lens can be replaced. If the line is detached from the frame, you will need to replace the line with a new one.
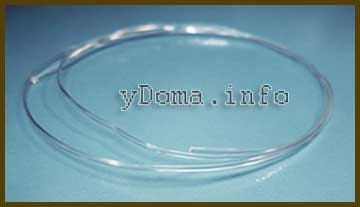
But do not get upset and run to the workshop, such a breakdown of the semi-rim frame of the glasses is not difficult to eliminate with your own hands. For repairs, ten centimeters of a transparent fishing line with a diameter of 0.8 mm is enough. The fishing line can be asked from familiar fishermen or asked at any fishing tackle store. I was cut off half a meter for thanks.
The first step when starting a repair is to remove the old fishing line from the frame. Usually, it is enough to move the line back and forth with effort and it will move from the attachment point. If its melted ends interfere, then the line can be cut. You won't need it anymore.
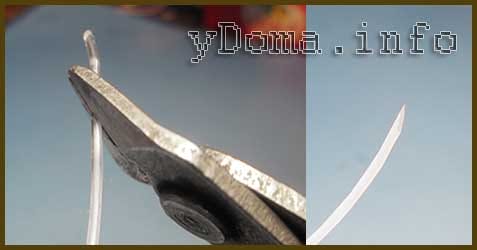
After freeing the holes from the old fishing line, you need to check whether the fishing line purchased for repair fits well. To do this, you need to bite off with side cutters or cut off one of its ends obliquely so that the end of the line becomes sharp. This will make it easier to insert it into the holes in the frame.
If the line cannot be passed through the mounting hole in the frame, then it must be cleaned. This is best done with a mini drill with a 0.8 mm drill bit. But if this is not possible, then you can use a needle or a thin awl, and an unbent paper clip will do.
The holes in the half-rim of the frame have the shape of a cone; from the side of the lens, their diameters are 0.8 mm, and from the outside, 1.5 mm. This can be clearly seen in the photograph. Thus, by melting the end of the line, you can securely fix it in the frame.
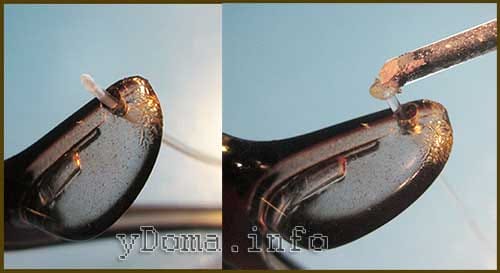
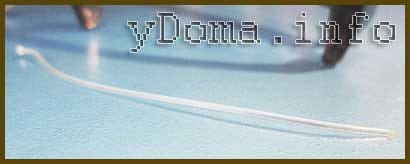
First, the line is threaded through the hole, which is in the nose pad, without a lens. Next, the end of the line is melted with a soldering iron and quickly, until the end of the line has hardened, it is pulled into the hole in the nosepiece. It must be pulled in slowly so that the line does not jump out of the hole.
If you have a high-power soldering iron at your disposal, you can wind several turns of any copper, aluminum or steel wire with a diameter of 1-2 mm on its tip. And with this impromptu sting, warm up the fishing line. In the absence of a soldering iron, you can melt the fishing line with a nail heated on the burner of a gas stove. In order not to burn yourself, the nail must be held with pliers. You can use the sharp tip of a heated electric iron to melt the fishing line or, at worst, even with a small flame of a lighter.

After fixing one end of the fishing line in the nose pad, a lens is inserted and the fishing line, threaded into the hole from the temple side, is pulled. Further, the fishing line is pressed with your fingers at the point of passage in the facet of the lens, and is cut in such a way that its end protrudes from the hole by a couple of millimeters. Then the lens is removed, the second end of the fishing line is melted and after cooling, the lens is installed in the half-rim.
Remnants of molten fishing line protruding from the holes of the frame must be cut flush with a sharp knife.
The glasses have been refurbished and are as good as new.
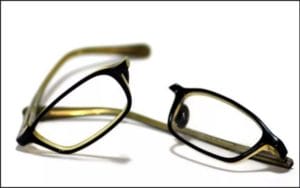
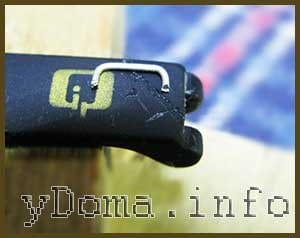
Repairing a broken half-rim of glasses frames
Several years passed, and the beloved glasses with semi-rim frames on the fishing line cracked as a result of a collision with the right angle of the kitchen shelf.
As you can see in the photo, the frame broke in the glass installation zone at the narrowest point. For its repair, a gluing technology was used, followed by reinforcement of the fracture site with a metal bracket.

At the first step, the frame must be glued with Super-moment glue or similar, designed for gluing plastic products. To do this, you first need to apply a thin layer of glue to the inner side of the rim of the frame, which is in contact with the glass along its entire length. Then also apply a thin layer of glue to the end of the glass in contact with the frame.
After gluing, a small gap was found between the glass and the nose pad. For the reliability of gluing, a small amount of soda was poured into this gap and then impregnated with glue.
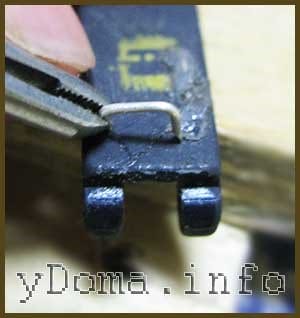
After such bonding, the frame received sufficient strength, but for a higher bond strength, a metal bracket made from a paper clip was additionally installed.

The bracket was fused into the frame of the glasses using an electric soldering iron. For clarity, the photo shows the bracket not yet fully recessed into the plastic.

Ultimately, the bracket was completely sunk into the plastic of the glasses, the place was sanded and polished with felt. There are practically no traces of repairs left.
In the same way, you can successfully repair plastic arms and a cracked frame at the point where it rests on the nose with your own hands.
Repairing a Broken Plastic Glasses Frame
I had to repair glasses with plastic frames, in which one of the plastic glasses fell out of the rim.

Upon closer inspection, it turned out that the bezel at the bottom was cracked in half. This is one of the glasses breakage that you can fix yourself in a few minutes.

To do this, it is enough to grease the crack with Super-glue and from the inside the rim a couple of centimeters to the sides of the crack. Next, insert the glass into the bezel, squeeze it tightly and hold it for a couple of minutes.

The rim of the glasses at the crack does not bear any force load, and therefore there is no need for reinforcement with steel wire. The glasses have been repaired, the appearance has not changed, and now, with careful treatment, they will serve for a long time.
Sketch of the shape of glasses, decor
The appearance of the glasses and their finishing should first be drawn on paper in accordance with the required size. You can find a suitable template on the Internet.
Advice! The easiest way is to fold the details over the frames of the finished glasses. In order not to scratch the lenses, they are protected by sticking pieces of tape.
The main thing is to think over the decorative processing to the smallest detail, since in addition to external beauty, its main function is to strengthen the entire structure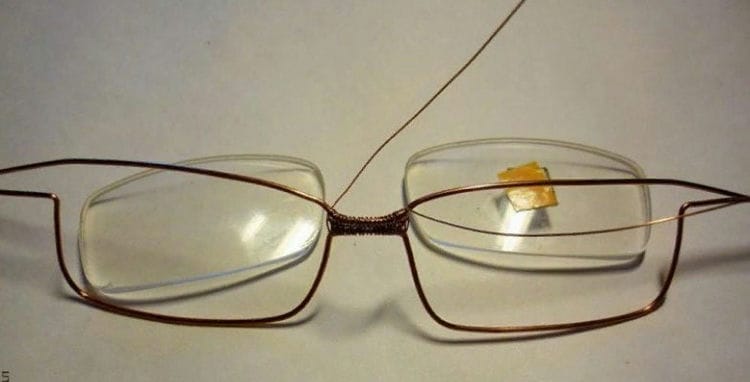
Nail Stickers
Embroidery
Sequins
Nail polish
Beads
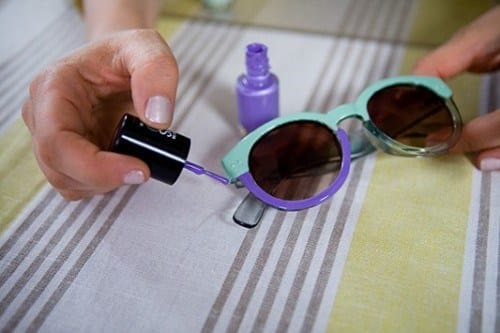
Regular glasses + two colors of varnish

You will need:
– nail polish in two colors;
– narrow masking tape;
1. With a strip of masking tape, separate half of the glasses, which will be painted in a different color.

2. Coat one half with the first color. Leave it on for 20 minutes.
3. Remove the masking tape strip and varnish the second half of the glasses.
Turning ordinary glasses into “cat eyes”

Or you can make glasses like Jay Lo by gluing silver sparkling “ears”:

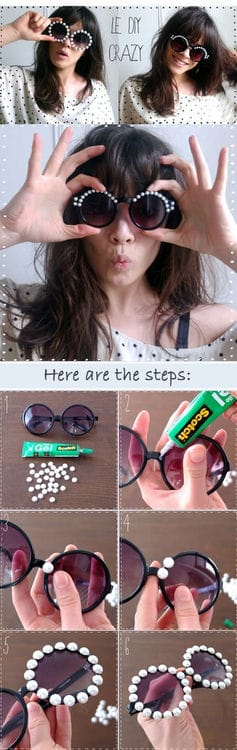
Beaded glasses
You will need:
– beads;
– glue.

Beaded glasses
You will need:
– beads-halves (they can be bought in shops where everything for creativity is sold);
– glue.
“Friday” Glitter Glasses

You will need:
– sequins (in “all for creativity” stores they will tell you what it is) and sparkles;
– glue;
– parchment for baking;
– pencil.
1. Draw the shape of the frame on baking paper. Brush generously with glue and cover with glitter. Leave it on for a while.

2. Cut the shiny frame out of baking paper.
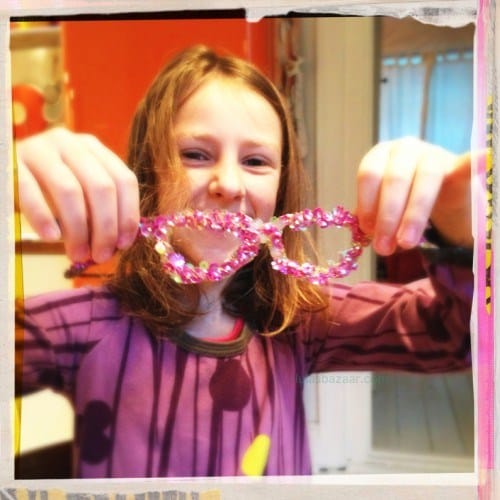
3. Stick the paper frame onto the plain one.

Happy Friday!
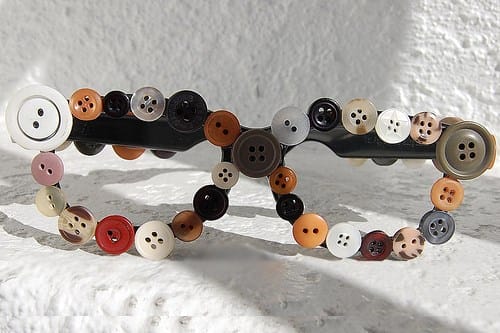
You will need:
– glue;
– buttons.
Gently glue buttons of different sizes onto the frame.
How do I paint the frame of my glasses?
 To decorate glasses with your own hands, it is absolutely not necessary to spend all your varnishes. By the way, there is a special paint for glasses frames on sale. If you decide to approach the issue with all seriousness, then go shopping. If you only want to use what is at hand, then here's another idea for you. How do you go about adding a little fun to your look? Summer is “on the nose” and a couple of bright touches in the “toilet” will only decorate you. If – yes, then here is the next “recipe”. Take funny polishes, cotton swabs and glasses, paint them like in the picture!
Advice
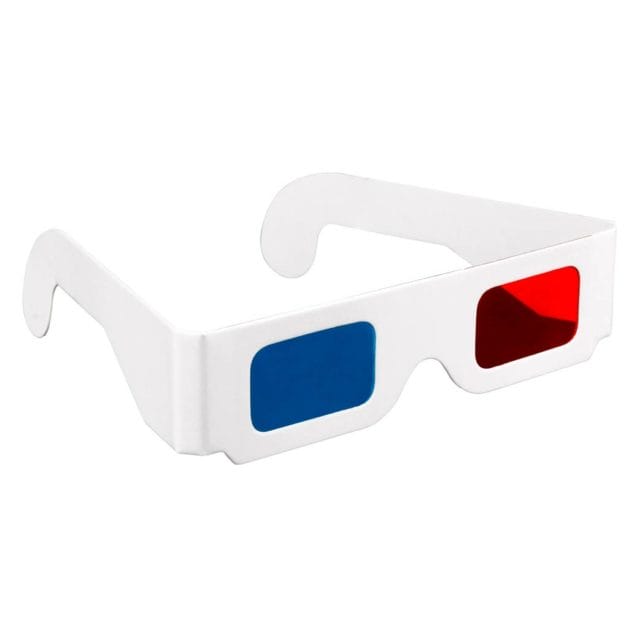
- If you're looking for PC games that support anaglyph glasses, download Bioshock, King's Bounty: Armored Princess or Minecraft.
- Decorate glasses with scrap materials to make them unique.
- If you want more durable 3D glasses, buy a pair of safety glasses from the hardware store and repaint your lenses.
- IMAX cinemas use linear polarization and RealD use circular polarization, although this may still change as progress does not stand still. Glasses for one format will not work in a theater that uses a different format.
Warnings
- Do not wear glasses all the time, because they can give you headaches.
- Do not wear these glasses while driving.
Sources used and useful links on the topic: https://sam.mirtesen.ru/blog/43068457448/Kak-sdelat-ochki-bolee-udobnyimi:-pyat-prostyih-priemov https://VRhow.ru/kak-sdelat- ochki-virtualnoj-realnosti-svoimi-rukami.html https://glasses.ua/blog/kak-delayut-ochki-i-linzy-dlya-ochkov/ https://e-ipar.ru/podelki/podelki-iz -bumagi / ochki https://tkaner.com/aksessuary/ochki/ochki-iz-kartona-svoimi-rukami-eto-veselo/ https://burdastyle.ru/master-klassy/tips/kak-hranit-solncezashchitnye- ochki-10-idej-s-instrukciyami_19721 / https://sumki.guru/svoimi-rukami/103-futlar-dla-ockov https://interviewrussia.ru/dom/kak-skleit-ochki-iz-plastika/ https: //YDoma.info/remont-svoimi-rukami/remont-izdelij/remont-opravi-ochkov-svoimi-rukami.html https://tkaner.com/aksessuary/ochki/oprava-dlya-ochkov-svoimi-rukami/ https://fishki.net/1502055-16-interesnyh-sposobov-ukrasit-solncezawitnye-ochki.html https://Lifehacker.ru/10-idej-po-dekorirovaniyu-obychnyx-ochkov/ https://workandhobby.ru/%D0%BA%D0%B0%D0%BA-%D1%83%D0%BA%D1%80%D0%B0%D1%81%D0%B8%D1%82%D1%8C-%D0%BE%D1%87%D0%BA%D0%B8-%D1%81%D0%B2%D0%BE%D0%B8%D0%BC%D0%B8-%D1%80%D1%83%D0%BA%D0%B0%D0%BC%D0%B8/ https://ru.wikihow.com/%D1%81%D0%BC%D0%B0%D1%81%D1%82%D0%B5%D1%80%D0%B8%D1%82%D1%8C-%D1%81%D0%BE%D0%B1%D1%81%D1%82%D0%B2%D0%B5%D0%BD%D0%BD%D1%8B%D0%B5-3D-%D0%BE%D1%87%D0%BA%D0%B8
Post source: lastici.ru